


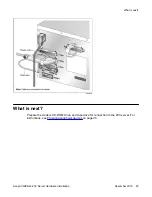


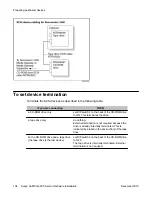


What is next?
If you are also installing a tape drive, set the tape drive SCSI ID (see
on page 100); otherwise, set the CD-ROM drive device termination (see
Setting the tape drive SCSI ID
Introduction
This section describes how to set the tape drive SCSI ID.
Important:
You must power down the tape drive before changing the SCSI ID.
Note:
The tape drive discussed in this section is the Tandberg SLR5 tape drive (NTRH9038). This
is currently the only supported tape drive.
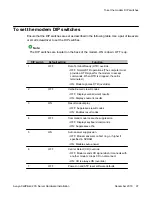
To set the tape drive SCSI ID
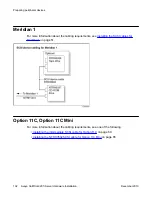
The SCSI ID setting is located on the back of the tape drive. See the following diagram.
Note:
The appearance and size of the tape drive cabinet is subject to change. The diagram is an
example of the key components.
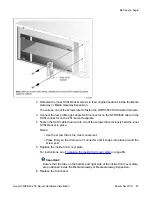
To change the SCSI ID, use the blade of a screwdriver to press either the plus (+) or minus (-)
button on the SCSI ID switch. Set the SCSI ID to 5.
Preparing peripheral devices
100 Avaya CallPilot
®
201i Server Hardware Installation
December 2010
Содержание CallPilot 201i
Страница 1: ...Avaya CallPilot 201i Server Hardware Installation 5 0 NN44200 301 01 03 December 2010 ...
Страница 8: ...8 Avaya CallPilot 201i Server Hardware Installation December 2010 ...
Страница 28: ...About the 201i server 28 Avaya CallPilot 201i Server Hardware Installation December 2010 ...
Страница 106: ...Preparing peripheral devices 106 Avaya CallPilot 201i Server Hardware Installation December 2010 ...
Страница 128: ...Connecting peripheral devices to the 201i server 128 Avaya CallPilot 201i Server Hardware Installation December 2010 ...