background image


24

Avaya 3720 DECT Telephone connected to Integral 5 - User Guide

05/2009

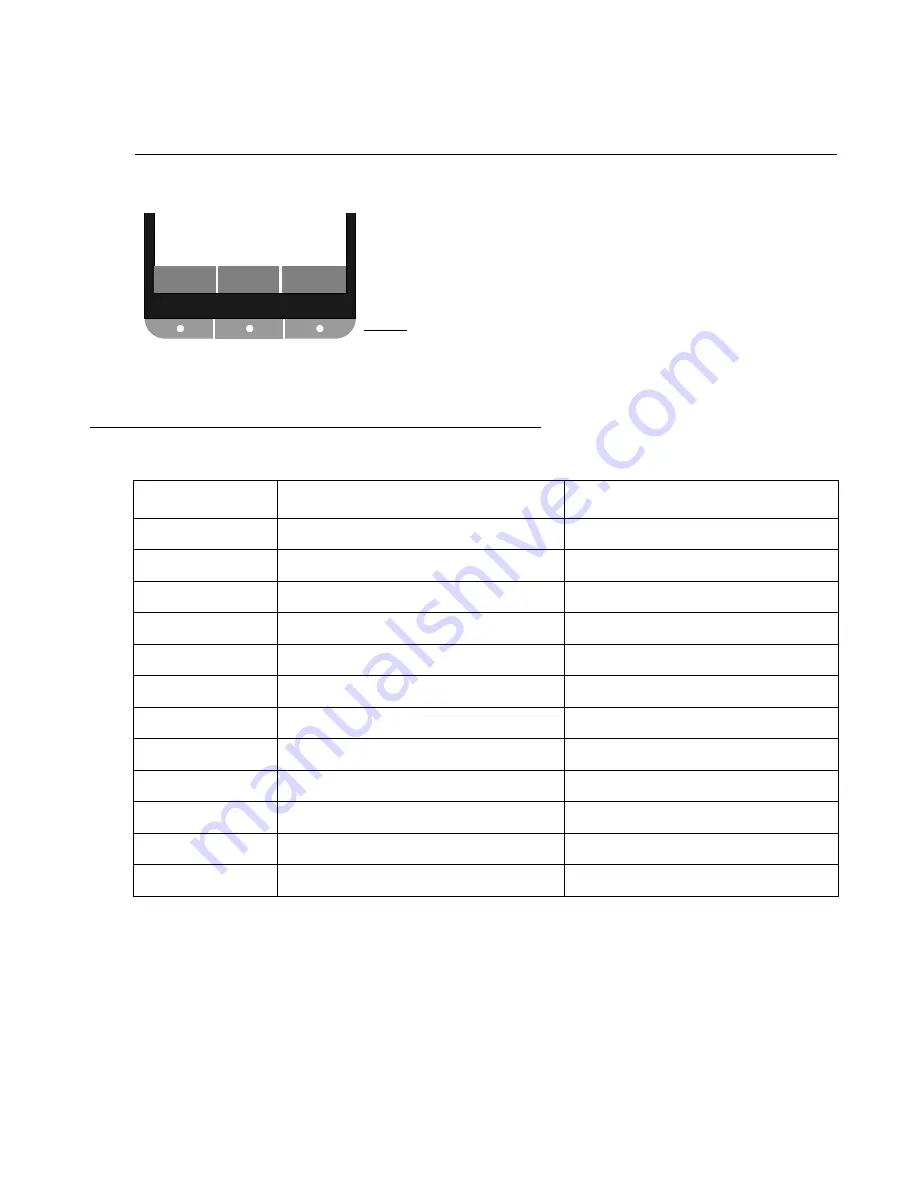
Soft Keys

Figure 4: Soft keys

The three Soft keys are located just beneath the display and the functions of each Soft key is 
indicated by text in the display just above the keys.

Alphanumeric Keys

Note:

Note:

Depending on the selected menu language, other characters can be available. 
This means that the character order can differ from the table above.

Clear

Menu

Soft keys

Key

Capital letter

Small letter

1

. , ? ! - ‘ ” 1

. , ? ! - ‘ ” 1

2

A B C À Â Æ Ç 2

a b c æ à â æ ç 2

3

D E F È É Ê Ë 3

d e f è é ê ë 3

4

G H I Î Ï 4

g h i î ï 4

5

J  K  L  5

j  k  l  5

6

M N O Ñ Ô Ö Œ 6

m n o ñ ô ö œ 6

7

P  Q  R  S  7

p  q  r  s  7

8

T U V Û 8

t u v û 8

9

W X Y Z 9

w x y z 9

0

Space + * 0

Space + * 0

*

*

*

#

#

#

Содержание 3720

Страница 1: ...Avaya 3720 DECT Telephone connected to Avaya Integral 5 User Guide 21 603408 05 2009 Issue 1 0 ...

Страница 2: ...R INSTALLATION OF THE PRODUCT INDICATES THE END USER S ACCEPTANCE OF THE TERMS SET FORTH HEREIN AND THE GENERAL LICENSE TERMS AVAILABLE ON THE AVAYA WEBSITE AT http support avaya com LicenseInfo GENERAL LICENSE TERMS IF YOU DO NOT WISH TO BE BOUND BY THESE TERMS YOU MUST RETURN THE PRODUCT S TO THE POINT OF PURCHASE WITHIN TEN 10 DAYS OF DELIVERY FOR A REFUND OR CREDIT Avaya grants End User a lice...

Страница 3: ...alified Design ID 12 Environmental Requirements 13 Introduction 15 Functions and Accessories 16 Functions 16 Accessories 16 Descriptions 17 Avaya 3720 DECT Telephone 18 Chargers 19 Desktop Charger 19 Charging the telephone in Desktop charger 19 Rackmount Charger 20 Icons and Text in the Display 20 Keys and Buttons 23 Off hook Key 23 On hook and On Off Key 23 Navigation Key 23 Sound Off Key 23 Key ...

Страница 4: ...ebook 36 Dial a Name from the Central Phonebook 36 Dial using Code Numbers 37 Redialling 37 Specific redialling 37 Calling a subscriber group 37 Calling via a specific line group 38 Private calling via specific line group 38 During A Call 38 Adjust the Volume during a Call 38 Open Menu during the Call 39 Turn the Microphone on off during a Call 39 Start a New Call during Conversation 39 End a Call...

Страница 5: ...nging call divert twinning remotely 49 Own allocation 51 Viewing the charges 51 Do not disturb 51 Disconnecting from hunt groups 52 Associated subscriber 52 General Purpose 53 Contacts 53 Open personal phonebook 53 Call Contact 53 Rapid Search for a Contact 53 Add Contact 54 Edit Contact 54 Delete Contact 54 Central Phonebook 54 Settings 55 Sound and Alert 55 Headset 56 Phone Lock settings 57 Disp...

Страница 6: ...dvanced Functions 67 Admin menu 67 Troubleshooting 68 Operation Notice 70 Accessibility and Voice Quality 70 Maintenance 71 Charge the Battery 71 Replace the Battery 71 Attach the Hinge type Clip 72 Attach the Swivel type Clip 72 Appendix 73 Codes for your telephone 73 Symbols and Codes 74 Quick Reference Guide 75 Index 83 ...

Страница 7: ...PACK Chargers shall only be connected with power adapters included in the following charger kits Basic Charger No 700466253 DECT HS BASIC CHARGER KIT EU No 700466261 DECT HANDSET BASIC CHARGER KIT UK NAR AU Advanced Charger No 700466279 DECT HS ADV CHARGER KIT EU No 700466287 DECT HS ADV CHARGER KIT UK No 700466295 DECT HS ADV CHARGER KIT NAR No 700466303 DECT HS ADV CHARGER KIT AU Sensitive Elect...

Страница 8: ...e that the product line DECT R4 concurs with the basic requirements and other relevant provisions of EU Directive 1999 5 EU concerning radio equipment and telecommunications terminal equipment and the mutual recognition of their conformity Intended use This equipment is intended for connection to radio interfaces DECT of Avaya PABX systems It is compliant with the essential requirements of the EU ...

Страница 9: ...erference by one or more of the following measures Reorient or relocate the receiving antenna Increase the separation between the equipment and receiver Connect the equipment into an outlet on a circuit different from that to which the receiver is connected Consult the dealer or an experienced radio TV technician for help Old electrical and electronic equipment marked with this symbol can contain ...

Страница 10: ...ng in conjunction with any other antenna or transmitter Information to User This device complies with Part 15 of the FCC Rules Operation is subject to the following two conditions 1 this device may not cause harmful interference and 2 this device must accept any interference received including interference that may cause undesired operation Modifications Changes or modifications to the equipment n...

Страница 11: ...to come into contact with conductive objects such as keys paper clips rings or bracelets Do not allow the cordless telephone and charger to come into contact with water or chemicals Only use the plug in AC adapter and battery type supplied Do not use AC adapters which are visibly damaged cracked or broken housing and keep the ventilation slits on the plug in AC adapters free Do not use the cordles...

Страница 12: ...flame Do not expose the telephone and the charger to direct sunlight for long periods Keep the telephone and charger away from excessive heat and moisture Do not allow heavy objects to fall on the telephone Do not allow children to play with the product packaging material Product packaging material is often small and may present a choking hazard Do not allow children to play with the telephone It ...

Страница 13: ...fore re inserting the battery Keep the telephone away from strong electromagnetic fields Do not place a cold telephone in a charger Battery Do not immerse the battery into water This could short circuit and damage the battery Do not expose a battery to an open flame This could cause the battery to explode Do not allow the metal contacts on the battery to touch another metal object This could short...

Страница 14: ...sted and found resistant to chipping fading or wearing off when the telephone is treated with common cleaners and disinfectants or perspiration The following chemicals have shown no harmful effect 3 Hydrochloric Acid M alcohol 70 Methylated Ethanol 60 Chlorhexidin 0 5 mg ml Acetone can be damaging to the plastic casing of the telephone and should not be used ...

Страница 15: ...igned to be used in office environment and has high quality voice Read the Important Safety Information on page 9 before using the telephone For software download and parameter set up read the Installation and Administration Manual DECT R4 Quick Reference Guide To get a quick overview on the basic functions of your telephone see Quick Reference Guide on page 75 Because of its handy format you can ...

Страница 16: ... phonebook 500 contacts Central phonebook Vibrator Headset connector Microphone on off during call Loudspeaking function Note Note Use of the function Central phonebook is system depending Accessories Basic Charger Advanced Charger Rackmount Charger Leather case Belt Clip hinge type swivel type Telephone lanyard Headset with microphone on cable ...

Страница 17: ...ed against dust by using the headset connector cover 8 Keypad 2 Left Soft key Used with GUI 9 Key lock and Upper Lower case Combined key lock and Upper Lower Case 3 Middle Soft key Used with GUI 10 Space To add space between text 4 Right Soft key Used with GUI 11 Sound off Turn off on audible signals in idle mode silencing the ring signal at incoming call and also to turn the microphone on off dur...

Страница 18: ...inge type clip standard a swivel type clip or no clip which makes it possible to use the cordless telephone without any clip on See Attach the Hinge type Clip on page 72 or Attach the Swivel type Clip on page 72 Use the clip to attach the telephone to a belt or similar Battery The battery is a rechargeable lithium ion battery placed under a battery cover See Replace the Battery on page 71 5 On Hoo...

Страница 19: ...ced in the charger The Basic Charger is delivered with a plug in power supply and is connected into an ordinary wall socket The Advanced Charger is delivered with a power supply adapter The adapter is connected with a power cord to the wall socket and the Charger itself is supplied from the adaper See also Installation and Administration Manual DECT R4 Note Note Only use the charger within the tem...

Страница 20: ...ones to synchronize parameters and for software download The built in power supply can charge up to six cordless telephones See Installation and Administration Manual DECT R4 Icons and Text in the Display All functions and settings available to the user are shown as icons and text in the display The icons and text in the display indicate functions and settings to which you have access The display ...

Страница 21: ...atus bar 3 Active area 2 Header bar 4 Soft key bar Signal strength icon is visible when the cordless telephone is connected to a system The staples shown in display depends on the signal strength Full Battery icon is displayed in the upper right corner Low battery icon is shown when the battery only has 5 of its capacity left The icon is flashing when the battery capacity is equal to or lower than...

Страница 22: ...ed telephone Headset icon indicates that a corded headset is connected to the telephone System connection icon is visible when connecting to a system Menu icons The Contacts menu contains all names numbers in the personal and central phonebook The Calls menu contains call lists call time and call services1 Call services is configured by your system administrator The Settings menu contains personal...

Страница 23: ... idle mode will switch the telephone on off Use this key to step in the menu are used for stepping left right and up down in the menu It is also used to change time date figures The is a short cut to Call list This key is to silence or mute the telephone While in a call a press on the button will mute the microphone When the telephone is ringing a short press switches off the ringing tone temporar...

Страница 24: ...numeric Keys Note Note Depending on the selected menu language other characters can be available This means that the character order can differ from the table above Clear Menu Soft keys Key Capital letter Small letter 1 1 1 2 A B C À Â Æ Ç 2 a b c æ à â æ ç 2 3 D E F È É Ê Ë 3 d e f è é ê ë 3 4 G H I Î Ï 4 g h i î ï 4 5 J K L 5 j k l 5 6 M N O Ñ Ô Ö Œ 6 m n o ñ ô ö œ 6 7 P Q R S 7 p q r s 7 8 T U ...

Страница 25: ...he character To switch between Abc ABC abc and 123 the key is pressed A long press on the key displays special characters To delete a character position the prompt right from the character to delete and press Soft key Clear Accessories Belt Clips Three belt clip options are available Hinge type clip To prevent the telephone from slipping out of for example pocket or belt Swivel clip To be able to ...

Страница 26: ...26 Avaya 3720 DECT Telephone connected to Integral 5 User Guide 05 2009 Headset A headset is recommended if you frequently use the telephone and or want to have both hands free ...

Страница 27: ... those used in the following menu trees Calls Charges Call services Absence Do not disturb Idle hunt group Divert call Call div to Call div from Clear call diversion Call forwarding Own allocation Clear own allocation Call diversion to partner Call diversion from partner Internal partner call Pick up calls Retrieve a call Seize ring line Pick up group Group 1 Group 8 Pick up partner Announcement P...

Страница 28: ...roup Group 1 Group 8 Priv line group Group 1 Group 8 Rel line group Group 1 Group 8 Show Hide number 1 Visible if defined by your system administrator Call contact Search From contact list Add contact Name Work number Mobile number Other number Edit contact Search Name From contact list Work number Mobile number Other number Delete contact Search From contact list Central Phonebook ...

Страница 29: ... Normal Short signal Silent Vibrating alert On On if silent Off Key sound Click Tone Silent Headset Mic on boom Mic on cable headset profile Display Contrast Time Date Time format Date format Set time date Locks Automatic key lock On Off Phone lock Auto phone lock On On in charger Off Change PIN code Language Dansk Nederlands English ...

Страница 30: ...time In the status menu you also will find some advanced settings for your telephone You can reach the status menu by pressing the Prog key in idle mode Owner ID In charger No action Switch off System Change system Subscribe Unsubscribe Rename system Priority Device info Software Hardware IPEI IPDI User ID Status information Call list Wagner 20 01 13 30 2 More Clear Settings Ringing tone Message b...

Страница 31: ...ached during an ongoing call by pressing the middle Soft Key marked More Second call Int call list call list Call list diversion A B A B deleted after off 10 min 1 h 1 T 1 W 1 M call display A B Prio idle display MAIL LIST Date Time Menu Microphone on off Audio transfer Conference Callback Refer b 1st PABX Code DTMF ...

Страница 32: ...32 Avaya 3720 DECT Telephone connected to Integral 5 User Guide 05 2009 Tone post dial A Tone post dial B Tone post dial C Tone post dial D Speed dial Prog Redial General purpose 1 General purpose 10 ...

Страница 33: ...de 1 Press On hook key long A control question will be displayed 2 Confirm with Soft key Yes Note Note The telephone returns to idle mode when pressing the On hook key while in a menu Turn the Audible Signal On Off The telephone is in idle mode or rings 1 Press the key long The status of the telephone changes between ring signal on off The icon indicates a silenced telephone Lock Unlock the Keypad...

Страница 34: ... page 57 Note Note While placed in charger a telephone s keypad is always unlocked Lock Unlock the Telephone The telephone can be protected for unauthorized use If this function is activated it locks automatically a short time after the last keystroke or when placed in the charger A PIN code is required for unlocking the telephone For more information see Phone Lock settings on page 57 Unlocking t...

Страница 35: ...et can be used to answer the call Answer a Call Your telephone rings 1 Press Off hook key Decline a Call Your telephone rings 1 Press On hook key to decline the call End a Call 1 Press On hook key to end the call Call forwarding You can forward an external call from your telephone to another connection that is programmed in the telephone system call forwarding position This function must be set up...

Страница 36: ...dded to the call list when pre dial is used Dial a Number from the Call list 1 Press to open the call list 2 Step with the and to scroll in the list Select number to call 3 Press Off hook key to dial Dial a Number from the Local Phonebook 1 Open the menu by pressing Soft key Menu 2 Select Contacts 3 Select Call contact 4 Select contact from list or search name by entering characters The best match...

Страница 37: ...you most recently dialled 1 Press Soft key 2 Select the required call number 3 Press the Off hook key Deleting an entry The redial entry you want to delete is being displayed 1 Press the 0 key Specific redialling With specific redialling only the call numbers you have previously selected will be saved in the redial list Specific redialling must be set up in the system Normal redialling is then swi...

Страница 38: ...ll number Private calling via specific line group 1 Press Soft key Menu 2 Select Calls icon 3 Select Group calls 4 Select Priv line group 5 Select the line group 6 Enter the call number During A Call Note Note Some of these functions are system dependent and are not shown in the menu They are set up by your system administrator in the PDM If applicable additional functions could also be programmed...

Страница 39: ...ct Microphone on 3 Press Select Note Note It also possible to turn the microphone off on by a long press on the key Start a New Call during Conversation 1 Press Soft key R The first caller is put on hold Note Note Dial the number You can also call an entry in your phonebook Select More Menu Contact Call contact Scroll to the desired entry and press the Off hook key End a Call and switch back to th...

Страница 40: ...ing for her him to pick up If the internal subscriber does not take the call the call will come back to you after a short period Note Note With an external external call transfer two trunk lines are occupied Starting a Conference Call A new call is started during conversation the first call is on hold 1 Select Soft key More 2 Select Conference You can now speak with both participants at the same t...

Страница 41: ... not taken into account with callback If you do not pick up after a certain time while the telephone is ringing the callback is cleared The waiting period is set in the system Clearing callback 1 Press Soft key Prog 2 Scroll to Callback act 3 Press 0 key for a long period Callback off appears briefly in the display Taking a second call During a call A second call appears and the a short tone could...

Страница 42: ...e new code number is saved automatically DTMF postdialling You can switch over to DTMF postdialling whilst telephoning Each press of a button is then transmitted as a tone allowing you to e g operate an answering machine Activating DTMF During a call 1 Press Soft key More 2 Select DTMF Continue to dial Each digit is transmitted as a tone Note Note By default DTMF postdialling is active and does no...

Страница 43: ...hen another telephone rings If you are assigned to a group this also works in an undirected way for any telephone within the group Pick up calls Another telephone rings 1 Press Soft key Menu 2 Select Calls icon 3 Select Call services 4 Select Pick up calls 5 Select Retrieve a call 6 Enter the call number of the subscriber whose call you wish to retrieve pick up You are connected Note Note If you h...

Страница 44: ...or name of the line appears in the display Pick up calls from associated subscriber The telephone of your associated subscriber rings 1 Press Soft key Menu 2 Select Calls icon 3 Select Call services 4 Select Pick up calls 5 Select Pick up partner The number and or name of the caller appears in the display You are connected Group Pick up Another telephone within your group rings 1 Press Soft key Me...

Страница 45: ...ordless telephone to a connection within your telephone system It is not possible to make an announcement to another cordless telephone Making an announcement 1 Press Off hook key 2 Enter the call number e g 1276 3 Select Soft key More 4 Select Menu 5 Select Calls icon 6 Select Call services 7 Select Announcement Speak now Making an announcement to associated subscriber 1 Press Soft key Menu 2 Sel...

Страница 46: ...l 5 User Guide 05 2009 6 Select Group announce 7 Select group you want to speak to Speak now Ending an announcement 1 Press the On hook key Voice Mail A new voice mail is indicated by the text List in the display Information is stored in the call list ...

Страница 47: ...ternal call partner of your call number you can prevent your call number being shown in your call partner s display Suppressing Reactivating display of own call number 1 Select Show Hide number An info message showing you the suppression reactivation appears briefly Note Note Call number suppression must be enabled at the exchange After a call display of your call number is automatically switched ...

Страница 48: ...A B appear in the display 5 Enter the number from which you wish to divert calls All calls to the specified number will be diverted to you if applicable after a delay or when busy The call diversion appears in the status display Call diversion You can divert all calls from your cordless telephone to another connection in your telephone system The cordless telephone must be within range of the tele...

Страница 49: ...Soft key Prog The twinning number is displayed e g twinning 0012341234 7 Enter the external number of the phone that you want to ring out when a call is received e g 0012341234 Changing call divert twinning remotely You can call up your telephone system from anywhere and set up or alter call divert or twinning for your cordless telephone or other telephones This is possible from any telephone with...

Страница 50: ...wed by 71 2 Enter the dial code for the call diversion option e g 1 Dial codes for call routing variations 1 immediately 2 on no answer 3 on busy 4 twinning 3 Enter the internal or external number to which calls are to be diverted e g 00897543 4 Press the key You will hear an acknowledgement tone b Divert calls from an internal subscriber Call diversion from Follow me 1 Press the key followed by 7...

Страница 51: ...ctivated own allocation the appropriate status message is shown in the status menu see Status Menu on page 30 Deactivating an own allocation 1 Select Call services 2 Select Divert calls 3 Select Own allocation Own allocation off appears briefly in the display Note Note If you have activated an own allocation and a call diversion you can deactivate both by entering a digit code see Codes for your t...

Страница 52: ...sociated subscriber Your system administrator can set up a telephone in your system as an associated subscriber e g for an executive secretary circuit Some of the related functions are particularly convenient Calling the associated subscriber 1 Select Call services 2 Select Divert calls 3 Select Internal partner call Call diversion to associated subscriber 1 Select Call services 2 Select Divert ca...

Страница 53: ... be downloaded by your system administrator Contacts from the company phonebook appears in the contacts list menu with a lock symbol next to the name number which means that it is not editable The contact will only include work number It is also possible to access a central phonebook Open personal phonebook 1 Enter the menu by pressing Soft key Menu or the confirmation button on the Navigation key...

Страница 54: ...n Back Edit Contact 1 Select Edit contact 2 Select contact and Press Soft key Edit twice 3 Enter new name number and Press Soft key OK 4 Press Soft key Save Delete Contact 1 Select Delete contact 2 Select contact and Press Soft key Delete 3 Press Soft key Yes to confirm Central Phonebook The names and call numbers of important call partners are stored within your telephone system You can dial thes...

Страница 55: ...he same way as described above Scrolling the phonebook By name Press or to scroll upwards or downwards By initial letters Press the button for a long period then press or briefly Call the entry displayed The desired entry of the central phonebook is displayed 1 Press the Off Hook key Settings 1 Enter the menu by pressing Soft key Menu 2 Select Settings icon 3 Press Soft key Select Sound and Alert ...

Страница 56: ...5 Press Soft key Back Note Note When the volume is set to silent the icon is shown in the display Set the Key Sound This means that the telephone sounds low at every keystroke You can choose between Silent Click or Tone 1 Select Sound Alerts 2 Select Key sound 3 Select key sound 4 Press Soft key Back It is possible to listen to the key sound by pressing Soft key Play Headset 1 Select Headset 2 Sel...

Страница 57: ...the last keystroke and a PIN code has to be entered at power on When it is set to On in charger it locks when switched off or placed in a charger The default phone lock code 0000 can be changed to any 4 8 digit personalized code The following function is still available when the telephone is locked Dialing emergency call numbers These numbers are set up by your system administrator Note Note If th...

Страница 58: ... setting Time Date Time and date is set in your telephone Note Note Every time you switch off your telephone the time and date settings are resetted Set Time Format 1 Select Time Date and Press Soft key Select 2 Select Time format The actual time format is marked Selectable time format 11 00pm am 23 00 3 Press Soft key Select to save the setting Set Date Format 1 Select Time Date and press Select ...

Страница 59: ...xt level press 4 Press OK to save the setting Set Time Date 1 Select Time Date and press Select 2 Select Set Time Date press Select 3 Select hour minute year month or day by using the and navigation key 4 Modify the entry by using the and on the navigation key 5 Press OK to save the setting Change the Menu Language You can choose between Deutsch German English Español Spanish Français French Itali...

Страница 60: ...2 Select No action System Your cordless telephone can be logged on to up to eight systems Each system is saved as a system entry To label each system precisely after logging on you can change the name of each system entry When set accordingly the telephone automatically chooses the system currently available as you move from place to place 1 Select System Change System 1 Select Change System 2 Sel...

Страница 61: ...ext 3 Enter System name 4 Press Next 5 Select your system 6 Press Next 7 Enter PARK code Note Note Do not enter a key after the code 8 Enter AC code Press Next An information text Protection on is displayed 9 Select Yes No if the new system is to be protected It is not possible to delete a protected subscription 10 Press OK A searching mode starts Note Note A restart could occur automatically when...

Страница 62: ...tware and hardware information of the cordless telephone is found 1 Select Device info 2 Depending on the info your are looking for select Software Hardware IPEI IPDI or USER ID Status menu Call list External calls you do not answer will be entered in the call list along with the time and date of the call You can display this list at any time and call back the subscribers registered in it When you...

Страница 63: ...ry from the Call list 1 Select entry to delete 2 Press 0 long Note Note An entry is automatically deleted when you call back the entry directly from the call list and the connection is established Note Note You can set that call list entries are deleted automatically after a defined time see Deleting call list entries automatically on page 66 Voice Mail Message Waiting Voice mail boxes can be conn...

Страница 64: ...up voice mail manually to hear the message Settings Ring tone acoustic pattern You can set a different sound for each type of call message external internal VIP The sound tells you what kind of call is waiting 1 Press Soft key Prog 2 Scroll to the Settings menu item 3 Press Soft key Prog 4 Select the desired call type e g Ext Call type 5 Select the melody with a digit 1 9 e g 3 You will hear the r...

Страница 65: ...ot answered are also entered in the call list 1 Press Soft key Prog 2 Scroll to the Settings menu item 3 Press Soft key Prog 4 Select Call list off 5 Press Soft key Prog 6 Press Soft key Clear Call list entries in case of call diversion If you have set up a Call diversion to you can set which telephone is to receive entries in the call list A only your telephone B only the call diversion destinati...

Страница 66: ...o display not only the caller s number or name but the number which they dialled This tells you whether the caller wants to speak to service or the workshop for example 1 Press Soft key Prog 2 Scroll to the Settings menu item 3 Press Soft key Prog 4 Scroll to the Call display A B menu item 5 Press Soft key Prog to chance the setting Preference LIST or MAIL in the display If you have received new e...

Страница 67: ... also Installation and Administration Manual DECT R4 The Admin menu contains Software and hardware information and IPEI DECT link information Fault logging Enhanced system menu with ability to alter protection Factory reset option Site Survey Tool for indication of radio signal and base station listing For activating the admin menu see Installation and Administration Manual DECT R4 ...

Страница 68: ... key or increase volume or contact system administrator Display shows Probable cause Action or comment No access The network is in range but no access rights Switch telephone off and then switch it on again or contact system administrator No System The telephone beeps once a minute during max 30 minutes with a low tone followed by a high tone if enabled the vibrator also follows the beeps The tele...

Страница 69: ...M Battery low charge now The battery level is low Charge or replace the battery Phonebook is not available at the moment The phonebook does not respond not available at the moment Try again later or if fault persists do a factory reset via admin menu or PDM Voice mail number not defined There is no Voice mail number defined in the telephone Define a Voice mail number via PDM Display shows Probable...

Страница 70: ...ephone in the area that is covered by your system Outside this area you will loose contact with the system The signal strength icon will be low and Searching will be displayed Out of Range When you leave the system s coverage area a short beep will sound and the text Searching will appear in the display The out of range beep will be repeated every minute for 30 minutes It is possible to turn the s...

Страница 71: ...ged battery Note Note Only use the prescribed chargers for charging Replace the Battery If the standby time for the cordless telephone becomes too low the battery should be replaced by a new one Please contact your system administrator or your supplier for information about new batteries Replace the battery as described in the illustration below The battery is connected to the cordless telephone i...

Страница 72: ...5 User Guide 05 2009 Attach the Hinge type Clip Attach the hinge clip as described in the illustration below Figure 7 Click on the clip Attach the Swivel type Clip Attach the swivel clip as described in the illustration below Figure 8 Click on the clip ...

Страница 73: ...o group x 17 x Retrieve pick up calls from group x 170 Exchange line recall when all exchange lines are busy 32 Retrieve pick up external calls 34 Retrieve pick up from an internal subscriber 40 Open door 1during conversation 41 Open door 2 during conversation 42 Open door 1 43 Open door 2 46 Call charge display for last call 64 Self assignment 64 Self assignment 66 Delete automatic callback 66 De...

Страница 74: ...subscribers 82 Announcement to associated subscriber 83 Call diversion from associated subscriber 83 Call diversion from associated subscriber off 84 Call diversion to associated subscriber 84 Call diversion to associated subscriber off 85 Retrieve calls pick up from associated subscriber 89 Clear own allocations for the associated subscriber 99 Clear all self assignments and call diversions Code ...

Страница 75: ...Avaya 3720 DECT Telephone connected to Avaya Integral 5 Quick Reference Guide ...

Страница 76: ... Loudspeaker off Sound off Ring volume silent Headset connected System connection Key lock Phone lock Display Soft keys Off hook key Navigation key Key lock and Upper lower Shows time and Shows date and Sound off key Shows the soft key function Microphone On Off and On hook key Space Headset connector Alphanumeric keys LED ...

Страница 77: ... be made in the following ways Dial the number and press the Off hook key Press the Off hook key and select number from the Call list Dial a number from the Local phonebook Enter Contacts Select Call contact select the name from the list and press Call or the Off hook key Dial a number from the Central phonebook In idle mode press and hold key until an upright arrow appears in the Product presenta...

Страница 78: ...s between audio signals on off The Sound off icon indicates a completely silenced telephone A long press on the Sound off key before answering a call silences the ring signal Lock Unlock the keypad manually Press the key and then Soft key Lock to lock unlock The Locked keypad icon indicates a locked keypad Change the volume during a call Use the Navigation key to adjust the volume Charge the batte...

Страница 79: ...iven instruction in the Voice Mail For descriptions of all functions see User Guide Avaya 3720 DECT Telephone Navigate the menu Use the Navigation key to move around in the menu structure The three Soft keys below the display are used for choices in the menu The function of each Soft key is explained by text in the soft key field in the display The menus are Calls Contacts and Settings An addition...

Страница 80: ...contact select Add contact select Name add the name and press OK Select the type of number you want to add enter the number press OK and press Save To delete a contact select Delete contact select the name press Delete and then press Yes Use the central phonebook Enter Contacts step to Central Phonebook and press Select Enter the first letter s of the name or step in the list Press the Off hook ke...

Страница 81: ...nce Guide The following accessories for the 3720 are available Also available Telephone lanyard Rackmount charger Accessories Belt clip swivel type Leather casing incl belt clip Standard clip Desktop chargers Headset with microphone on boom ...

Страница 82: ...Avaya 3720 DECT Telephone Quick Reference Guide ...

Страница 83: ...st 63 call diversion activ 65 deleting entries automatically 66 internal 65 Call services 48 Callback 40 Calling 35 Code Numbers 37 dial a number 36 name in the phonebook 36 quick call by a name in the phonebook 36 Calls icon 22 menu tree 27 Case 18 Central phonebook 53 Charger 19 disconnect telephone 20 Chemical resistance 14 Clip 18 Code assign to calls 42 Codes 73 74 Company phonebook 53 Confer...

Страница 84: ...M Menu tabs 22 Menu Tree 27 Microphone 18 39 Microphone off icon 21 N Navigation Key 23 Number input mode 25 O On Off key 23 On hook key 23 Operating Area 70 Out of Coverage 70 P Personal phonebook 53 Phone lock 57 icon 22 Pick up 43 associated subscriber 44 group 44 PIN code 57 Preference LIST MAIL 66 Q Quick Reference Guide 75 R Redialling 37 Specific 37 Ring tone acoustic pattern 64 Ring Typ 56...

Страница 85: ...off telephone 33 Symbols and Codes 74 System connection icon 22 T Telephone lanyard 25 Text input mode 25 Time Date 59 Transfer Call 39 Troubleshooting 68 Twinning 49 V Vibrator 56 Voice Mail 46 63 Volume adjusting during call 38 ringer 55 W Writing Text Numbers add space in text 25 ...

Страница 86: ...86 Avaya 3720 DECT Telephone connected to Integral 5 User Guide 05 2009 ...

Отзывы: