User Manual
www.AvantcoEquipment.com 3
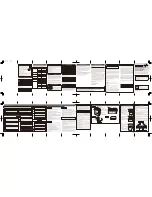
Features
Assembly
Instructions
1. Place Bottom Lamp Frame (
C
) on a stable, flat surface.
2. Insert the Middle Lamp Frame (
B
) into Bottom Lamp
Frame (
C
) and secure with Screw (
D
).
3. Insert Top Lamp Frame (
A
) into Middle Lamp Frame (
B
)
and secure with Screw (
D
).
4. Screw Shatterproof Bulbs (
E
) into sockets.
(Bulbs included in box)
5. Plug power cord into appropriate socket and switch unit
on to check the bulbs.
6. The appliance is now ready for use.
• Stand can be adjusted from 23¼" - 31
1/8
" to control heat intensity.
• (2) clear, shatterproof 250W bulbs included in box.
• Durable aluminum (stainless steel for 177W62SS) construction
provides excellent durability at exceptional price.
• Simple on/off control is easy for any employee to use.
Operation
1. Plug cord into grounded electrical outlet of the correct voltage.
Electrical shock can occur if appliance is not grounded.
2. Place food products in a pan, located directly under the
bulbs for best results.
3. Turn unit off when not in use. To disconnect appliance,
turn switch off and remove plug from power source.
Bulb Replacement
NOTE: Each standard heat lamp is suitable for use with clear or infrared heat lamp bulbs rated at or below 250 watts.
1. To replace a bulb, place the switch in the OFF position and allow the bulb to cool completely.
2. Bulbs have a threaded base; unscrew the bulb counterclockwise from the unit and replace with a new bulb.
FOR SAFE AND PROPER OPERATION, DO NOT INSTALL A BULB BEYOND 250 WATTS INTO THE UNIT.
!
Cleaning & Maintenance
NOTE: Proper maintenance plays an important part in the life span and functioning of the warmer.
1. Unplug the cord and let warmer cool before cleaning or moving.
2. This unit can be cleaned with a damp sponge and mild soap. Rinse with clean water and wipe dry.
3. Do not immerse in water or other liquid.
A
B
C
D
E