Avalon Instruments Linear Fast Reverse Скачать руководство пользователя страница 21

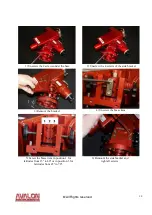
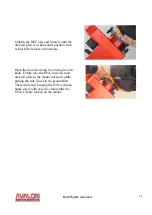
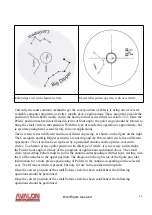
1. Slightly loosen the knob that keeps the mount fixed to the tripod base to allow its 

Azimuth rotation, while still keeping it safely on the tripod. 

2. Slightly loosen the black knurled side knobs to allow the Latitude (altitude) movement. 
3. Put the polar scope’s star diagonal in a comfortable position and tighten all 

knobs

 in this 

position. 

4. Once you are confident that the polar scope is correctly oriented, use small movements of

the Azimuth and Altitude adjustment knobs


to place Polaris exactly in the center of the 

classical reticle’s corresponding small circle in or in the defined hour position for the 
newer type reticle. 

5. When finished, firmly re-tighten the Altitude and Azimuth knobs as well as those fixing 

the mount to the tripod. The mount is now aligned to the celestial North Pole. 

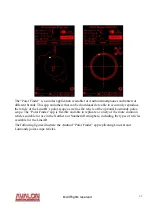
In case of use of the new reticle (on the right figure) the only difference is that, being missing
the small circle correspondent to the Polaris, the star must be brought to the position in the
graduated circle defined by the specific application.

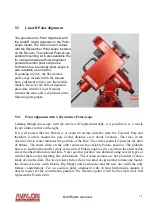
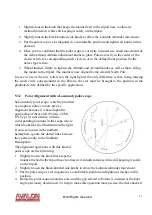
5.3.2  Polar Alignment with a Losmandy polar scope

he Losmandy polar scope, which is provided
as an option, allows a more precise
alignment because it is based upon the 
positioning of three stars (Polaris, 

UMi,

OV Cep ) in concurrence with the
corresponding locations in the scope reticle
which looks like the illustration on the right.
If you are located in the northern
hemisphere, ignore the dotted lines because
they pertain only to the Southern
Hemisphere.
The alignment operations with this kind of
polar scope are the following:
1. Slightly loosen the knob that keeps the

mount attached to the tripod base to allow its Azimuth rotation, while still keeping it safely 
on the tripod. 

2. Slightly loosen the black knurled side knobs to allow the Latitude (altitude) movement. 
3. Put the polar scope’s star diagonal in a comfortable position and tighten its latches in this 

position.

4. Rotate the polar scope around its axis until the gap related to Polaris is oriented at the hour 

angle previously determined. To help to make this operation more precise, the dial attached 

© 

All Rights reserved

21

Содержание Linear Fast Reverse

Страница 1: ...ion 2 0 November 2019 All the pictures and contents included here are propriety of AVALON INSTRUMENTS They cannot be reproduced published copied or transmitted in any way including the internet withou...

Страница 2: ...eople with reduced mental capacity Avoid to operate the mount except as strictly indicated in the manual Modifying or altering in any way the characteristics of the mount will void the manufacturer s...

Страница 3: ...All Rights reserved 3...

Страница 4: ...weight 12 3 4 Installing the Optical Tube 12 4 Telescope balancing 14 4 1 RA Balancing 14 4 2 Dec Balancing 14 5 LineAR Polar Alignment 16 5 1 Adjusting the mount in latitude 16 5 2 Azimuth Regulation...

Страница 5: ...System Pulleys made with special glass fiber polymer and high precision tooth belts RA Axis Heavy duty steel diam 35mm all roller bearing axis movement DEC Axis Heavy duty steel diam 35mm all roller b...

Страница 6: ...for the use with third party software and in particular with the ASCOM driver are reported in the StarGO manual which is part of the mount supply A careful reading of this manual will enable the use o...

Страница 7: ...n the mount Losmandy type dovetail plate for the telescope installation Tripod plate and screws for fixing the mount to the tripod Counterweight shaft 6 kg stainless steel counterweight StarGO Control...

Страница 8: ...ands to avoid any deformation elongation and stress It is important to underline that in the pulley toothed belt system no direct contact occurs between the pulley and the motion is transmitted by the...

Страница 9: ...3 1 Latitude Range Adjustment This section describes in detail the procedures to set the correct range of latitudes depending of the site where the mount will be used The latitude range setting must...

Страница 10: ...screws of the side bracket 3 Remove the bracket 4 Unscrew the brass item 5 Screw the brass item in position 1 for latitudes from 15 to 40 or in position 3 for latitudes from 45 to 70 6 Remount the sid...

Страница 11: ...digital compass can be used to perform this task The LineAR comes with the plate for attaching the mount on the tripod but the plate must be assembled on the tripod according to the instructions belo...

Страница 12: ...ock is in between the two azimuth screws The mount body will remain well balanced over the tripod Tighten the two fixing screws equipped with plastic knobs in the two elongated holes to maintain the m...

Страница 13: ...ore counterweights will be needed Completely unscrew both the security screw at the bottom of the counterweight shaft and the fixing screw on the counterweight Insert the counterweight on the shaft pl...

Страница 14: ...axis Open the dovetail clamp by rotating its own knob Firmly take the OTA insert its male dovetail plate in the mount dovetail saddle putting the side closer to the ground first Then while still keep...

Страница 15: ...atform 2 Loosen the latch of the RA shaft and place the telescope on one of the sides of the frame The counterweight bar will extend horizontally on the opposite side of the mount 3 Let go the telesco...

Страница 16: ...knob of the mounting platform is loose 6 Tighten the dovetail clamp knob to lock the telescope in place NOTE It should be emphasized that the LineAR mount on the contrary of the mounts based on worms...

Страница 17: ...le Milan and Venice are at 45 Rome at 42 Palermo at 38 using the two Altitude knobs acting in push pull arrangement and the indication of the scale latitude engraved on the left side of the mount As m...

Страница 18: ...h should be performed only during the important phase of precise polar alignment before starting an observation or photographic session Once the polar alignment has been reached THE MOUNT SHOULD NOT B...

Страница 19: ...is is at about 40 arcmin distance from the Celestial Pole and therefore it orbits around the pole at that distance every about 24 hours The cross in the classical reticle center indicates the position...

Страница 20: ...re missing and the Polaris orbit circle has a different appearance The circle has been replaced by a graduated annulus made up three concentric circles To obtain a precise polar position with this typ...

Страница 21: ...ht to the position in the graduated circle defined by the specific application 5 3 2 Polar Alignment with a Losmandy polar scope he Losmandy polar scope which is provided as an option allows a more pr...

Страница 22: ...ed in this section However the same concepts described here are applicable to all other existing apps Polar Scope Align is an app which runs on iOS smart devices This program uses the device s interna...

Страница 23: ...lar scope as well as the reticle of the optional Losmandy polar scope The Polar Finder app is flexible and able to replicate a variety of the more common reticles suitable for use in the Northern or S...

Страница 24: ...Polar Finder app also takes the observation site s geographical coordinates from the Android device s internal GPS if available If the device has no internal GPS the geographical coordinates of the si...

Страница 25: ...t CCD must be firmly installed on the mount keeping a good parallelism with the polar axis of the mount itself Avalon Instrument has developed an adapter for fixing the CCD to the LineAR body This ada...

Отзывы: