background image


Page 

18

 of 

33


AC-MAX-24 USER MANUAL 

Matrix 

The 

Matrix 

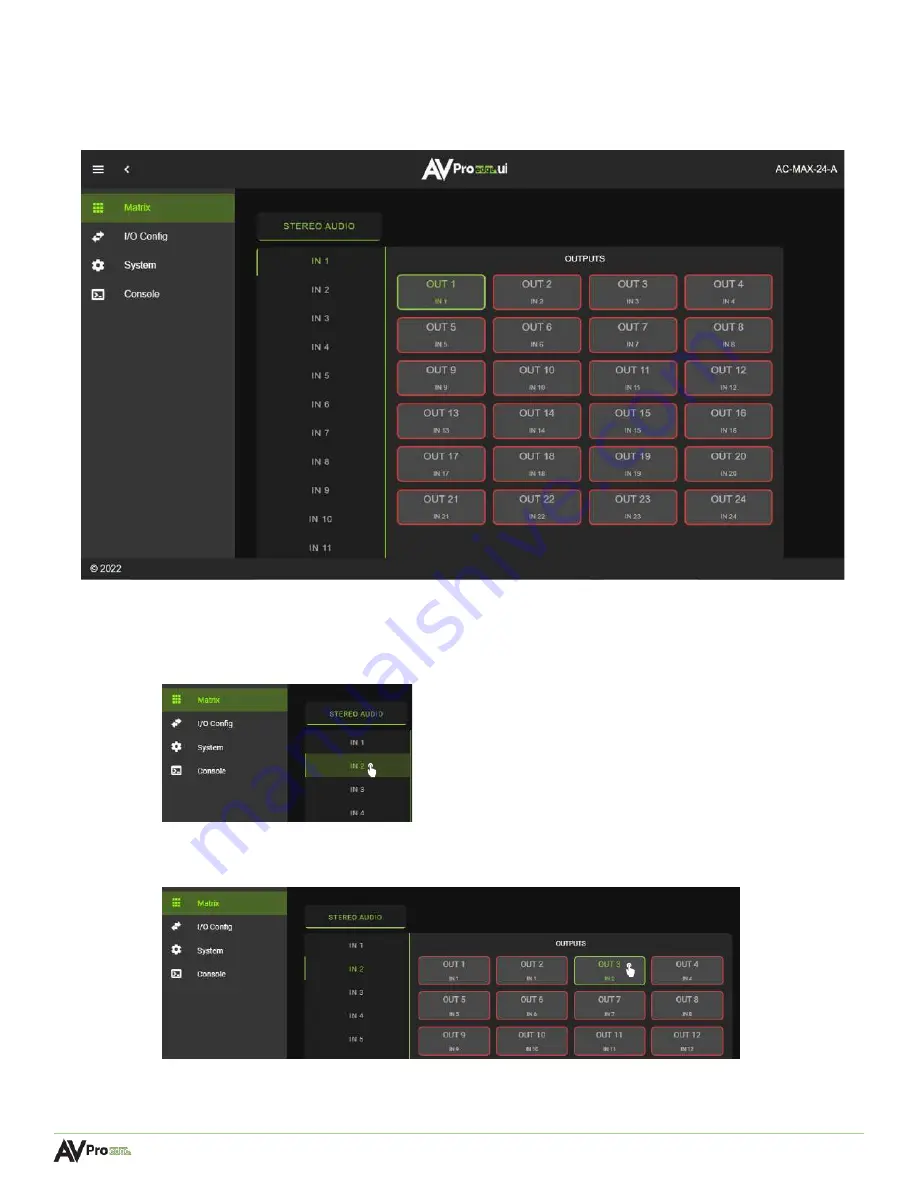
page layout consists of the 

Stereo Audio


Inputs

 column on the left and the 

Outputs

 grid on the 

right. Each 

Input

 and 

Output

 can be individually selected to route the input’s audio signals to the output(s). 


Matrix Switching 

1


From the 

Inputs 

column, select the desired input. This will highlight the input with a green text 

to indicate the selection was made. 


2


From the 

Outputs

 grid, select the desired output(s) to route the selected input to. This will 

highlight the output(s) with a green border to indicate the selection was made. 


3


The selected input’s audio signals are now routed to the selected output(s). 

Содержание AC-MAX-24

Страница 1: ...24 I O STEREO AUDIO MATRIX WITH AUDIO EXTENSION AC MAX 24 User Manual ...

Страница 2: ... Mounting Feet Assembly 10 Grounding Cable 10 Wiring and Connections 11 Audio Connections 11 RS 232 Control 12 LAN Wiring 12 Initial Setup 13 Connecting the Devices 13 Locating the IP Address 14 Accessing the Web UI 14 OTA Cloud Services 14 Navigating the Web UI 17 Matrix 18 Matrix Switching 18 I O Config 19 Stereo Audio Input Settings 19 Stereo Audio Output Settings 19 Audio Configuration 20 Equa...

Страница 3: ...b Interface 24 Hardware 24 Cloud Services 25 Console 27 Command List 28 Troubleshooting 30 Maintenance 30 Damage Requiring Service 31 Support 31 Warranty 31 The Basics 31 Coverage Details 32 Red Tape 32 Obtaining an RMA 32 Shipping 32 Limitation on Liability 33 Exclusive Remedy 33 ...

Страница 4: ...devices IMPORTANT Provides special information that is critical for installing configuring and operating the equipment CAUTION Provides special information for avoiding situations that may cause damage to the devices WARNING Provides special information for avoiding situations that may cause physical danger to the installer end user etc Electrical Shock Prevention ELECTRIC SHOCK The source power p...

Страница 5: ...ided plug does not fit into your outlet consult an electrician for replacement of the obsolete outlet 8 Protect the power cord from being walked on or pinched particularly at plugs convenience receptacles and the point where they exit from the devices 9 Only use attachments and accessories specified by the manufacturer 10 Unplug these devices during lightning storms or when unused for long periods...

Страница 6: ...o sources directly or from remote audio sources via the AC AEX KIT as shown below Compatible Devices AC AEX KIT The AVPro Edge AC AEX KIT is a pair of PoC Power over Cable powered transmitter AC AEX T and receiver AC AEX R modules that extend 2 channel analog and digital audio signals over standard category cable via AVPro Edge s exclusive AEX technology The AC AEX KIT is ideal for sending and rec...

Страница 7: ...s Mute Available on all outputs Audio Inputs AEX Audio 2 RCA 20 Digital TOSLINK 2 Digital Coaxial 2 Audio Outputs AEX Audio 2 RCA 22 Control Interfaces RS 232 IP LAN Additional Connections In System Programming USB Type C 12V DC Trigger Output 4 Power Total Power Consumption 50 Watts Maximum AC Power 100 240 VAC Dimensions Height x Width x Depth Standalone Unit Millimeters 88 x 440 x 234 95 Inches...

Страница 8: ...rts 3 DIGITAL AUDIO INPUTS 23 24 2x Digital Coaxial audio input ports 2x Digital Optical TOSLINK audio input ports 4 12V TRIGGER OUT 4x 3 5mm output ports 5 AC POWER INLET Main AC power for the AC MAX 24 6 AEX OUTPUTS 1 2 2x 8 pin RJ 45 female connector Long range audio extension input ports for connecting AC AEX KIT Power over Cable PoC Unshielded Twisted Pair UTP up to 100 meters 328 ft Shielded...

Страница 9: ...ER MANUAL 9 RS232 CONTROL 3 pin terminal block connector port 10 ISP CTL USB TYPE C Proprietary service port for AVPro Edge technical assistance 11 GND Ground screw Connect with the provided ground wire to the conducting parts ...

Страница 10: ...oth sides of the rack 2 Attach the mounting brackets to the rack with rack screws not included Mounting Feet Assembly The 4x mounting feet can be assembled to the unit with the 4x provided mounting screws 1 Align the holes on the mounting feet with the holes underneath the unit 2 Attach the mounting feet to the unit with the provided screws Grounding Cable Use a screwdriver to attach the yellow gr...

Страница 11: ...NNECTIONS Audio Connections AVPro Edge recommends using shielded RCA interconnected cabling between the AC MAX 24 and connected analog devices to maintain a high level of audio performance The diagram below shows the audio connections of the AC MAX 24 ...

Страница 12: ...l use a null modem serial cable adapter and set the serial communications to Baud 57600 no parity 8 data bits and 1 stop bit with no handshaking Add a carriage return Enter key after each command when using direct commands The unified command list ASCII can be located here LAN Wiring The IP control port located in the bottom right corner on the rear panel is used to communicate with the AC MAX 24 ...

Страница 13: ...s are made followed by accessing the Web UI and checking for any firmware updates to the unit Connecting the Devices 1 Connect the audio source devices to the audio inputs on the back of the unit 2 Connect the audio output devices to the audio outputs on the back of the unit 3 Connect the provided power cable to the AC inlet on the back of the unit then plug the power cable into a standard wall re...

Страница 14: ...ough a web browser for configuration and control For initial setup it is recommended to connect the AC MAX 24 to a local area network LAN with a computer on the same network to access the built in Web UI and check for any firmware updates to the unit OTA Cloud Services Firmware updates to the unit can be performed OTA Over the Air by enabling the Cloud Services setting on the Web UI This allows th...

Страница 15: ...le at the top of the page Select the Close button 7 If a newer version of firmware is detected from the Cloud a notification window will prompt the message New firmware update is available Select the Update button 8 The unit s new firmware file will automatically populate into the File input field from the Cloud Select the Upload button 9 From this screen newer versions of firmware can be viewed b...

Страница 16: ...the progress bar reaches 100 select the Close button and refresh the webpage 11 The unit will automatically reboot once the firmware updates are complete After the unit reboots refresh the webpage to verify that the firmware update was successful ...

Страница 17: ...navigation menu column on the left side of the screen 1 Enter the unit s IP address into a web browser such as Chrome or Edge to access the Web UI 2 To hide the navigation menu select the hamburger menu icon 3 To hide the navigation menu text and show only the menu icons select the left arrow icon 4 To navigate through the different pages select the individual tab pages from the navigation menu Th...

Страница 18: ... audio signals to the output s Matrix Switching 1 From the Inputs column select the desired input This will highlight the input with a green text to indicate the selection was made 2 From the Outputs grid select the desired output s to route the selected input to This will highlight the output s with a green border to indicate the selection was made 3 The selected input s audio signals are now rou...

Страница 19: ... switch to enable or disable the audio input 5 Volume Adjust the volume by using the slider bar or entering a value 0 100 in the text field Stereo Audio Output Settings 1 Port Shows the audio output port number 2 Type Shows the audio output connection type 3 Label Select the text field to enter in a custom name for the output Limit of 15 characters 4 Enabled Select the toggle switch to enable or d...

Страница 20: ... equalizer EQ with 29 presets and 24 user EQ profiles to enhance listener experience EQ s 1 27 consist of various combinations of bass midrange and treble attenuations in increments of 6dB up to a total of 12dB The table below shows the gain values for the various EQ presets EQ s 28 and 29 are high and low pass filters respectively The remaining EQ s ranging from 30 53 are user configurable where ...

Страница 21: ...r when the trigger is disabled NOTE An audio output and its routed input must both be enabled in order to detect audio at the output 1 Trigger Output Shows the trigger output port letter 2 Enabled Select the toggle switch to enable or disable the trigger output port 3 Timeout Select the text field to enter the trigger Timeout duration in milliseconds Limit of 5 characters 4 Select All Select the c...

Страница 22: ...eld to enter in a custom name for the unit The default shows the unit s model number 2 Model Name Shows the unit s AVPro Edge model number 3 Serial Number Shows the unit s unique serial number 4 MAC Address Shows the unit s unique MAC address 5 IP Assignment Select the dropdown menu to set the unit s IP mode to DHCP default or Manual Static IP then select the Apply button 6 IP Address Shows the un...

Страница 23: ...ult is Telnet port 23 Admin Web Interface Select the Secure toggle switch to enable green or disable red When enabled the username and password can be changed With the Admin Web Interface enabled the only menu that will be accessible on the Web UI will be the Matrix tab page The rest of the settings will require the Admin login Default username admin Default password admin ...

Страница 24: ... and User Web Interfaces enabled no menus will be accessible on the Web UI without first logging in Logging in with the User credentials the only menu that will be accessible on the Web UI will be the Matrix tab page The rest of the settings will require the Admin login Default username user Default password user123 Hardware This section shows the unit s current firmware versions and provides opti...

Страница 25: ... may revert back to their original factory default settings and may need to be re applied after the firmware updates are complete It is always recommended to backup and save your settings and configurations before updating firmware 1 Enter in the unit s IP address into a Chrome or Edge web browser to access the unit s Web UI 2 Navigate to the System tab page 3 In the Cloud Services section review ...

Страница 26: ...ill prompt the message New firmware update is available Select the Update button 8 The unit s new firmware file will automatically populate into the File input field from the Cloud Select the Upload button 9 From this screen newer versions of firmware can be viewed before they are installed Select the Upgrade button The unit will now begin installing the latest versions of firmware DO NOT refresh ...

Страница 27: ... stream while the Console tab page is open within the Web UI 2 Auto Scroll Check box that enables or disables auto scrolling as system events are generated 3 Export Log Select to download a txt file of the information recorded by the console log The console log only records information while the unit s Web UI is opened to the Console tab page and does not record or store information internally 4 C...

Страница 28: ...T OUTx MUTE UNMUTE Set Audio Output Mute Unmute x 1 24 0 all SET OUTx VOL y Set Output x Volume Level y x 0 24 0 All y 0 100 SET OUTx VOL y Increase Output x Volume by y x 1 24 y 1 100 optional default 1 SET OUTx VOL y Decrease Output x Volume by y x 1 24 y 1 100 optional default 1 SET OUTx VOL LOCK UNLOCK Lock Unlock Output x Volume x 0 24 0 ALL SET OUTx BAL y Set Output x Balance y x 0 24 0 All ...

Страница 29: ...t x mapping ON OFF x 0 24 0 ALL y 0 All 1 4 GET TRIGGER y TIMEOUT Get Trigger y disable timeout in ms y 0 All 1 4 Network Setup Commands SET RIP xxx xxx xxx xxx Set Route IP Address to xxx xxx xxx xxx xxx 000 255 SET HIP xxx xxx xxx xxx Set Host IP Address to xxx xxx xxx xxx xxx 000 255 SET NMK xxx xxx xxx xxx Set Net Mask to xxx xxx xxx xxx xxx 000 255 SET TIP zzzz Set TCP IP Port to zzzz zzzz 00...

Страница 30: ...in an electrical system will use the same reference value for their signals and reduces the possibility of a ground loop which can result in a shift in video signals and mains frequencies to exhibit a buzzing or humming noise in audio systems MAINTENANCE To ensure reliable operation of this product as well as protecting the safety of any person using or handling this device while powered please ob...

Страница 31: ... the issue is occurring Clean this unit with a soft dry cloth Never use alcohol paint thinner or benzene to clean this unit WARRANTY The Basics AVPro Edge warranties its products that are purchased from all Authorized AVPro Edge Resellers or direct purchases Products are guaranteed to be free from manufacturing defects and of sound physical and electronic condition AVPro Edge has developed a warra...

Страница 32: ...tion will not be covered Incorrect power supply inadequate cooling improper cabling inadequate protection static discharge are examples of this Products installed or sold by a third party to AVPro Edge will be serviced by the Authorized AVPro Edge Reseller Accessories IR Cables RS 232 Power Supplies etc are not included in the warranty We will make acceptable efforts to source and supply replaceme...

Страница 33: ... performance price and functionality issues product redevelopment is not an option Discontinued or out of production items will be credited at fair market value towards a current product of equal or comparable capabilities and cost Fair market value is determined by AVPro Edge Exclusive Remedy To the maximum extent permitted by law this limited warranty and the remedies set forth above are exclusi...

Отзывы: