Autotek A690RXA Скачать руководство пользователя страница 13

13

FUNCTIONAL INSTRUCTIONS

7

8

6

9

If the

 POWER LED 

lights up blue, the sound system is ready for operation. If the

 POWER LED 

lights up red refer to the chapter


TROUBLE SHOOTING on page 15.

The 

REMOTE 

jack is for connecting the enclosed bass remote. With this controller you are able to adjust the bass level e.g. out 

of the driver’s seat. If the bass remote is connected, the 

OUTPUT LEVEL

 controller (#1) is without function.

Connect the enclosed wiring harness into  

AUDIO INPUT

 and connect the die RCA with RCA cables to your head unit. If your 

head unit is not equipped with pre-amplifier outputs, you can use its speaker output cables as input signal. Then set the switch  

INPUT LEVEL

 to position 

HIGH

.

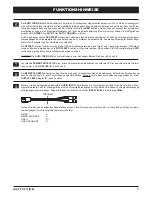
Cut the cables of the enclosed wiring harness with RCA jacks and connect the four loose ends with the speaker outputs of your 

head unit as following:
WHITE 

  L+ 

WHITE-BLACK    

L-

GRAY 

  R+

GRAY-BLACK    

R-

The 

AUTO TURN ON

 switch determines the way how the sound system will be turned on. If you want to turn on the sound sys-

tem with the remote cable of the head unit and it‘s connected as described on page 5 Section #2, the switch must be in position 

REM

. If you need to switch the sound system automatically because your head unit does not have a remote cable, you can set 

the switch 

AUTO TURN ON

 to 

DC OFFSET

 or 

AUTO

.

By the so called 

DC OFFSET

 function the amplifier detacts a voltage increase to 6 volts on the high level speaker outputs and 

turns on and the amplifier automatically. As soon as the head unit is turned off, the amplifier shuts down automatically.
The 

DC OFFSET

 function usually works with 90% of all headunits, because they are equipped with the ”High Power” outputs. 

Only with a few older headunits the 

AUTO TURN ON

 function is not applicable. Then use the switch position 

AUTO

, which turns 

the amplifier on and off with a little delay.

IMPORTANT: The 

AUTO TURN ON

 function works only with high level input operation. Refer to #5 and #9.

CUT

Содержание A690RXA

Страница 1: ...BENUTZERHANDBUCH OWNER S MANUAL ACTIVE SUBWOOFER SYSTEM A690RXA...

Страница 2: ...25 150 Hz 50 150 Hz 25 Hz fix 0 12dB 45 Hz 0 180 0 15 5 V 1 x 15 A 45 5 x 28 5 x 27 23 cm Die Garantieleistung entspricht der gesetzlichen Regelung in Ihrem Land Von der Garantieleistung ausgeschlosse...

Страница 3: ...AS GER T NICHT AN STELLEN EINBAUEN AN DENEN ES HOHER FEUCHTIGKEIT ODER STAUB AUSGESETZT IST Bauen Sie das Ge r t so ein dass es vor hoher Feuchtigkeit und Staub gesch tzt ist Wenn Feuchtigkeit oder St...

Страница 4: ...m Kofferraum zu befestigen Achten Sie bei der Installation und der Befestigung des Ger ts unbedingt darauf dass keine serienm ige Komponenten des Fahr zeugs Airbags Sicherheitsgurte Kabelstr nge Benzi...

Страница 5: ...ollte m glichst kurz sein und an einem blanken metallischen Punkt des Fahrzeugchassis angebracht werden Achten Sie darauf dass dieser Punkt eine sichere elektrische Verbindung zum Minuspol der Fahrzeu...

Страница 6: ...t die Begrenzung des Frequenzgangs des Subwoofers nach oben Die Trennfrequenz ist stufenlos von 50Hz bis 150Hz regelbar Der PHASE SHIFT Schalter erlaubt die Umkehrung der Phasenlage von 0 auf 180 Dadu...

Страница 7: ...AUTO TURN ON Schalter bestimmt die Art wie das Soundsystem eingeschaltet werden soll Wenn Sie das Soundsystem mit der Einschaltleitung Remote des Steuerger ts Autoradios einschalten m chten und dieses...

Страница 8: ...2 Die Hochpegel Cinchkabel sind defekt Kabel ersetzen 3 Der Lautsprecher ist defekt Lautsprecher ersetzen 4 Kein Signal vom Steuerger t Radio Steuerger t Einstellungen pr fen Fehler Verzerrungen aus L...

Страница 9: ...s in the trunk area Less suitable are storage spaces behind the side coverings or under the car seats DO NOT INSTALL THE DEVICE AT LOCATIONS WHERE IT WILL BE EXPOSED TO HIGH HUMIDITY AND DUST Install...

Страница 10: ...any other mounting solutions in the trunk area Please observe not to damage any serial components of your vehicle airbags wires gastank etc during the installation of your soundsystem by drilling or a...

Страница 11: ...ontact ground point on the vehicle s chassis The ground wire must be as short as possible and must be connected to a blank metallic point at the vehicle s chassis Ensure that this ground point has a s...

Страница 12: ...r low pass filter adjusts the cut off point of the frequency range to above The cut off frequency is continuously adjustable from 50 Hz to 150 Hz The PHASE SHIFT switch allows to switch the phase from...

Страница 13: ...L GRAY R GRAY BLACK R The AUTO TURN ON switch determines the way how the sound system will be turned on If you want to turn on the sound sys tem with the remote cable of the head unit and it s connect...

Страница 14: ...ation inside vehicles in the European Union EU PLEASE KEEP THIS MANUAL FOR LATER PURPOSES SPECIFICATIONS WARRANTY GENERAL NOTES Technical specifications are subject to change Errors are reserved MODEL...

Страница 15: ...ions of the high level inputs or the RCA audio cables are defective Replace cables 3 The loudspeaker is defective Replace speaker 4 No signal from the head unit Check head unit settings Malfunction di...

Страница 16: ...D E S I G N Audio Design GmbH Am Breilingsweg 3 D 76709 Kronau Germany Tel 49 7253 9465 0 Fax 49 7253 946510 www audiodesign de 2016 Audio Design GmbH All Rights Reserved...

Отзывы: