AutoExtra ARA-HD2 Скачать руководство пользователя страница 30

30 


IV.  Trouble Shooting Q&A 

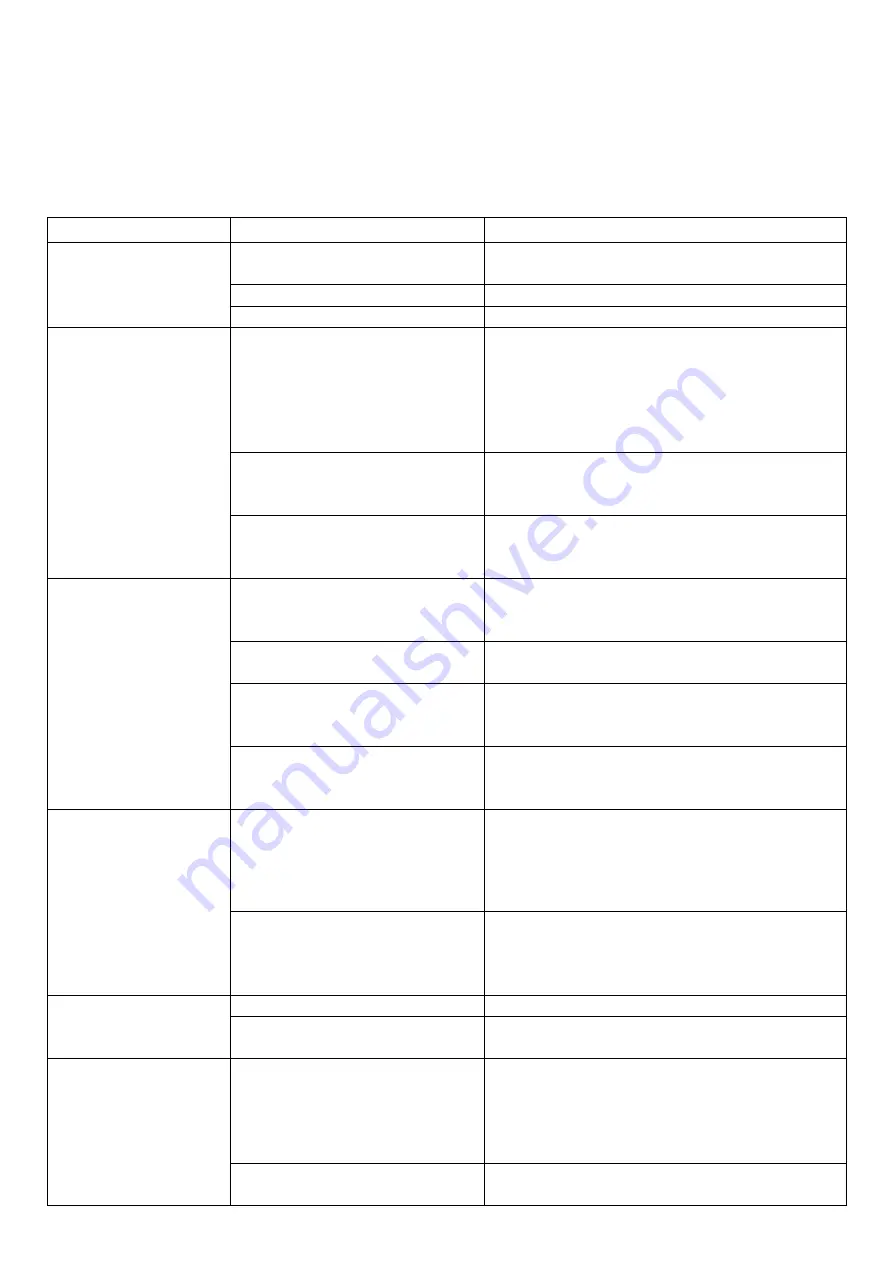
Most  of  the  troubleshooting  issues  can  be  easily  resolved.  The  most  common  cases  and  their 

respective solutions are listed in the table below. If the problem persists, please contact the after 

sales service. 


Problem 

Possible Reason 

Solution 

No picture, no audio. 

The  power  cord  is  not 
properly inserted into the unit. 

Check the power wire connection. 

The unit is not switched on. 

Press [POWER] button. 

Unit is in stand-by mode. 

Press [POWER] button. 

In  DVB-T  mode,  the 
number  of  DVB-T 
channels  is  not  as 
much 

as 

we 

expected. 

The number of available 
channels is limited due to the 
local broadcasting 
environment. The available 
channels can vary depending 
on the area. 

Perform “Auto Search” or “Manual Search” 
to rescan all the channels. 

The signal quality of some TV 
channels is too low. 

Please  use  active  antennas  instead  of 
passive  antennas  for  better  reception 
quality. 

Some  TV  channels  are  not 
available. 

Only the locally free broadcasted channels 
can  be  viewed.  They  can  differ  depending 
on the area. 

In  DVB-T  mode,  all 
of 

the 

channels 

show  “no  signal”  or 
random  mosaic  tiles 
appear 

on 

the 

display. 

Some  TV  channels  signal 
quality is too low. 

Please  use  active  antennas  instead  of 
passive  antennas  for  better  reception 
quality. 

The 

antennas 

are 

not 

properly connected. 

Please  check  the  connection  of  the 
antennas. 

No DVB-T service is provided 
in the area. 

Check your country DVB-T coverage map. 
It is not possible to watch digital TV/listen to 
digital radio in non-covered areas. 

Incorrect Regional Setting 

Please check whether “Regional Setting” is 
correct,  and  perform  “Auto  Search”  to 
rescan all of the channels. 

In  DVB-T  mode,  no 
video  or  audio  and 
“Scrambled” 
message 

appears 

on the screen 

No Smart card is inserted 

“Scrambled”  message  will  appears  when 
the TV/Radio signal received is paid-TV. To 
watch these channels, please insert a valid 
smart card into CA slot on front panel. 

Smart card is out of date 

Please  check  your  subscription  date.  If 
your 

subscription 

date 

is 

already 

out-of-date,  please  contact  your  service 
provider to extend your subscription. 

The video is fine but 
there is no sound. 

The audio volume is too low. 

Press [VOL

] button to raise the volume. 

The audio is muted. 

Press  [MUTE]  button  to  disable  the  mute 
function. 

The  remote  control 
does not work 

No power. 

Check  the  remote  control  battery. 

NOTE: 

the  new  remote  control  might  be  supplied 
with  a  small  plastic  insulator  to  avoid 
discharge of battery power. Check that the 
plastic insulator has been removed.


No “line-of-sight” between unit 
and controller 

Ensure there  are no obstacle  between  the 
controller and the unit. 

Содержание ARA-HD2

Страница 1: ...ARA HD2 Car use HD DVB T Diversity Receiver User Manual...

Страница 2: ...equipment and the automotive accessories may be dangerous and could lead into the risk of the electric shock or the other hazards If the receiver does not work properly please disconnect the power plu...

Страница 3: ...l List 19 III 1 2 Channel Management 20 III 1 3 Auto Search 21 III 1 4 DVB T Audio Settings 21 III 1 5 Channel Information 22 III 1 6 Aspect Ratio 22 III 1 7 Subtitle 23 III 1 8 Teletext 23 III 1 9 AF...

Страница 4: ...ED indicates if the 12V or 24V power supply has been successfully applied to the device 4 Conax Slot extension port Extension port for external Conax smart card slot to enable pay TV service 5 USB por...

Страница 5: ...5 Back Side 6 Ant In antenna connection port NOTE this unit provides 5V antenna power through this connection port 7 HDMI Port HDMI output port 6 Ant in 7 HDMI port...

Страница 6: ...the vehicle Please refer to the diagram below for some recommended locations 1 Behind the Front Bumper Note Please make sure the bumper is not made of metal 2 Top of the Front Windscreen but at least...

Страница 7: ...7 Antenna Cable Routing Once a suitable position of antenna placement is found carefully route the antenna cables to the receiver unit and then connect to the Antenna Inputs on DTV receiver...

Страница 8: ...AUDIO L output 8 Audio R output 9 UART Rx input 10 UART Tx input 11 IR data intput 12 LED_EN 13 IR power output 14 PWR_GND 15 12V input 16 ACC input AV I O Ports Definition B out G out GND Audio L out...

Страница 9: ...e volume down or move the cursor left 13 OK Select the highlighted item or select play pause 14 FR Fast Rewind 15 REC Start to record the TV Radio program or exit the recording Subtitle key in the nor...

Страница 10: ...to select it DVB T TV Mode To enter DVB T TV mode DVB T Radio Mode To listen to DVB T radio broadcasting Movie Playback Mode To enter movie playback mode and watch movie files Music Playback Mode To e...

Страница 11: ...LED indicator will be illuminated in RED as shown below 3 When the system is activated the Operating LED on the unit will be illuminated in Green Step 2 Highlight the TV option and press OK to enter t...

Страница 12: ...anged Step 4 Perform auto search to find available TV channels 1 Select Start on Setup Wizard and press OK to active it 2 The device will show Scan screen as below and perform searching the available...

Страница 13: ...Radio Listening 1 Press CH CH buttons to select the Ratio item and then press OK button to enter the radio mode 2 Press CH CH buttons to select your preferred radio channel 3 The radio service will st...

Страница 14: ...ack in Music mode Important notes i A recorded program will be stored in a default folder named Recorded_Program The file types will be TSV file for TV program and TSA file for Radio ii The file is na...

Страница 15: ...Use CH and CH buttons to scroll up and down through files and then select the desired file by pressing OK button The video file will instantly start playing NOTE Users can only choose video files unde...

Страница 16: ...Use CH and CH buttons to scroll up and down through files and then select the desired file by pressing the OK button The audio file will instantly start playing NOTE users can only choose music files...

Страница 17: ...ppear on screen Use CH CH VOL VOL buttons to browse the folder and then select the desired one by pressing OK button Note users can only choose photo files under this mode If users choose music or vid...

Страница 18: ...and press VOL button to rotate it counterclockwise Slideshow Press PLAY PAUSE to start stop photo slideshow Zoom 1 When viewing a picture press OK to enter zoom mode 2 Press FF to zoom in or press FR...

Страница 19: ...st will appear on screen NOTE you can also press EPG button on remote controller to enter Channel List while enjoying DVB T TV Radio 2 Press CH CH buttons to scroll up down the channel list to preview...

Страница 20: ...by pressing VOL VOL buttons 2 Press OK button to activate or deactivate it NOTE this function temporarily removes the channel from the program list Users can restore the channels by deactivating this...

Страница 21: ...Audio Settings To select either master or secondary language as well as the audio channel of current service 1 Browse the TV menu screen using CH CH buttons to highlight the Audio option Press OK butt...

Страница 22: ...the channel information 3 Press EXIT MENU button to exit III 1 6Aspect Ratio To adjust image aspect ratio into full screen letter box and none 1 Browse TV menu using CH CH button and press OK button...

Страница 23: ...to highlight the Teletext option Press OK button to enter Teletext menu 2 Press CH button to view next page or CH to view previous teletext page 3 Press MENU EXIT to leave III 1 9AFS Setting To set up...

Страница 24: ...ving between 2 cities areas where the channel is broadcasted in different frequencies For example channel ABC in city A is broadcasted in frequency 474MHz In city B this channel ABC is broadcasted in...

Страница 25: ...gional settings 1 Press CH CH buttons to highlight the item you want to adjust 2 Press VOL button and use CH CH to scroll up and down the options 3 Select one by pressing the OK button or exit the set...

Страница 26: ...ss CH CH buttons to highlight the item you want to adjust 2 Press VOL button and use CH CH to scroll up and down the options 3 Select one by pressing the OK button or exit the setting by pressing the...

Страница 27: ...ade file into the card slot 2 After entering the Version Upgrade menu press OK button to start the upgrade III 2 7Reset Default To reset all settings to factory default 1 Press CH CH buttons to highli...

Страница 28: ...t the setting by pressing the EXIT MENU button 4 After adjusting press EXIT MENU button to exit III 4 Music Menu On entering Music service press MENU button to invoke music menu Through this menu user...

Страница 29: ...and subtitle III 5 1 Menu 1 Press MENU to enter Menu 2 Press CH CH buttons to highlight the item you want to adjust 3 Press VOL button and use CH CH to scroll up and down the options 4 Select one by...

Страница 30: ...ssive antennas for better reception quality The antennas are not properly connected Please check the connection of the antennas No DVB T service is provided in the area Check your country DVB T covera...

Страница 31: ...land Turkish Czech Greece Danish Arabic Thai Traditional Chinese Hungarian Simplified Chinese Vietnamese Indonesian Features DVB T TV Radio Auto Channel Search Multi Language EPG Teletext Subtitle Aut...

Страница 32: ...32 Dimension and Weight Dimension 80 x 28 5x 137 5 mm Weight 242 g...

Отзывы: