


2
v3.1 2428
On cars with airbags, you may notice bright yellow tubes or harnesses
marked SRS (Supplemental Restraint System) underneath the steering
column area. DO NOT tamper with these wires in any way, to prevent
personal injury and/or damage to the air bag system.
Battery gases are explosive.
Do not smoke while working near the car’s battery.
Note: Some installers connect a battery charger to the vehicle’s battery during
installation. This is fine, but it must be removed before running the vehicle under
remote starter control.
All General Motors (GM), rear wheel drive vehicles built prior to 1995
with automatic transmissions and Dodge Dakota trucks (4 cylinder
engines only) with automatic transmissions built prior to 1996 have a
MECHANICAL TYPE of NEUTRAL SAFETY SWITCH. See important
warning on the last page of these instructions.
When running the wires through the car’s firewall, be sure to protect
them from sharp metal edges and from hot surfaces on and around the
engine.
INSTALLATION INSTRUCTIONS
1. Before You Start
Take time to read through the whole installation manual before beginning.
Always leave a window open to avoid locking your keys in your car.
IMPORTANT:
After having read the entire manual, start the installation
by putting the yellow WARNING STICKER in the engine compartment.
Choose a surface that is clean and readily visible when the hood is open.
POWER & IGNITION HARNESS
The remote starter module will be installed under the dash once all wiring has been
completed.
Do not mount the module at this time! You will need to check
the red diagnostic LED light as the installation progresses
.
Locate (or
drill) a hole in the firewall to run the PURPLE and GREEN wires of the
Control
Harness
and the PINK wire of the
Power Harness
into the engine compartment.
The remaining short wires stay in the passenger area. Leave about a foot of the wire
harness under the dash for ease of working and visual access to the diagnostic light.
The
Installation Information
section of our web site www.designtech-intl.com is
available 24 hours/day to provide you with free, up-to-date vehicle wiring information
for your particular vehicle after you log in.
Note: Always connect the
PINK
and
BLACK
wires before connecting any of the
other wires. Do not insert the fuse until step 11.
2. Black Wire (16 AWG) – Ground
Connect the BLACK wire to a very good, clean chassis ground in the driver’s kick
panel area. Use the small ring terminal. (The thin metal bracing around or beneath
the dash board is not always adequate.)
3. Pink Wire (12 AWG) – Power (+12 Volts)
Connect the ring terminal at the end of the short PINK wire to the +12 Volt terminal of
the battery. Run the long PINK wire through the firewall of your vehicle. Join the
remaining ends of the power wire together by soldering them. Tape with electrical
tape to leave no exposed wires. Alternatively, you may wish to use the yellow butt
connector, but we recommend soldering. Wait to insert the 30 amp green fuse into
the holder until step 11. As the power is first applied to the unit the red diagnostic
LED light will blink once.
Note: Failure to properly install the fuse holder and 30 amp fuse to the PINK wire to
the battery voids all product warranties.
Ignition Key Diagram for Steps 4-7
The vehicle’s wires are found coming off of the key switch.
Remove the panel under the steering column to access
these wires.
4. Blue Wire (14 AWG) – Ignition 1
Connect the BLUE wire to the ignition 1 wire of your vehicle. This wire will measure
+12 Volts on the test meter in the “run”
and
“start” position, and is off in the “lock/
off” and “accessory” positions.
5. Green (14 AWG) – Ignition 2
Connect the GREEN wire to the Ignition 2 wire in the vehicle. The Ignition 2 wire can
function in several different ways in your vehicle. It is important to understand how it
works. The Ignition 2 wire will usually m12 Volts in the “run” position and is
off (ground) in the “lock/off” and “accessory” positions. In certain vehicles, it may
also show +12 Volts in the “Start” position or Ignition 2 may turn OFF during “Crank”
and turn back ON after the starter disengages. Carefully note the function of the Ignition
2 wire. If the Ignition 2 turns OFF during “Crank”, set Option #4 (in section 24). If
Ignition 2 stays ON during “Crank,” no options need to be changed.
6. White Wire (14 AWG) – Accessory
Connect the WHITE wire to the accessory wire which is +12 Volts in the “run” and
“accessory” position, but off in the “start” and “off” positions. In GM vehicles, connect
the white wire to the orange wire that is hot in “run” only.
7. Yellow (14 AWG) – Starter
Connect the YELLOW wire to the starter wire. This wire will m12 Volts on
the test meter in the “start” position only.
Note: Most Nissan vehicles have two starter wires. Connect both starter wires of the
vehicle to the YELLOW start wire of the remote starter.
8A. Plug-In On/0ff Switch
Mount the control switch so that it is easily accessible and so that
the “ON” position is facing upward. Make sure there is enough clearance behind the
mounted switch for the wire connections. Do not let the switch wires touch ground.
Do not plug the switch into the unit until it is mounted first. Connection of this switch
is mandatory. Use a 1/4" drill-bit for the mounting hole.
Plug the ON/OFF control switch into the module just to the right of the power wires.
Turn the switch on.
8B. Plug-In LED Light
Drill a 5/16" hole in to the dash or panel to mount the LED light and plug the LED
light plug into the red connector. Mounting the LED light is not mandatory but the
LED light is used for alarm status, troubleshooting and programming options.
CONTROL HARNESS
ALL WIRES ARE THE SMALLER 18 AWG SIZE
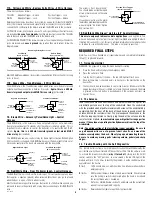
9. Purple Wire – Hood Pin Switch – Control Harness
The hood pin switch MUST be installed with the remote starter. It prevents operation
of the remote starter when the hood is open and is used to initialize the unit. Connect
the PURPLE wire to the hood pin switch using the red
connector.
Note: If you already have a hood pin switch which is
being used by a car alarm system, you may share the
wiring – but be sure to diode isolate each wire going to
the hood pin switch with the bands of diodes pointing
towards the pin switch as shown at right.
WARNING
This car is equipped with a remote control starting device.
Disable before working on car!
AVERTISSEMENT
Ce véhicule est équipé d’un systéme de démarrage a distance. Mettez-le
hors fonction avant d’eflectuer toute opération d’entretien ou de réparation!
How to share a hood pin
switch with an alarm
To Alarm
To Remote Starter


