

Fitting the Levers and Face Plates
1
Fit and secure the
face plates
to the remote locks using the
#8x13 blunt point screws supplied.
2
Fit the HD8 levers & cylinder as per the supplied HD8
instructions.
3
Using the cylinder and the snib lever, test that the remote locks
unlock and lock smoothly and lively.
Fitting the HD8 Centre Lock Strike Plates
1
Fit the HD8 strike plate as per supplied HD8 instructions (STEP 7).
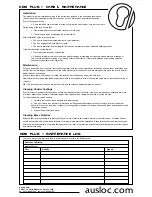
Fitting the HD16 Remote Lock Strike Plates (Figure 6)
1
Ensure the lock is unlocked and the
remote beaks
are retracted.
2
Pencil mark the
door jamb
at the same height as the
remote beak
cutout (refer to
indicator lines
, figure 6).
3
Centre the
strike plate
square cutout over the pencil marks on
the
door jamb
. Ensure the strike plate is orientated as shown in
figure 6. The
broken edge
of the strike plate must be facing the
outside of the building.
4
Pencil mark through the
screw holes
,
square cutout
and the two
recess holes
BENEATH the square cutout.
5
Pilot drill the
screw holes
if necessary.
6
Remove the timber 15mm deep with a chisel between the TOP of
the
square cutout
, and the two recess holes BENEATH the
square cutout.
7
Secure the
strike plate
to the
door jamb
with the two
#8x25mm
screws
supplied.
8
Repeat the process for the remaining
remote strike plate
.
9
Test the fit between the
main beak / remote beaks
and the
strike
plates / door jamb
to ensure there is adequate clearance around
all sides.
HD16 PLUS
Fitting instructions continued...
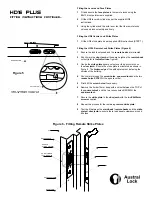
USING A SCREWDRIVER, SECURELY CLIP
THE COLLAR LUGS INTO THE DRIVE BOX
Figure 5
DOOR SECTION
COLLAR LUG
Figure 6 - Fitting Remote Strike Plates
CHISEL TIMBER
15mm DEEP
FACE PLATE
INDICATOR LINES
REMOTE BEAK
BROKEN EDGE
RECESS HOLES
REMOTE
STRIKE PLATE
SCREW HOLE
DOOR JAMB