background image

Cold Milk Foam  


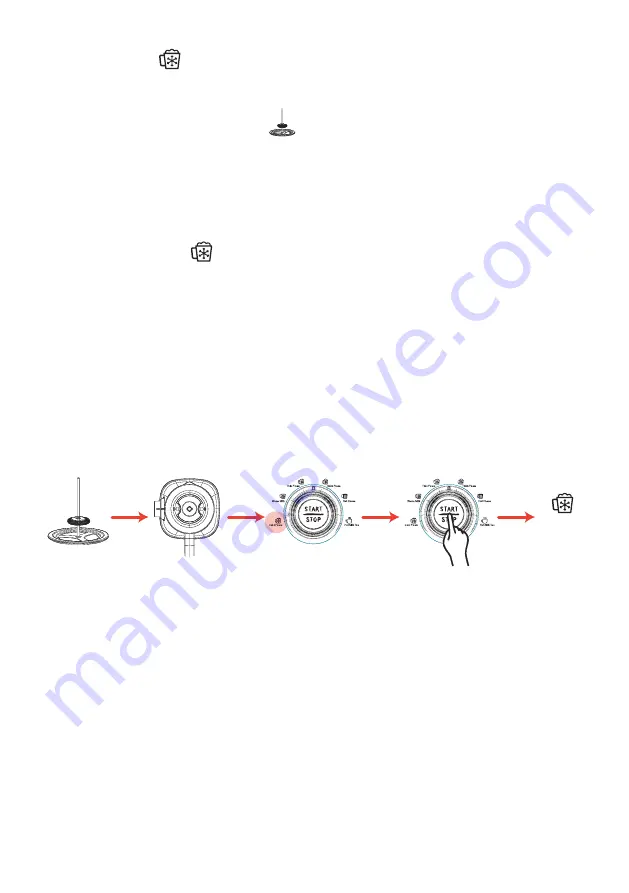
For making Cold Milk Foam, follow the steps below:


1.

   Make sure the frothing whisk “        ” is properly attached to whisk holder inside

         the milk jug before operation.


2.

   Fill the jug with fresh milk up to Max level indicated for frothing (300 ml). 


3.

   Connect the plug of milk frother to the power source according to its required 

         tandard rating power supply.


4.

   Turn the knob to “        ” Cold Milk Foam mode.


5. 

  Press the START/STOP button, the buzzer beeps once with the blue indicator

         light, the motor will start to rotate. 


6.

   The machine will end up its operation after 2 minutes and the LED light will turn

         into white from blue. It beeps once and the blue indicator light turns to white
         (STAND BY MODE).


7.

   After 30-sec of not using the machine, the indicator light keeps flashing for 3

         seconds with beeping 3 times and then stops and light turns OFF.

NOTE-1:

   The only stirring option will be functioning during this operation mode to

                 produce proper Cold Milk Foam. The built-in heater will not be active for this mode.

NOTE-2:

   The preparation time of Cold Milk Foam is 2 minutes. Once the preset build-in

                 timer reads 2 minutes of operation, the frothing will end.
 

2 min

10

Add the milk

and select the
desired option

Press the

start button

and wait

Finish &

ready to use

Attach the 

disk

Содержание AusFroth-06

Страница 1: ...AUSPURE SUPPORT www auspure com au support au auspure com User Manual Advanced Cafe Milk Frother Model AusFroth 06 ...

Страница 2: ...ucts feel free to contact our helpful customer support team at support au auspure com We hope you enjoy using this product and we will be more than happy to assist our valued customers for any inquiry related to Auspure products Copyright Since 2021 Auspure Australia All Rights Reserved This user manual is protected by copyright It is not permitted to photocopy these instructions for use or transl...

Страница 3: ...AUSPURE CUSTOMER SUPPORT 4 5 6 7 8 14 14 14 15 16 20 20 PACKAGE CONTENTS TABLE OF SPECIFICATIONS 1 Auspure Milk Frother 1 Stainless Steel Milk Jug 1 Chocolate Cover Whisk 1 Mesh Tea Infuser 1 Whisk Holder 1 Frothing Whisk 1 User Manual 1 Warranty Card Product Model AusFroth 06 Product Brand Auspure Kitchen Power Supply 220 240 V 50 60 Hz Rated Power 500 W Max Capacity 0 6 L Product Weight 1 5 kg D...

Страница 4: ... Frother unattended while it is operating The appliance should NOT be operated by children NOR shall play with the appliance DO NOT let children or people with reduced physical or mental capabilities to use or clean the Milk Frother While operating the appliance care should be taken to NOT get burned by the steam DO NOT touch hot surface of the Milk Frother use handles or knobs only MAKE SURE to s...

Страница 5: ...Steel Milk Jug Milk Frother Base Function Chromed Knob Start Stop Button Power Cord Frothing Whisk Whisk Holder Chocolate Cover Mesh Tea Infuser MAX Level for Heating 600 ml MAX Level for Frothing 300 ml MIN Level for Frothing or Heating 125 ml 5 ...

Страница 6: ...fees including cappuccino and cafe latte as well as making hot tea and chocolate milk Control and Settings NOTE The difference between hot thin and hot thick milk is the rotation speed to make different foam level 6 Symbol Whisk Function Hot thick milk foam Hot thin milk foam Cold milk foam Warm milk Hot chocolate Hot milk tea Max Capacity 300 ml 300 ml 300 ml 600 ml 600 ml 600 ml Temperature 55 7...

Страница 7: ...he first time In warm soapy water thoroughly clean the frother jug and its lid Wipe the outside of the appliance with a soft damp cloth and let it dry completely Your Milk Frother is now ready for real use IMPORTANT NOTE Do NOT put the milk frother base power cable or plug in the dishwasher and Do NOT submerge them in water or other liquids 7 ...

Страница 8: ...this product for the first time 4 If you unplug or disconnect the machine from power source during operation and connect the machine again later there will be a beep with turning on the LED light This indicates STAND BY mode 5 When you switch the mode during operation it beeps once the blue LED light turns to white and machine stops working For operation again you need to press the START button af...

Страница 9: ...heater will start to operate 6 Once the temperature reaches 65 o C the machine ends its operation It beeps once and the blue indicator light turns to white indicating STAND BY MODE The milk foam is ready to use and for best result should be immediately used 7 After 30 sec of not using the machine the indicator light keeps flashing for 3 seconds with beeping 3 times and then stops and the LED light...

Страница 10: ...end up its operation after 2 minutes and the LED light will turn into white from blue It beeps once and the blue indicator light turns to white STAND BY MODE 7 After 30 sec of not using the machine the indicator light keeps flashing for 3 seconds with beeping 3 times and then stops and light turns OFF NOTE 1 The only stirring option will be functioning during this operation mode to produce proper ...

Страница 11: ...the motor and heater will start to work 6 Once the temperature reaches 50 o C the machine ends operation It beeps once and the blue indicator light turns to white STAND BY MODE 7 After 30 sec of not using the machine the indicator light keeps flashing for 3 seconds with beeping 3 times and then stops and light turns OFF NOTE 1 The heating and stirring option will be both functioning during this op...

Страница 12: ...tart to work 6 During operation add the desired amount of coca powder then put in the lid and let the liquid immersed the coca powder or chocolate pieces and to melt and produce fresh Hot Chocolate 7 Once the temperature reaches 80 o C the machine ends operation It beeps once and the blue indicator light turns to white STAND BY MODE 8 After 30 sec of not using the machine the indicator light keeps...

Страница 13: ...or and heater will start to work 6 During operation add the tea leaves in the tea making accessory And then put in the lid and let the liquid immersed the tea leaves producing fresh Hot Milk Tea 7 Once the temperature reaches 90 o C the machine ends operation It beeps once and the blue indicator light turns to white STAND BY MODE 8 After 30 sec of not using the machine the indicator light keeps fl...

Страница 14: ...warm soapy water 5 Rinse and dry them thoroughly 6 Store the cleaned milk jug jug lid and frothing whisk in safe place away from children 7 The milk jug lid and frothing whisk are dishwasher safe STORAGE If not using your Milk Frother for an extended period of time the following points must be considered for safe storage Turn OFF the machine and then unplug from the power outlet Follow the instruc...

Страница 15: ...hat the Milk Frother has been properly turned on 1 Frothing whisk might not placed correctly 2 The frothing whisk might have been taken out while working 3 Ingredients might have been added too quickly Stop operation Remove liquid from milk jug Place the frothing whisk inside the milk jug before turning on the milk frother Refill the milk jug with liquid Start frothing Add ingredients if desired s...

Страница 16: ... Against Defects 1 1 For Brand new Products We provide a 12 month standard warranty against defects with the Products from the date of purchase We provide an optional additional free 12 month extended warranty against defects with the Products resulting in a 24 month warranty against defects with the Products from the date of purchase In order to claim the additional 12 month extended warranty you...

Страница 17: ...eplacement or repair and either send you a replacement Product or effect a repair This warranty against defects is in addition to any other rights and remedies to which you may be entitled under Australian law To Clarify What is covered by the warranty The repair or replacement of your Auspure product at Auspure s discretion if the product is found to be defective due to faulty manufacture Auspure...

Страница 18: ...he goods fail to be of acceptable quality and the failure does not amount to a major failure 3 Disclaimer You are solely responsible for evaluating the Product and determining whether it is fit for your purpose You acknowledge and agree that Product is not safe for use by children You acknowledge and agree that working with the Product is dangerous and carries the risk of electric shock burns lace...

Страница 19: ... or damage which may result from your use of the Product Except as otherwise provided by law or as otherwise set out in this warranty and disclaimer our liability to you shall be limited to the cost of replacement of the Product together with your reasonable costs of postage and or delivery in connection with your returning of the Product 5 Indemnity You agree to defend indemnify and hold us and o...

Страница 20: ...us Once our Customer Support Team has reached to your request approval please return the unit with its order number AUSPURE CUSTOMER SUPPORT Feel free to contact our helpful customer support team with any questions regarding your product Your satisfaction is our priority Ausbrilliant PO Box 2 Ermington NSW 1700 Australia www auspure com au support au auspure com Please provide your order number wh...

Страница 21: ......

Страница 22: ...Questions or Inquiries support au auspure com V1 0222 ...

Отзывы: