background image

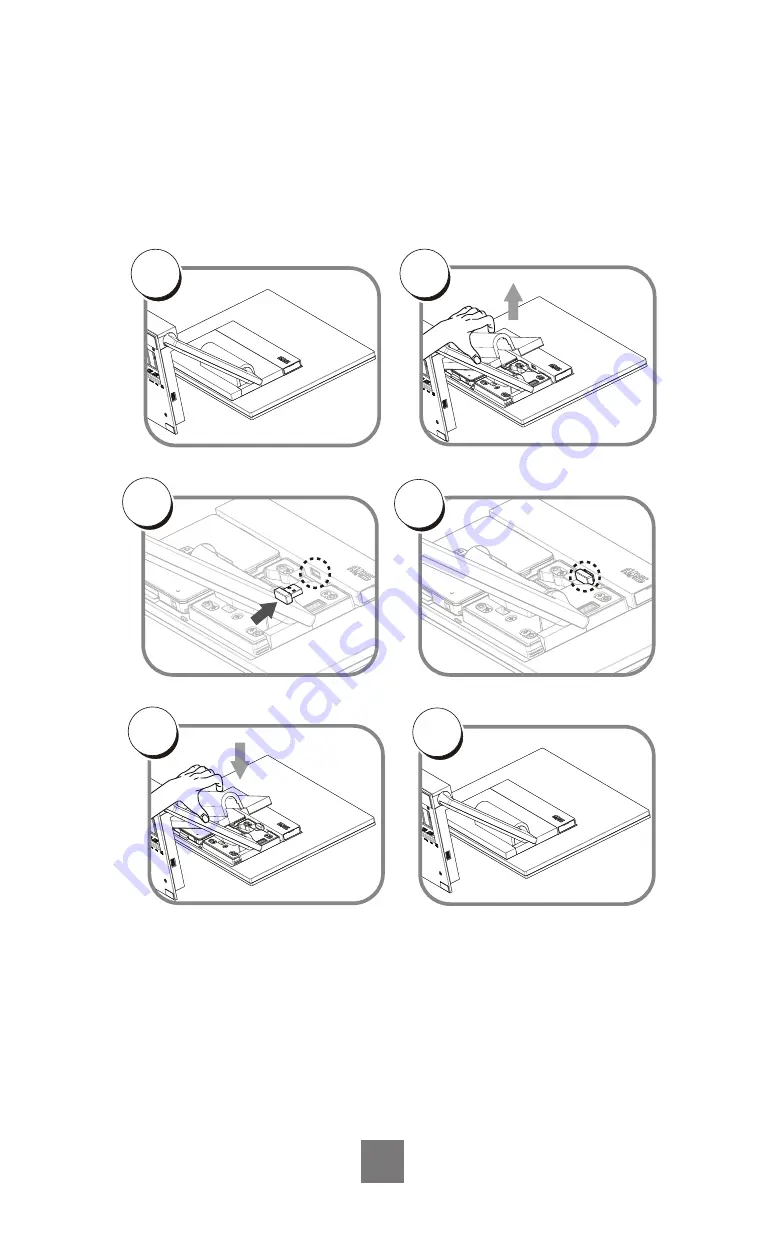
How to install the WIFI Dongle

1.  Lay the LCD flat on an even surface.

2. Remove the MB cover as seen in the step 2 diagram.

3.  Insert the WIFI Dongle to the appropriate as seen in the step 3&4 diagram.

4.  Re-attach the arm cover as seen in the step 6 diagram.

2

3

4

1

5

6

8

Содержание JAZZ-BASE151

Страница 1: ...Rev B Mar20 USER S MANUAL JAZZ BASE151 JAZZ KIOSK BASE l ART 04XXX JAZZ BASE151 BLACK JAZZ BASE151 WHITE JAZZ KIOSK BASE151 BLACK JAZZ KIOSK BASE151 WHITE ...

Страница 2: ... device may not cause harmful interference and 2 This device must accept any interference received including interference that may cause undesired operation Caution The manufacturer is not responsible for any radio or TV interference caused by unauthorized modifications to this equipment Such modifications could void the user authority to operate the equipment CAUTION Risk of Explosion if Battery ...

Страница 3: ...ensure reliable operation of the product and to protect it from overheating These openings must not be blocked or covered The openings should never be blocked by placing the product on a bed sofa rug or other similar surface This product should never be placed near or over a radiator or heat register or in a built in installation unless proper ventilation is provided This product should be operate...

Страница 4: ... C Monitor Cables 7 How to install the WIFI Dongle 8 Attaching the 2nd Display 9 Attaching the MSR 10 Attaching the EMV Reader 11 Attaching the iButton Reader 12 Removing the 2nd Display 13 Removing the MSR 14 Removing the EMV Reader 15 Removing the iButton Reader 16 I O Connection 17 Product Dimensions 18 Appendix A Driver Install 19 1 ...

Страница 5: ...2 JAZZ BASE151 JAZZ KIOSK BASE151 w o stand Power Cord RJ 50 to DB 9M Cable x 2 DC Power Supply Package Overview 2nd Display Optional EMV Reader Optional MSR Optional iButton Reader Optional User Manual ...

Страница 6: ...Product Overview JAZZ BASE151 is an 15 inch touch display module designed for point of sale applications Front View stand is option Bottom View 3 ...

Страница 7: ...ce USB Storage SSD Two M 2 2280 Slots one 128GB SSD Std Monitor System Power button 1 x with Power indicator Blue color when power ON USB 4 x Type C female From CPU BOX by one DP USB3 0 Accessory device Left said by one USB2 0 only 5V 0 5A Accessory device Right said by one USB2 0 only 5V 0 5A 2nd Display up said by one USB2 0 only 5V 1 5A 1 x Type A female USB2 0 only 5V 0 5A Speaker Output Mono ...

Страница 8: ...Humidity 5 80 non condensing Dimension W x D x H LCD 0 degree 517 44 x 54 08 x 313 31mm Weight N W G W 5 4kg 7 1kg JAZZ BASE151 2 3kg 3 8kg JAZZ KIOSK BASE151 OS support J1900 i3 Windows 7 Professional for Embedded Systems Windows Embedded POSReady 7 Windows 10 Linux OS support i5 Windows 10 Linux This specification is subject to change without prior notice 5 ...

Страница 9: ... into position as shown in the step 2 diagram 3 Remove the back cover as seen in the step 3 diagram 4 Insert the Processor Module as seen in the step 4 diagram 5 To connect the USB cable to Processor Module per step 5 diagram 6 Replace the back cover as shown in the step 6 diagram 6 2 3 4 7 6 5 1 ...

Страница 10: ...he stand bottom cover as seen in the step1 diagram 3 Connect the USB C and power cable to the appropriate connectors as seen in the step 2 diagram 4 Replace the stand cover and tighten 4 screws as seen in the step 3 diagram 5 Keep additional cables in order by using the cable mount as seen in the step 4 diagram 7 1 3 4 2 ...

Страница 11: ... Lay the LCD flat on an even surface 2 Remove the MB cover as seen in the step 2 diagram 3 Insert the WIFI Dongle to the appropriate as seen in the step 3 4 diagram 4 Re attach the arm cover as seen in the step 6 diagram 2 3 4 1 5 6 8 ...

Страница 12: ...ve the rear cover cap from monitor 2 a Rotate 2nd display and move the bracket into position b insert the thumb screw 3 Remove the display arm cover from 2nd display 1 Remove the thumb screw from 2nd display 5 Move the 2nd display into monitor 6 Fix the 4 screws in 2nd display with monitor 7 Re attach the display arm cover to 2nd display a b ...

Страница 13: ...taching the MSR Before attaching the MSR to your monitor please make sure your monitor and computer are turned off 10 Insert the MSR to the appropriate as seen in the diagram 2 1 Remove the rear cover cap ...

Страница 14: ... EMV Reader Before attaching the EMV Reader to your monitor please make sure your monitor and computer are turned off 11 Insert the EMV Reader to the appropriate as seen in the diagram 2 1 Remove the rear cover cap ...

Страница 15: ...utton Reader Before attaching the iButton Reader to your monitor please make sure your monitor and computer are turned off Insert the iButton Reader to the appropriate as seen in the diagram 2 1 Remove the rear cover cap ...

Страница 16: ... Move the 2nd display from monitor 4 Attached the rear cover cap to monitor 2 Remove the 4 screws in 2nd display 1 Uninstall the display arm cover from 2nd display 5 Install the display arm cover to 2nd display 7 Insert the thumb screw to 2nd display 6 a Remove the thumb screw b Rotate 2nd display and move the bracket into position b a ...

Страница 17: ...monitor please make sure your monitor and computer are turned off 4 Attached the rear cover cap Attached the rear cover cap to monitor Remove rear cover cap from monitor 1 a Release the hook by a slim needle b Remove the MSR as seen in diagram 2 3 a b ...

Страница 18: ... to your monitor please make sure your monitor and computer are turned off 4 Attached the rear cover cap Attached the rear cover cap to monitor Remove rear cover cap from monitor 1 a Release the hook by a slim needle b Remove EMV as seen in diagram 2 3 b a ...

Страница 19: ...to your monitor please make sure your monitor and computer are turned off 4 Attahced the rear cover cap Attached the rear cover cap to monitor Remove rear cover cap from monitor 1 a Release the hook by a slim needle b Remove iButton as seen in diagram 2 3 b a 16 ...

Страница 20: ...I O connection 17 USB C USB C USB 3 0 USB 3 0 USB 3 0 USB 3 0 COM 2 COM 1 LAN DC 19V USB 3 0 USB 3 0 ...

Страница 21: ...18 Product Dimensions 340 0 267 0 382 9 201 0 ...

Страница 22: ... A Driver Installation To download the most recent drivers and utilities and obtain advice regarding the installation of your equipment please visit the AURES Technical Support Website www aures support com 19 ...

Отзывы: