10
USER’S MANUAL
YUNO-K270 I ART-04027
Rev.C
Страница 1: ...10 USER S MANUAL YUNO K270 I ART 04027 Rev C...
Страница 2: ...pment and the receiver Connect the equipment into an outlet on a circuit different from that to which the receiver is connected Consult the dealer or an experienced radio or television technician for...
Страница 3: ...nings must not be blocked or covered The openings should never be blocked by placing the product on a bed sofa rug or other similarsurface This product should never be placed near or over a radiator o...
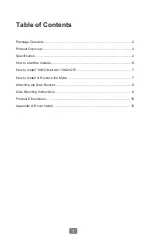
Страница 4: ...oduct Overview 3 Specification 4 How to start the module 6 How to Install YUNO board to YUNO K270 7 How to Install or Remove the Mylar 7 Attaching the Side Bracket 8 Side Mounting Instructions 9 Produ...
Страница 5: ...2 2 10 Package Overview YUNO K270 BLACK Power Cord DC Power Supply RJ 50 to DB 9M Cable x 2 User Manual Side Bracket Set x 2 Bracket Screws M4 x L8 x 8 pcs Mylar x 8 Thermal Pad Foam Tape...
Страница 6: ...3 3 10 Product Overview YUNO K270 is a 27 inch panel PC designed for point of sale and kiosk applications This product is of a modular design enabling easy maintenance Front View Back View...
Страница 7: ...x 2 5 7mm SATA MLC SSD Side I O Power button 1 x with Power indicator Blue color when power ON USB 1 x USB 2 0 and 1 x USB 3 0 2 x USB 3 0 Rear Bottom I O DC IN jack 1 x Radio jack connector for 19VDC...
Страница 8: ...t Operating Temperature 0 35 C 32 F 95 F Storage Temperature 20 C 60 C 4 F 140 F Humidity 20 80 non condensing Dimension W x D x H LCD 0 degree 385 03 x 64 10 x 644 60mm Weight N W G W 8 04kg 10 55kg...
Страница 9: ...How to start the module 1 Remove the cover of module 2 Connect the DC adapter to the power connector on the module 3 Press the Power Switch button to ON OFF the module 4 Add the cover to module Power...
Страница 10: ...mounting holes see below 3 To install a cover simply place it on one of the holes 4 To remove a cover use a pointed object to dislodge it Take the thermal pad from accessory box and remove one side o...
Страница 11: ...acket B Bracket A Bracket B or Bracket B Bracket A Depending on your mounting scheme alternately you may use the side brackets to mount your displays onto your wall or device Find a suitable location...
Страница 12: ...9 9 10 Mounting Instructions The monitor can be mounted on a wooden or concrete wall with 8 screws and two pairs of opposing brackets OR 1 0 220 0 1 0 186 0 4 1 51 6 20 0 37 4...
Страница 13: ...n To download the most recent drivers and utilities and obtain advice regarding the installation of your equipment please visit the AURES Technical Support Website www aures support fr French www aure...