background image

50

IT

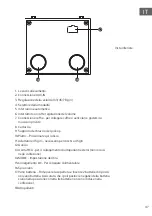
Perno guida 

(interno)

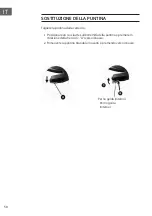
SOSTITUZIONE DELLA PUNTINA

Togliere la puntina dalla cartuccia.

1.  Posizionare un cacciavite sull'estremità della puntina e premere in 

direzione della freccia (v. "A") verso il basso.

2.  Rimuovere la puntina tirandola in avanti e premendo verso il basso

Perno guida (interno)

Содержание 10039050

Страница 1: ...w w w a u n a m u l t i m e d i a c o m TT Classic Chrono Plattenspieler Record Player Platine vinyle Tocadiscos Giradischi 10039050 10039051 ...

Страница 2: ......

Страница 3: ...zur Entsorgung 12 Sehr geehrter Kunde wir gratulieren Ihnen zum Erwerb Ihres Gerä tes Lesen Sie die folgenden Hinweise sorgfäl tig durch und befolgen Sie diese um möglichen Schäden vorzubeugen Für Schäden die durch Missachtung der Hinweise und unsachgemäßen Gebrauch entstehen übernehmen wir keine Haf tung Scannen Sie den folgenden QR Code um Zugriff auf die aktuellste Bedienungsanleitung und weite...

Страница 4: ...tig vermeiden Sie Stöße Blockieren Sie nicht den Ausfall der Geräteausgänge Stellen Sie das Gerät nicht in der Nähe einer Wärmequelle z B einem Heizkörper auf Setzen Sie das Gerät nicht der Sonne aus Schließen Sie das Gerät wie in dieser Bedienungsanleitung angegeben an Zur Reinigung des Gerätes beachten Sie bitte die Empfehlungen des Hinweises Das Netzkabel sollte abgezogen werden wenn Sie es übe...

Страница 5: ...arf nicht verstopft sein ODER sollte bei bestimmungsgemäßer Verwendung leicht zugänglich sein Übermäßiger Schalldruck von Ohrhörern und Kopfhörern kann zu Hörverlust führen Halten Sie Mindestabstand 8 cm um das Gerät herum für ausreichende Belüftung ein Die Belüftung darf nicht dadurch behindert werden dass die Belüftungsöffnung mit Gegenständen wie Zeitungen Tischdecken Vorhängen usw abgedeckt wi...

Страница 6: ...6 DE GERÄTEÜBERSICHT 1 2 3 5 7 4 6 9 8 11 10 13 14 15 12 12 16 Draufsicht Seitenansicht Vorderansicht ...

Страница 7: ...te hier 11 45 UpM Adapter wird bei 45 UpM Schallplatten benötigt 12 Aufhängung 13 RCA Ausgang zum Anschluss externer Lautsprecher nicht im Lieferumfang enthalten 14 MODE Zeiteinstellung 15 DC Anschluss Zum Anschluss des Netzadapters 16 Zeitanzeige 17 Batteriefach Entfernen Sie die Abdeckung und legen Sie 2 Batterien des Typs AA in das Batteriefach ein Stellen Sie sicher dass die positiven und nega...

Страница 8: ...challplatte Drücken Sie den Lifthebel nach vorne um den Tonarm langsam auf die gewünschte Position auf der Schallplatte abzusenken 6 Die automatische Stoppfunktion bezieht sich insbesondere auf 33 UpM Schallplatten Wenn der automatische Stoppschalter sich in der Position ON befindet wird die Schallplatte automatisch gestoppt wenn diese am Ende angelangt ist Wenn die automatische Stoppfunktion deak...

Страница 9: ...Sie lange die Taste MODE drücken beginnt die Stundenanzeige zu blinken Drücken Sie kurz die Taste MODE um die gewünschte Stunde einzustellen Drücken Sie die Taste anschließend lange um Ihre Eingabe zu bestätigen Die Minutenanzeige beginnt zu blinken Drücken Sie kurz die Taste MODE um die gewünschten Minuten einzustellen Drücken Sie die Taste anschließend lange um Ihre Eingabe zu bestätigen Hinweis...

Страница 10: ... Entfernen der Nadel von der Kartusche 1 Platzieren Sie einen Schraubenzieher an der Spitze der Nadel und drücken Sie in Pfeilrichtung siehe A nach unten 2 Entfernen Sie die Nadel indem Sie diese nach vorne ziehen und nach unten drücken Führungszapfen innen ...

Страница 11: ... die Nadelspitze regelmäßig mit einer weichen Bürste indem Sie vorsichtig von hinten nach vorne streichen Wenn Sie eine Nadelreinigungsflüssigkeit verwenden müssen gehen Sie sehr sparsam damit um Wischen Sie die Staubabdeckung und das Gehäuse des Plattentellers vorsichtig mit einem weichen Tuch ab Verwenden Sie nur eine kleine Menge eines milden Reinigungsmittels um den Plattenteller und die Staub...

Страница 12: ...ten Sie von Ihrer örtlichen Verwaltung oder Ihrem Hausmüllentsorgungsdienst Dieses Produkt enthält Batterien Wenn es in Ihrem Land eine gesetzliche Regelung zur Entsorgung von Batterien gibt dürfen die Batterien nicht im Hausmüll entsorgt werden Informieren Sie sich über die örtlichen Bestimmungen zur Entsorgung von Batterien Durch regelkonforme Entsorgung schützen Sie die Umwelt und die Gesundhei...

Страница 13: ...ormance 21 Disposal Considerations 22 Dear Customer Congratulations on purchasing this equipment Please read this manual carefully and take care of the following hints to avoid damages Any failure caused by ignoring the items and cautions men tioned in the instruction manual are not covered by our warranty and any liability Scan the QR code to get access to the latest user manual and other informa...

Страница 14: ... heat source e g radiator Do not expose it to the sun Plug the device as indicate on this information form For cleaning the device please follow the recommendations of the notice The power cord should be unplugged when not using for a long period of time Device shall be repaired by a qualified person when a the power cord is damaged b objects have fallen into the apparatus or a liquid has been spi...

Страница 15: ...hall be disconnected from the mains as the disconnect devices is the mains plug of apparatus The mains plug of apparatus should not be obstructed or should be easily accessed during intended use Excessive sound pressure form earphones and headphones can cause hearing loss Minimum distance 8 cm around the apparatus for sufficient ventilation The ventilation should not be impeded by covering the ven...

Страница 16: ...16 EN PRODUCT OVERVIEW 1 2 3 5 7 4 6 9 8 11 10 13 14 15 12 12 16 Top view Side view Front view ...

Страница 17: ...Tone arm clip 10 Platter Place your record here 11 45 rpm adapter Used for 45 rpm vinyl records 12 Hinge 13 RCA output Used to connect to external speakers not included 14 MODE Used to set the time 15 DC port Used to connect power adapter 16 Time display 17 BATTERY COMPARTMENT Remove the cover and place 2 AA batteries into this compartment Be sure the positive and negative poles of the batteries a...

Страница 18: ...se the tone arm Push the lift lever backward to raise the tone arm and gently move the tone arm to the desired position over the record 6 The auto stop function applies to most 33 rpm vinyl records If the auto stop control switch is turned ON the record will stop automatically when finished If the auto stop control switch is turned OFF the record will not stop automatically when finished LINE IN M...

Страница 19: ... Press the MODE button the Hour Time will start to flash then short press the MODE button to set the hour time and then long press the button again to confirm the Hour Time at the same time Minutes time start to flash then short press the MODE button to set the minutes time and then long press the button to confirm the minutes time Remark Put 2 AA batteries in the battery slot to maintain the time...

Страница 20: ...EPLACE THE TURNTABLE STYLUS NEEDLE Removing the Stylus from the cartridge 1 Place a screwdriver at the tip of the stylus and push downward as shown in direction A 2 Remove the stylus by pulling the stylus forward and pushing downward ...

Страница 21: ...he needle against the turntable platter or record edge Frequently clean the needle tip use a soft brush in a back to front motion only If you must use a needle cleaning fluid use very sparingly Gently wipe the dust cover and turntable housing with a soft cloth Use only a small amount of mild detergent to clean the turntable and dust cover Never apply harsh chemicals or solvents to any part of the ...

Страница 22: ... your local authority or your household waste disposal service This product contains batteries If there is a legal regulation for the disposal of batteries in your country the batteries must not be disposed of with household waste Find out about local regulations for disposing of batteries By disposing of them in accordance with the rules you are protecting the environment and the health of your f...

Страница 23: ...formations sur le recyclage 32 Cher client chère cliente Toutes nos félicitations pour l acquisition de ce nouvel appareil Lisez attentivement les in dications suivantes et suivez les pour éviter d éventuels dommages Nous ne saurions être tenus pour responsables des dommages dus au non respect des consignes et à la mauvaise uti lisation de l appareil Scannez le QR Code pour obtenir la dernière ver...

Страница 24: ...z pas l appareil à proximité d une source de chaleur radiateur par exemple N exposez pas l appareil au soleil Branchez l appareil exactement comme indiqué dans le mode d emploi Pour nettoyer l appareil veuillez suivre les recommandations des consignes Débranchez le cordon d alimentation si vous n utilisez pas l appareil pendant une longue période L appareil doit être réparé par un personnel qualif...

Страница 25: ...lement accessible pour l utilisation prévue Une pression acoustique excessive du casque ou des écouteurs peut entraîner une perte auditive Maintenez une distance minimale 8 cm autour de l appareil pour une ventilation adéquate La ventilation ne doit pas être entravée en recouvrant son ouverture avec des articles tels que journaux nappes rideaux etc Aucune flamme nue ne doit être placée sur l appar...

Страница 26: ...26 FR APERÇU DE L APPAREIL 1 2 3 5 7 4 6 9 8 11 10 13 14 15 12 12 16 Vue de haut Vue de côté Vue de face ...

Страница 27: ...cez le disque ici 11 Adaptateur 45 tours nécessaire pour écouter les 45 tours 12 Suspension 13 Sortie RCA pour brancher des enceintes externes non fournies 14 MODE réglage de l heure 15 Prise CC pour brancher l adaptateur secteur 16 Affichage de l heure 17 Compartiment à piles Retirez le couvercle et insérez 2 piles AA dans le compartiment à piles Assurez vous que les bornes positive et négative d...

Страница 28: ...récaution jusqu à la position souhaitée au dessus du disque Tirez le levier vers l avant pour abaisser lentement le bras de lecture jusqu à la position souhaitée sur le disque 6 La fonction d arrêt automatique concerne notamment les disques 33 tours Lorsque l interrupteur d arrêt automatique est en position ON le disque s arrête automatiquement en fin de lecture Si la fonction d arrêt automatique ...

Страница 29: ... l appareil dans la prise 2 Appuyez longuement sur la touche MODE les chiffres des heures se mettent à clignoter Appuyez brièvement sur MODE pour régler l heure souhaitée Appuyez ensuite longuement sur la touche pour valider votre saisie L affichage des minutes se met à clignoter Appuyez brièvement sur MODE pour régler les minutes Appuyez ensuite longuement sur la touche pour valider votre saisie ...

Страница 30: ... DE LECTURE AIGUILLE Pour retirer l aiguille de la cartouche 1 Placez un tournevis sur la pointe de l aiguille et appuyez dans le sens de la flèche voir A 2 Retirez l aiguille en la tirant vers l avant et en la poussant vers le bas Goupille de guidage à l intérieur ...

Страница 31: ... Nettoyez régulièrement la pointe de l aiguille avec une brosse douce en frottant doucement de l arrière vers l avant Si vous devez utiliser du liquide de nettoyage pour aiguilles utilisez en avec parcimonie Essuyez doucement le couvercle anti poussière et le boîtier du plateau avec un chiffon doux N utilisez qu une petite quantité de détergent doux pour nettoyer le plateau et le couvercle anti po...

Страница 32: ...orité locale ou votre service d élimination des déchets ménagers Ce produit contient des piles S il existe une réglementation légale pour l élimination des piles dans votre pays ne les jetez pas avec les ordures ménagères Renseignez vous sur les réglementations locales concernant la mise au rebut des piles En respectant des règles de recyclage vous protégez l environnement et la santé de vos sembl...

Страница 33: ...a retirada del aparato 42 Estimado cliente Le felicitamos por la adquisición de este produc to Lea atentamente el siguiente manual y siga cuidadosamente las instrucciones de uso con el fin de evitar posibles daños La empresa no se responsabiliza de los daños ocasionados por un uso indebido del producto o por haber desaten dido las indicaciones de seguridad Escanee el siguiente código QR para obten...

Страница 34: ... la unidad cerca de una fuente de calor por ejemplo un radiador No lo exponga a la luz del sol Conecte el dispositivo como se describe en este manual Para limpiar el dispositivo siga las recomendaciones indicadas El cable de alimentación debe desconectarse si no se utiliza la unidad durante un largo período de tiempo Una persona cualificada debe reparar la unidad si a el cable de alimentación está...

Страница 35: ...O debe ser fácilmente accesible para el uso previsto La presión sonora excesiva de los auriculares y audífonos puede causar pérdida de audición Mantenga una distancia mínima 8 cm alrededor de la unidad para una ventilación adecuada No obstruya la ventilación cubriendo la abertura de ventilación con objetos como periódicos manteles cortinas etc No coloque fuentes de llama abierta tales como velas e...

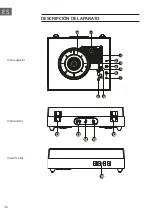
Страница 36: ...36 ES DESCRIPCIÓN DEL APARATO 1 2 3 5 7 4 6 9 8 11 10 13 14 15 12 12 16 Vista superior Vista lateral Vista frontal ...

Страница 37: ... que se colocan los discos 11 Adaptador para 45 RPM es necesario para discos de 45 RPM 12 Suspensión 13 Salida RCA para conectar altavoces externos no incluidos 14 MODE Configurar el tiempo 15 Conexión DC Para conectar el adaptador de red 16 Visualización de la hora 17 Compartimento de las pilas Retire la tapa e introduzca 2 pilas AA en el compartimento de las pilas Asegúrate de que los polos posi...

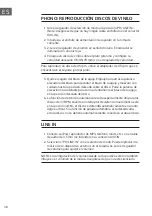
Страница 38: ...sta la posición deseada sobre el disco Pulse la palanca de elevación hacia delante para colocar lentamente el brazo de la aguja en la posición deseada del disco 6 La función de detención automática resulta especialmente útil para los discos de 33 RPM Cuando el interruptor de detención automática esté en la posición ON el disco se detendrá automáticamente en cuanto llegue al final Si la función de ...

Страница 39: ...l aparato en la toma de corriente 2 Si pulsa el botón MODE durante un tiempo prolongado la indicación de la hora comienza a parpadear Pulse brevemente el botón MODE para ajustar la hora deseada A continuación mantenga pulsado el botón para confirmar su entrada El indicador de minutos comienza a parpadear Pulse brevemente el botón MODE para ajustar los minutos deseados Pulse brevemente el botón MOD...

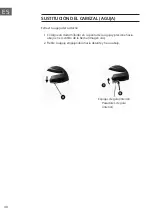
Страница 40: ...ÓN DEL CABEZAL AGUJA Extraer la aguja del cartucho 1 Coloque un destornillador en la punta de la aguja y presione hacia abajo en el sentido de la flecha imagen A 2 Retire la aguja empujándola hacia delante y hacia abajo Espigas de guía interior ...

Страница 41: ...unta de la aguja periódicamente y pase con cuidado un cepillo suave de la parte trasera a la delantera De tener que utilizar un líquido de limpieza de agujas procure utilizar la menor cantidad posible Pase con cuidado un paño suave por la cubierta y la carcasa del giradiscos Utilice solo una cantidad pequeña de un producto de limpieza suave para limpiar el giradiscos y la cubierta de protección Nu...

Страница 42: ... póngase en contacto con su ayuntamiento o con el servicio de eliminación de residuos domésticos Este producto contiene baterías Si en su país existe una normativa para la eliminación de baterías estas no deben ser arrojadas al cubo de la basura común Infórmese sobre la legislación de su país que regula la retirada y eliminación de las pilas y baterías La retirada y eliminación de pilas conforme a...

Страница 43: ...1 Avviso di smaltimento 52 Gentile cliente la ringraziamo per l acquisto del dispositivo La preghiamo di leggere attentamente le seguenti istruzioni per l uso e di seguirle per evitare possi bili danni Non ci assumiamo alcuna responsabili tà per danni scaturiti da una mancata osservanza delle avvertenze di sicurezza e da un uso impro prio del dispositivo Scansionare il codice QR se guente per acce...

Страница 44: ...ositivo vicino a fonti di calore ad es un termosifone Non esporre il dispositivo al sole Collegare il dispositivo esattamente come indicato nel manuale Per pulire il dispositivo rispettare le indicazioni fornite Scollegare il cavo se il dispositivo non viene utilizzato per lunghi periodi Il dispositivo deve essere riparato da una persona qualificata se a Il cavo di alimentazione è danneggiato b So...

Страница 45: ...ilmente accessibile Un pressione sonora eccessiva da cuffie e auricolari può causare la perdita dell udito Tenere una distanza minima 8 cm intorno al dispositivo per garantire una ventilazione sufficiente Non ostacolare la ventilazione Non coprire le aperture di ventilazione con oggetti come giornali tovaglie tende ecc Non poggiare fiamme libere sul dispositivo come ad es candele accese Il disposi...

Страница 46: ...46 IT DESCRIZIONE DEL DISPOSITIVO 1 2 3 5 7 4 6 9 8 11 10 13 14 15 12 12 16 Vista superiore Vista laterale Vista anteriore ...

Страница 47: ... Posizionare qui il disco 11 Adattatore 45 giri necessario per dischi a 45 giri 12 Gancio 13 Uscita RCA per il collegamento di altoparlanti esterni non inclusi nella confezione 14 MODE Impostazione dell ora 15 Collegamento DC Per collegare l alimentatore 16 Spia orario 17 Vano batteria Rimuovere la copertura e inserire 2 batterie di tipo AA nel vano batteria Assicurarsi che i poli positivi e negat...

Страница 48: ...a del disco Spingere in avanti la leva di sollevamento per abbassare lentamente il pick up alla posizione desiderata sul disco 6 La funzione di arresto automatico si riferisce in particolare ai dischi a 33 giri Se l interruttore di arresto automatico si trova in posizione ON il disco si arresta automaticamente una volta giunto alla fine Se la funzione di arresto automatico è disattivata il piatto ...

Страница 49: ...remuto il tasto MODE l indicazione dell ora inizia a lampeggiare Premere il tasto MODE per impostare l ora Quindi tenere premuto lo stesso tasto per confermare l impostazione L indicazione dei minuti inizia a lampeggiare Premere il tasto MODE per impostare i minuti Quindi tenere premuto lo stesso tasto per confermare l impostazione Nota inserire 2 batterie di tipo LR6 AA nel vano batterie affinché...

Страница 50: ... PUNTINA Togliere la puntina dalla cartuccia 1 Posizionare un cacciavite sull estremità della puntina e premere in direzione della freccia v A verso il basso 2 Rimuovere la puntina tirandola in avanti e premendo verso il basso Perno guida interno ...

Страница 51: ...l bordo Pulire regolarmente la puntina con una spazzola morbida passandola delicatamente partendo dal dietro e muovendosi in avanti Se è necessario utilizzare un liquido per puntine usarne solo lo stretto indispensabile Pulire la copertura antipolvere e l alloggiamento con un panno morbido facendo attenzione Usare solo piccole quantità di detergente delicato per pulire piatto rotante e copertura N...

Страница 52: ... disponibili presso l amministrazione locale o il servizio di smaltimento dei rifiuti Questo prodotto contiene batterie Se nel vostro Paese sono presenti regolamenti legislativi per lo smaltimento di batterie queste non possono essere smaltite nei rifiuti casalinghi Informarsi in relazione alle normative locali sullo smaltimento di batterie Lo smaltimento conforme tutela l ambiente e salvaguarda l...

Страница 53: ......

Страница 54: ......

Отзывы: