52
EN
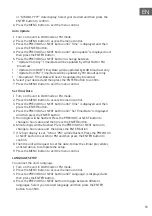
Timer on/off setup
1.
Turn off the unit in Standby mode.
2.
Press and hold the TIMER button to set the timer on/off. It will display
“On Timer”.
3. Press the PREVIOUS or NEXT button to set the on timer hour value. Then
press the TIMER button to confirm.
4. Press the PREVIOUS or NEXT button to set the on timer minute value.
Then press the TIMER button to confirm. It will display “Off Timer”.
5.
Press the TIMER button to the next selection.
6.
Press the PREVIOUS or NEXT button to set the off timer hour value. Then
press the TIMER button to confirm.
7.
Press the PREVIOUS or NEXT button to set the off timer on minute value.
Then press the TIMER button to confirm.
8. Press the PREVIOUS or NEXT button to set the timer on source (DISC,
USB, DAB, FM,BUZZ). Then press the TIMER button to confirm.
9. Press the PREVIOUS or NEXT button to set the timer on volume level.
The press the TIMER button to finish the timer on/off setup.
10. Press the TIMER button to activate the timer schedule. A timer symbol
will be shown on the display.
Note:
Press the TIMER button again will deactivate the timer schedule.
Time setup
This setup allows you to setup 4 different display modes. They are set Time/
Date, time update mode, set 12/24 hour display and set date format
Set 12/24 Hour Display
1. Turn on the unit in DAB mode or FM mode.
2. Press the MENU button to access the menu control.
3. Press the PREVIOUS or NEXT button until “Time” is displayed and then
press the ENTER button.
4. Press the PREVIOUS or NEXT button until “Set 12/24 hour” is displayed
and then press the ENTER button.
5. Press the PREVIOUS or NEXT button to toggle between 12 or 24 hour
display. Select your desired and then press the ENTER button to confirm.
6.
Press the MENU button to exit the menu control.
Set Date Format
1. Turn on the unit in DAB mode or FM mode.
2. Press the MENU button to access the menu control.
3. Press the PREVIOUS or NEXT button until “Time” is displayed and then
press the ENTER button.
4. Press the PREVIOUS or NEXT button until “Set date format” is displayed
and then press the ENTER button.
5. Press the PREVIOUS or NEXT button to toggle between “DD-MM-YYYY”
Содержание 10034086
Страница 2: ......
Страница 8: ...8 DE GERÄTEÜBERSICHT 18 ...
Страница 15: ...15 DE Stehende Installation ...
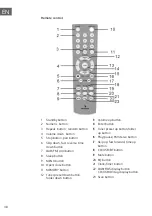
Страница 36: ...36 EN OVERVIEW 18 ...
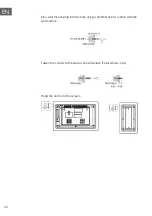
Страница 40: ...40 EN SYSTEM CONNECTIONS Make sure to unplug the AC DC power lead before making any connections ...
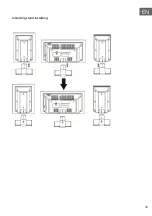
Страница 43: ...43 EN Installing stand installing ...
Страница 62: ...62 FR APERÇU DE L APPAREIL 18 ...
Страница 69: ...69 FR Installation sur pied ...
Страница 90: ...90 ES VISTA GENERAL DEL APARATO 18 ...
Страница 97: ...97 ES Montaje en posición vertical ...
Страница 118: ...118 IT DESCRIZIONE DEL DISPOSITIVO 18 ...
Страница 125: ...125 IT Posizione di montaggio verticale ...
Страница 141: ......
Страница 142: ......
Страница 143: ......

