background image

17

Connection

16

Description

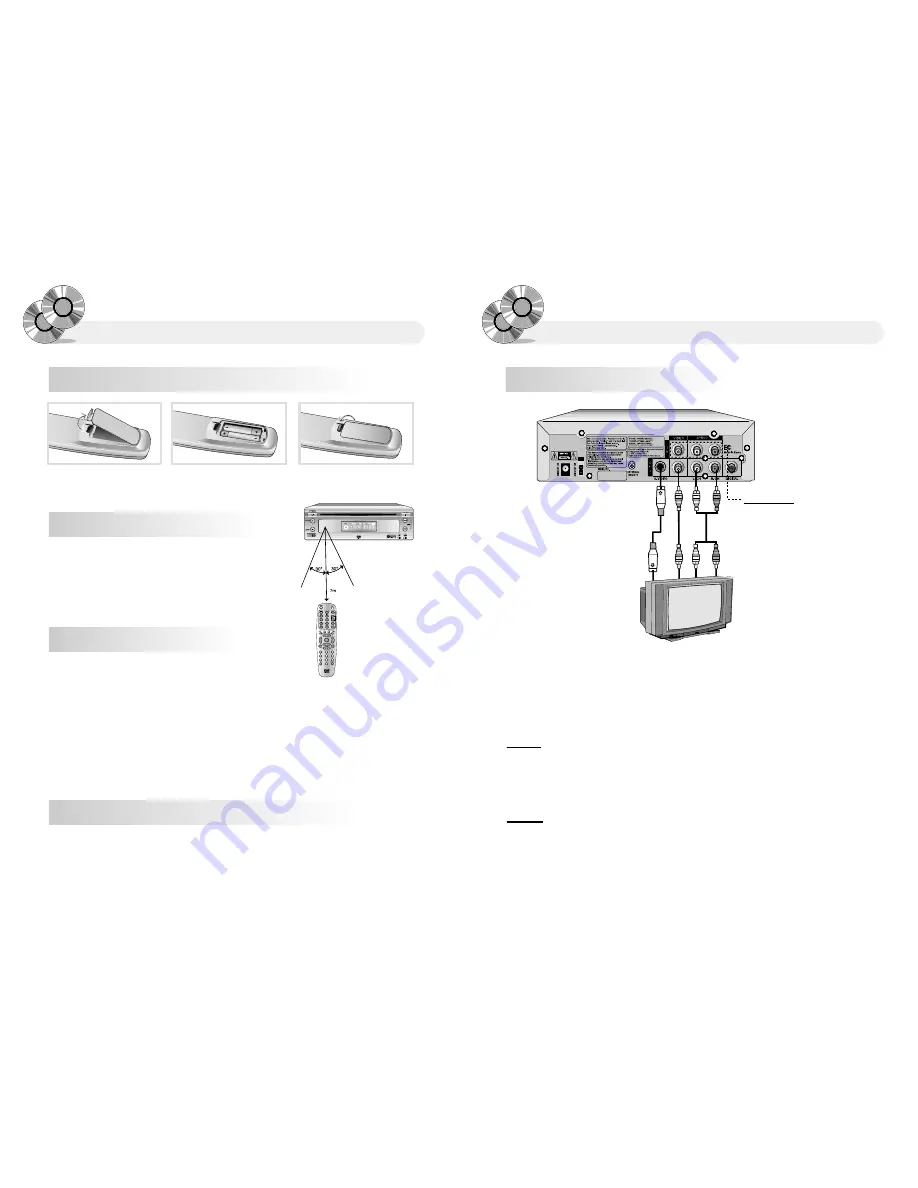
Installing Batteries in the Remote Control

Connecting to a TV/Monitor

Using the Remote controller

1.  Press the tab and lift up the battery

cover

The effective operating range of the remote control

16 feet, and 30° left or right of the from the DVDIR

receiver.

Battery Handling Precaution

Incorrect use of the battery cause leakage or corrosion.

Ensure that polarities are correct when inserting batteries.

Do not expose to impose heat or fire. Do not disassemble or short-circuit the batteries.

Ensure that exhausted batteries are not inserted into the remote control.

Do not use different types of batteries together. Do not use old batteries together with new ones.

If you don't use the remote controller for a long time, remove the batteries to avoid possible damage

from battery corrosion.

Replace the batteries with new ones if the remote controller does not operate  or the operating distance

comes to be short.

Remote controller handling precaution

Do not leave a remote control  in a hot or damp place.

Do not drop place a heavy object on the remote control. 

Do not disassemble remote control.

Do not get wet.

2. Insert new batteries and ensure 

that the polarity is correct when
installing.

3.  Slide and Close the battery cover.

1. Connect the audio cables between the AUDIO OUT (L/R) jacks on the back of your DVD player and the 

corresponding Audio Input jacks on your TV/Monitor. 

2. Connect the video cable between the VIDEO OUT jack on the back of your DVD player and the

corresponding Video Input jack on your TV/Monitor. (If you have S-video jack on you TV/Monitor, connect

this jack.)

C

C

a

a

u

u

t

t

i

i

o

o

n

n

When you connect the DVD player to your TV/Monitor, be sure to turn off the power and unplug

both 

units before making any connection.

Connet the DVD player to your TV/Monitor directly.

If you connect the DVD player to a VCR, the playback picture will be distorted because DVD  
video discs are copy protected.

W

W

a

a

r

r

n

n

i

i

n

n

g

g

Do not set the Digital Audio Output of this DVD player to "PCM" unless you are connecting the 

Digital Audio jack of this DVD player to an AV decoder that has Dolby Digital decoding function.

R

Re

effe

erre

en

nc

ce

e ::

You can connect auxiliary
devices in this port, such
as VCR.

Audio Cable

Video 
Cable

S-Video 

Cable

Содержание MMDV4

Страница 1: ... model and serial number of your new DVD player are located on the back of the DVD player cabinet For your future convenience we suggest that you record these numbers here MODEL NO SERIAL NO MMDV4 MADE IN KOREA 128 6970 2004 AEC 150 Marcus Blvd Hauppauge N Y 11788 1286970 1286970 ...

Страница 2: ...om the type of power source indicated on the marking label If you are not sure of the type of power supply in your home consult your product dealer or local power company For products intended to operate from battery power or other sources refer to the operating instructions Connect the unit to a switched ACC line in your vehicle There should be 12vdc with the key in the ACC or Run position 3 Vent...

Страница 3: ... touch dangerous voltage points or short out parts that could result in a fire or electric shock Never spill liquid of any kind on the product 9 Attachments Do not use attachments not recommended by the product manufacturer as they may cause hazards 10 Accessories Carts and Stands Do not place this product on an unstable cart stand tripod bracket or table The product may fall causing serious injur...

Страница 4: ...6K 3 O2 X Y eV W 6K O X MB Yf N UI W 6X N W2 X 0MS Hf V I W 6X hf W2 0MS 0Y J Y g3 1 V4 UI4 K W MS Me7 5 gV L V UI X hf hfW M W Me 7 HhV LeI X I 6Xhf hf O 0YW Y J Y g N 1eV XV4 Khf he W 0Y W Y eJ 5 h N 1e N X V X he he W2 M W Ye 7 Hhe3 L V X I 6Xhe heW MeW Yf7 H he f3 X V Xhe heW Y 7 Y eJ 5 heN 1 eV 1eV X h h W Y W H e J 5hf3 L eV 1eV X h he7 YeJ Yf7 H he 3 e V L V 1 h hW Ye 7 5f 7 HhfN 1 e V L V ...

Страница 5: ...TV MONITOR 17 Connecting to a Dolby Digital Amp 18 Before playing Your DVD Disc 19 Playing a DVD disc DVD CD 20 Playing a MP3 file 21 Disc Menu 22 Setting DVD 23 Setting up Language 24 Setting up Video item 26 Setting up Audio item 28 Setting up the Parental Control 30 Selecting Audio languages with the unit in play mode 32 To select Audio Language 32 To select Subtitles Language 33 Confirming Scr...

Страница 6: ... CD PBC MP3 Indicates the type of the disc loaded in the disc tray Rotation Rotates when the disc is spinning Play Pause Indicates the current operation mode Repeat All Indicates the current repeat play mode Chapter Track Illuminates the chapter or track information of the disc playing Angle Indicates that the current disc being played can be viewed from multiple angles Time Indicates time informa...

Страница 7: ...IO OUT Coaxial Use a coaxial cable not provided to connect your DVD player to a compatible Dolby Digital decoder S VIDEO Use the S Video cable not provided to connect this jack to the S Video jack on your an TV or monitor for a higher quality picture 3 9 6 2 1 8 7 4 5 Description W Wa ar rn ni in ng g Use the AC DC Adapter DC 12V 2A when playing the DVD player at home using an external power sourc...

Страница 8: ...ops disc play 15 PAUSE Use this button to pause on a scene 16 PLAY Begin disc play 17 BACK Move to the previous chapter DVD or track CDDA MP3 18 FR Reverses through the disc form 2X to 20X faster 19 NEXT Use to move to the next chapter DVD or track VCD CDDA MP3 20 FF Forward scan through the disc from 2X to 20X faster 21 ARROWS Use to move to the desired menu item 22 ENTER Use this button to confi...

Страница 9: ...not drop place a heavy object on the remote control Do not disassemble remote control Do not get wet 2 Insert new batteries and ensure that the polarity is correct when installing 3 Slide and Close the battery cover 1 Connect the audio cables between the AUDIO OUT L R jacks on the back of your DVD player and the corresponding Audio Input jacks on your TV Monitor 2 Connect the video cable between t...

Страница 10: ... played no disc Connecting to a Dolby Digital Amp DVD disc must be recorded in Dolby Digtal You must have Dolby Digital decoder and 6 channel Amp 5 speakers and 1 bass woofer You must set Digital Out of AC3 at Raw in Audio Setting This product is manufactured by technical co operation with Dolby Laboratories this symbol and trademark are reserved for Dolby Laboratories Dolby Laboratories Inc All r...

Страница 11: ...ding on the recording condition Playing a DVD disc DVD CD Make sure that the disc s label is facing up Sliding into the slot the disc is automatically played To stop Press the button STOP To stop temporarily Press the button Pause To resume again Press the button PLAY Insert the DVD disc R Re ef fe er re en nc ce e The player memorizes the position you pressed the button and if you press the butto...

Страница 12: ...audio out Setting up Parental Control You can set up the parental control level Press the button œ to move each menu Press the button to choose menu you want Press the SETUP button with the unit in Stop mode Press the œ buttons to move to menu you want and press the ENTER button 1 2 Disc Menu You can select the following menu when the menu is recorded in discs To display recorded menu in disc DVD ...

Страница 13: ... recorded in disc 3 4 Setting DVD Setting up Language You can display OSD subtitles or listen audio by language you want OSD Menu when selecting menu language of DVD player Subtitle when selecting subtitles when select Auto it is set up as the first recorded language Audio when selecting language you listen from speakers DVD Menu when selecting language of each menu recorded in disc Default when r...

Страница 14: ...C When connecting to TV with NTSC method PAL When connecting to TV with PAL method Auto Automatically selected depending on disc TV Shape TV System Press the buttons to item you want and press the ENTER button Press the button to exit from the SETUP screen 3 4 Setting DVD Setting up Video item You can set up about screen as following Press the SETUP button with the unit in Stop mode Press the œ bu...

Страница 15: ...eing connected to Dolby Digital Amplifier DolbyDigital Press the button to exit from the SETUP screen 3 Setting DVD Setting up Audio item You can set up as following depending on the connected Audio speaker Press the SETUP button with the unit in Stop mode Press the œ buttons to choose Audio Setting and press the ENTER button 1 2 ...

Страница 16: ...changes each time you press Enter button If you select Rating Level 6 Rating Level 7 8 does not replay The bigger the number is the closer to adult the disc is Setting DVD Setting up the Parental Control This setting prohibits children from viewing inappropriate discs You can grade by 8 rating levels It works with DVD discs that have been assigned a rating Press the SETUP button with the unit in S...

Страница 17: ... Re ef fe er re en nc ce e Audio Languages Subtitles may not operate depending on disc This function does not operate with the unit in pause mode This function operates with the unit in play mode Selecting Audio languages with the unit in play mode SelectingAudiolanguageswiththeunitinplaymode To select Audio Language You can select various language Kor Eng by pressing the LANGUAGE button DVD if di...

Страница 18: ...appears right after loading when playing CD title The total running time is displayed on screen when pressing the Display button The present lapsing time is displayed when pressing the Display button The current title chapter number angle status audio track and subtitle selection 2 DVD On Screen Display Screen display may differ depending discs Press the DISPLAY button 1 The first screen shows the...

Страница 19: ...ress the PAUSE button with the unit in the Pause mode 1 You can step frame by frame each time the PAUSE button is pressed Press the PLAY button to play at normal speed Scanning Screen or Song To Skip Chapters tracks or Songs DVD MP3 Press the button BACK NEXT 1 Moves to beginning of the present chapter track If you press once more it moves to the previous chapter track When you press the BACK butt...

Страница 20: ...s the A B button again Repeating Playback To repeat a chapter title or track DVD CD Press the MODE button 1 Play mode Menu appears on the screen DVD Off When you do not want to repeat playback Title when you want to repeat the present title Chapter when you want to repeat the present chapter CD Off When you do not want to repeat playback Track when you want to repeat the present track Disc when yo...

Страница 21: ...amera Angle does not change When a DVD contains multiple angles of a particular scene you can select the Angle fuction Zoom Angle Functions Enlarging the picture Press the ZOOM button in Play or Pause mode 1 is displayed on screen and the screen ratio is displayed on screen Each press of the ZOOM button enlarges screen in the following sequence 4 3X 3 2X 2X Off You can enlarge the picture up to 3X...

Страница 22: ...sing the numeric buttons and then press the ENTER button 3 Searching to the DesiredChapten Track Time To scan by time for example by 1 hour 5 minutes 15 seconds Press the GOTO button 1 Press the buttons to move to the time item 2 Press the buttons 1 0 5 1 5 using the numeric buttons and then press the ENTER button 3 You can find the desired time title chapter track ...

Страница 23: ...de show plays only JPG JPEG files The JPEG file name can not use some characters Slide show may not play JPEG Disc s depending on the recording format Make sure that the disc s label is facing up Slide show begins from first picture automatically Insert the Disc 1 You can enjoy a slide show by displaying 9 pictures at a time by pressing the Menu button 2 Choose the picture button you want by press...

Страница 24: ...ayer Contact the service center if same phenomenon appears after taking following measures The picture is not seen on the screen while the disc is running or the picture has poor quality and wavers Ensure that TV is turned on Ensure that the power cord is plugged in completely Check if the disc is dirty or damaged Poorly manufactured discs may not operate Check all connections Check if remote cont...

Страница 25: ...48 MEMO ...

Отзывы: