Audiovox MMD7HRPKG - Movies2Go - DVD Player Скачать руководство пользователя страница 6

6

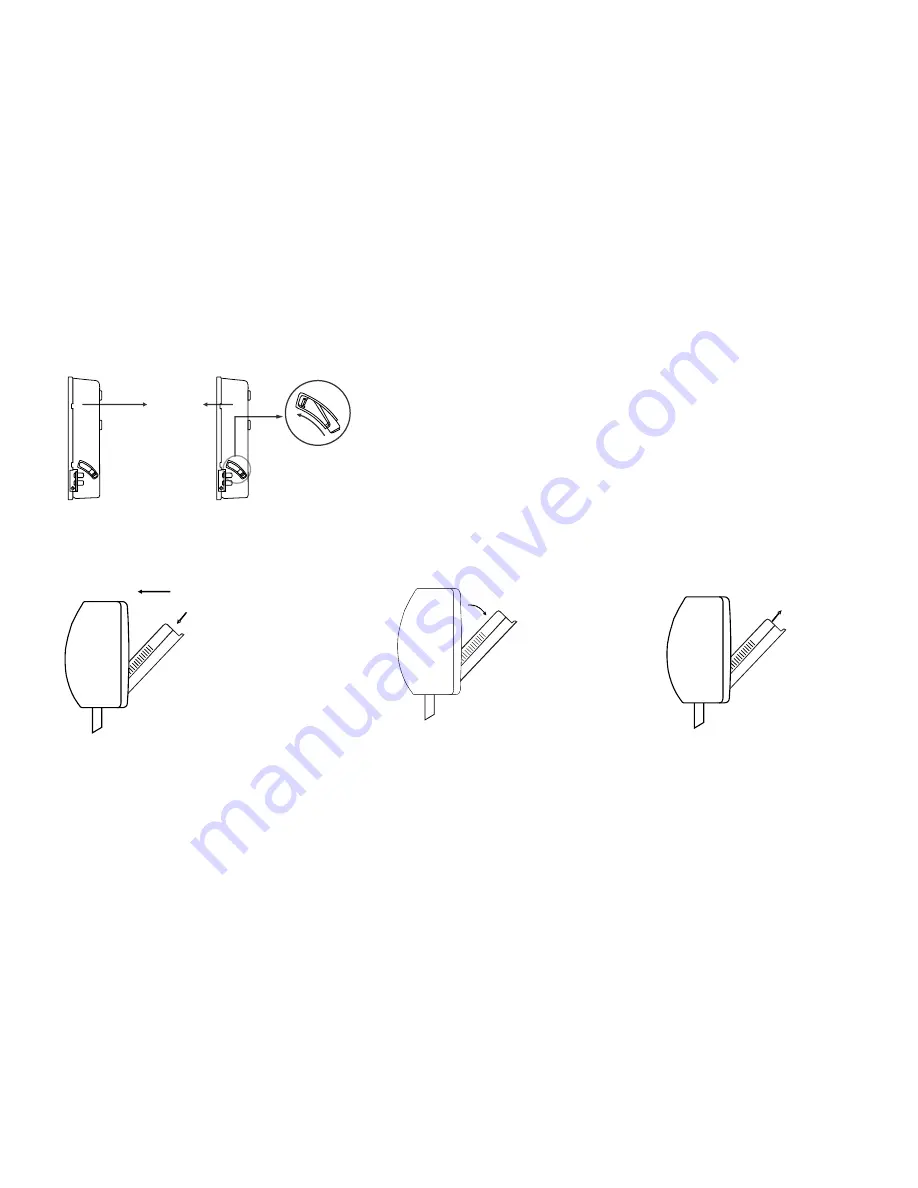
9) Pivot the screen until a comfortable viewing angle reached. The internal lock limits the screen to a maximum adjustment of 30 degrees from closed 

position, the headrest itself can be tilted forward to help achieve a comfortable viewing position.

Inner Ring

Closed Position

Internal Lock

MMD7HRPKG: MMD7HRM Monitor only.

10)  Insert disc

11)  Eject disc

Disc Label

30 degrees

Insert disc

Eject disc

MMD7HRPKG: MMD7HRM Monitor only.

Содержание MMD7HRPKG - Movies2Go - DVD Player

Страница 1: ...MMD7HRPKG Two Specific Vehicle Headrests With 7 LCD Monitors and Built In DVD Player for Rear Seat Entertainment 128 8281 Operation Manual ...

Страница 2: ...vehicle connection point and the mobile video product An LCD panel and or video monitor may be installed in a motor vehicle and visible to the driver if the LCD panel or video monitor is used for vehicle information system control rear or side observation or navigation If the LCD panel or video monitor is used for television reception video or DVD play the LCD panel or video monitor must be instal...

Страница 3: ...ble viewing position 5 Optional wireless headphone has a CH A CH B switch When sitting in front of the M1 screen use the CH A switch setting When sitting in front of the M2 screen use the CH B switch setting Set the headphone to the proper channel and press the Power On Off switch The power indicator will light up red Turn the volume down to its lowest setting before putting them on your head 6 Wh...

Страница 4: ...or LED 4 POWER Button Press to turn the unit ON OFF 5 SCREEN MODE Button Press this button to select between Wide 16 9 Normal 4 3 aspect ratio or screen off display OFF 6 PLAY Button Press this button to start playback 7 SOURCE Button Press this button to select between DVD and AUX 8 STOP Button Press this button to stop playback 9 IR Transmitter LEDS 10 Wired Headphone Jack 11 AUX Input Jack use ...

Страница 5: ...nsmitter CH B for use with the optional two channel wireless headphones CH B 4 The monitors will show all of the functions with the comprehensive OSD 5 The optional two channel wireless Headphone sets have an A B switch that allow the user to select the audio from either M1 MMD7HRM CH A or M2 MMD7HRS CH B 6 Using different IR codes the M1 Monitor will only respond to the remote control unit when t...

Страница 6: ... adjustment of 30 degrees from closed position the headrest itself can be tilted forward to help achieve a comfortable viewing position Inner Ring Closed Position Internal Lock MMD7HRPKG MMD7HRM Monitor only 10 Insert disc 11 Eject disc Disc Label 30 degrees Insert disc Eject disc MMD7HRPKG MMD7HRM Monitor only ...

Страница 7: ...with a Pull Tab to prevent battery discharge Remove the Pull Tab before attempting to use the remote Battery Replacement 1 Remove the battery holder 2 Insert the battery into the battery holder and insert the battery holder into the remote Be sure to observe the correct polarity 3 Align the battery holder with the remote control and push until the holder clicks CR2025 ...

Страница 8: ...utton Used to implement a selected setting 4 CURSOR pqtu Button Use these buttons to navigate the menu selections on the screen 5 PREV 9 Button Press to return to the previous chapter or track 6 SCAN BACKWARD 7 Button Press to search in a backward direction Press repeatedly to change the search speed from 2 4 8 and 20 times the normal speed 7 PLAY u Button Press to activate the play mode while a d...

Страница 9: ...ncy Frequency 1 88 3MHz Frequency 2 88 7MHz Frequency 3 89 1MHz Frequency 4 89 5MHz Frequency 5 89 9MHz 15 DISC MENU Button Allows the user to access the DVD DVD MODE main menu 16 DISPLAY Button Press to display the current disc information while the disc is playing Press the cursor pqtu buttons to highlight the desired option For title and chapter selection use the number buttons to enter the des...

Страница 10: ...re adjustment displays the adjustment bar for BRIGHTNESS CONTRAST COLOR or TINT For NTSC only Once the desired adjustment bar is displayed use the VOL VOL button to adjust the setting The display will automatically turn off if no adjustments are made within 6 seconds or if any other button is pressed 24 VOL Button Use this button to decrease or increase the volume level of the wired headphone jack...

Страница 11: ...button u 3 After entering the setup area highlight the desired option using the cursor button p or q 4 Press u to move the highlight to the different options for the selected item Press p or q to select the desired options and then press ENTER to confirm the selection 5 Repeat steps 3 4 to continue setting the options that reside on the same Setup Page 6 To change to another Setup page press t unt...

Страница 12: ... AUDIO SETUP Select AUDIO using pq button then press u button to enter the Submenu Select the audio you desire using pq button then press ENTER to confirm the setting Press t button to return Note The audio selection is only available for discs that are recorded in the above listed languages If the selected language is not available the player will play and display on the screen the original langu...

Страница 13: ... Select this type for multi system TV Screen Saver On Load Factory Language Video Rating Misc RATING SETUP Rating This item allows you to limit the content of movie playback from G to Adult The lower the value the more strict the control G PG PG 13 R NC 17 Adult Parental 6 Adult Password Enter Password Language Video Rating Misc Parental 6 Adult Password Language Video Rating Misc Note The Default...

Страница 14: ...selection 2 Title Selection Press numeric 0 9 buttons to initiate a change of title selection Then press ENTER to implement the selection 3 Chapter selection Press numeric 0 9 buttons to initiate a change of chapter selection Then press ENTER to implement the selection As you toggle through the options the repeat option changes at that time The track for example repeats once that track has ended T...

Страница 15: ...OK The songs in the folder will be displayed on the screen 2 Press p or q to move the highlight to the desired track containing the song and press OK to begin track playback Skipping Songs Use the Next button on the remote control to move to the next song Use the Previous 9 button to move to the previous song The Filter function applies to the following formats Audio Audio data format MP3 WMA Phot...

Страница 16: ...ptions Normal Shuffle Random and Music Intro Move cursor to the desired Mode function and press OK Normal Shuffle Random Music Intro are selected in that order The Mode function default status is Normal Normal Play all songs in folder once Shuffle Play songs in a folder in a shuffled order Each song in the folder is played only once Random Play songs in a folder in a random order Each song in the ...

Страница 17: ...n and press ENTER the following selections appear Edit Mode Browser View Clear Program Notice Edit Mode Program View Add to program functions are all related and can not be implemented during play mode or any other program function Method WhenAdd to program function is finished highlight the Browser view function the songs in the new program are displayed To delete a selected song highlight the se...

Страница 18: ...al or sound content only MP3 discs A disc that contains audio files for example a CD R with downloaded MP3 files This system is capable of playing most recordable DVD formats However due to the variety of disc manufacturers and software playback cannot be guaranteed Loading and Playing Discs Before you load a disc make sure that it is compatible with the player Insert the disc with the label facin...

Страница 19: ...MD7HRM Sources DVD AUX DVD Select DVD to view the internal DVD player AUX Select AUX to view the source that is connected to the AUX input on the front of the unit MMD7HRS Sources AV1 AUX AV1 Select AV1 to view the DVD player from the MMD7HRM monitor AUX Select AUX to view the source that is connected to the AUX input on the front of the unit The AUX input requires the use of AV adapter cable 1 8 ...

Страница 20: ...re coded by region If the regional codes don t match the disc can t be played No sound or distorted sound Make sure your DVD is connected properly Make sure all cables are securely inserted into the appropriate jacks Disc loaded backwards turn disc around so that the disc label is facing towards the driver Play starts but then stops immediately The disc is dirty Clean it Condensation has formed Al...

Страница 21: ...ct sunlight for extended periods of time MONITOR SPECIFICATIONS 20 1 Type TFT Active Matrix LCD 2 Resolution 1440 W x 234 H 3 Pixels 336 960 4 Back Light Edge Light Tube 5 Power Source 12 VDC 6 Power Consumption 26W 7 Operating Temperature 32 F 125 F 0 C 52 C 8 Storage Temperature 22 F 150 F 30 C 70 C 9 Video Display System NTSC PAL 10 Backlight life 10 000 hours 11 Headphone Audio Output 0 03W 32...

Страница 22: ...ect accident or by removal or defacement of the factory serial number bar code label s THE EXTENT OF THE COMPANY S LIABILITY UNDER THIS WARRANTY IS LIMITED TO THE REPAIR OR REPLACEMENT PROVIDED ABOVE AND IN NO EVENT SHALL THE COMPANY S LIABILITY EXCEED THE PURCHASE PRICE PAID BYPURCHASER FORTHE PRODUCT This Warranty is in lieu of all other express warranties or liabilities ANY IMPLIED WARRANTIES I...

Страница 23: ... 2007 Audiovox Electronics Corp Hauppauge NY 11788 WWW audiovox com For Customer Service Visit Our Website At Product Information Photos FAQ s Owner s Manuals 128 8281 ...

Отзывы: