background image

Image


Adjust for PC

/

Component Mode

Image


Adjust

- Be sure to select the correct source 

(

Analog RGB or Component

)

 before operation.

1
2

Within the menu, use 

 to 

use 

 to 

5

or

6

select

3

or

4

adjust.

Press 

EXIT

 button to exit. 

3

Option

Function

Image


size

Selects a desired image


size

 (

aspect


ratio

)

The choice may be different in different mode.(refer to <

Setting


Picture

/

Adjusting


Image

 > section in TV mode for details.)  

Note


you may directly press 

ZOOM

 button on the remote control to select.

H position

Frequency

Phase

Move


the


image


on


the


screen


left

/

right

Adjusts


the


sample


frequency

Improves


the


focussing


of


stable


image

.

Press 

MENU

 and then use 

3

or

4

6

 to display 

IMAGE


ADJUST


menu page, press   to enter.

V position

Freeze


Image

Select

 "

ON

to


freeze


the


image


on


the


screen

Select

 "

OFF

to


reactivate


the


image

.

H width

(component mode only)

Adjusts t he h

  orizontal  

width

 o

  f t he  

i

mage.

V width

(component mode only)

Auto Adjust

(PC mode only)

Highlight "Auto Adjust" item and then use 

3

or

4

 button to start auto adjustment. The 

set will automatically adjust the image such as frequency, position setting, etc.   

Move


the


image


on


the


screen


up

/

down

Adjusts t he  

vertical


width

 o

  f t he  

i

mage.

Note

: you may directly press 

FREEZE

 button on the remote control to freeze


the


image

press


again


to


restore

.

(

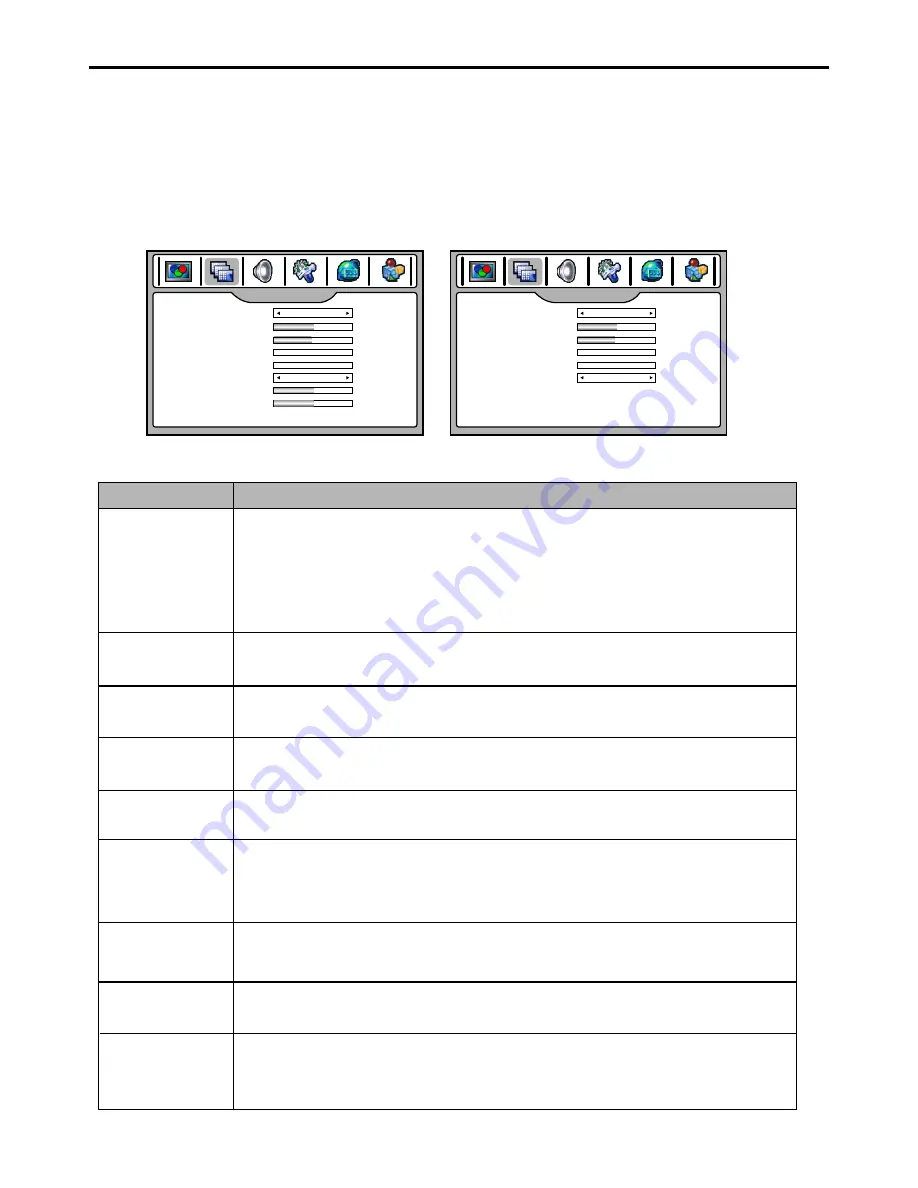
IMAGE


ADJUST


menu


in


Component


mode

)

(

IMAGE


ADJUST


menu


in


PC


mode

)

IMAGE ADJUST

050

047

OFF

FILL ALL

Image size
H position
V position

Freeze Image

000

000

Frequency
Phase

005
005

H width
V width

IMAGE ADJUST

050

047

OFF

FILL ALL

Image size
H position
V position

Freeze Image

000

000

Frequency
Phase

Auto


Adjust


>>>

37

Содержание FPE4707HR - 47" LCD TV

Страница 1: ...rating or adjusting this product please read the manual completely Please keep this manual for future reference FOR ASSISTANCE CALL 1 800 619 3848 OR VISIT US AT WWW AUDIOVOX COM LCD TV Operating Manu...

Страница 2: ...tions 29 Setting Parental Control 30 Troubleshooting 39 Care and Maintenance 40 Specifications 41 Programming the Universal Remote Control 42 Setting Picture 23 Setting Picture Adjusting Image 24 Sett...

Страница 3: ...authorities or the Electronic IndustriesAlliance www eia org FCC STATEMENT FCC Notice LCD TV A CLASS B digital device This equipment has been tested and found to comply with the limits for a Class B...

Страница 4: ...dcleanersoraerosolcleaners Useadampclothforcleaning 7 Ventilation Do not block any ventilation openings Install in accordance with the manufacturer instructions The vents and other openings in the cab...

Страница 5: ...e receptacles on other equipmentasthiscanresultinariskoffireorelectricshock 18 Entering of objects and liquids Never insert an object into the product through vents or openings High voltage flows in t...

Страница 6: ...ur product dealer or local power company For added protection for this product during a lightning storm or when it is left unattended and unused for long periods of time unplug it from the wall outlet...

Страница 7: ...ferent locations on different models Precaution on battery use Improper use of batteries can result in a leakage of chemicals and or explosion Be sure to follow the instructions below Place batteries...

Страница 8: ...output jack on the unit matching the and ends of the cable Power connection Connecting theAC plug to the wall outlet as illustrated Note This product should be operated only from the type of power so...

Страница 9: ...and sound an antenna the correct cable 75 Ohm coaxial and the correct terminating plug are required If a communal antenna system is used you may require the correct connection cable and plug between t...

Страница 10: ...ttons to adjust the value or setting of each item 5 Channel up down Channel up or down In OSD Menu press these buttons to choose the OSD items Press this button to turn the unit ON from STANDBY mode P...

Страница 11: ...ct to the audio and component output jacks of a DVD player or Set top box 5 AV inputs 1 2 Receive video audio signals from external sources such as VCR or DVD player 6 AV output Connect to the VCR inp...

Страница 12: ...return to the previous channel 7 CH To select channels upward or downward 8 VOL Used to adjust volume 9 MUTE Sound mute 10 MENU To access the Menu main page 11 INFO To display channel status or signal...

Страница 13: ...Analog TV mode To select audio track DTV mode 18 SLEEP To set Sleep timer 19 LIST To display program list 20 PICTURE To select the picture mode 21 FAVORITE To display favorite program list 22 AUDIO T...

Страница 14: ...o For a full Home Theater sound experience you must connect your Hi Fi or Audio processor to the S PDIF OUT Optical terminal on the TV rear Note The S PDIF OUT terminal only can output digital TV prog...

Страница 15: ...ur camcorder to confirm operation OUT IN W W Y Y R R W W Y Y R R Audio cable Video cable 1 Turn on your TV press INPUT button on the remote control to display INPUT SELECT menu use 5 6to select AV2 an...

Страница 16: ...able 14 Note If the external device has DVI output only use a DVI to HDMI adapter cable to connect to the HDMI terminal Connect the audio cable to the AUDIO terminal of VGA IN on the TV rear 1 Turn on...

Страница 17: ...een the Y Pb Pr input jacks on the unit and Y Pb Pr output jacks on the DVD or STB Component color inputs provide luminance and separate color signal Connect theAudio cable between theAUDIO input jack...

Страница 18: ...2 Turn on your PC and check for PC system requirements 3 Adjust the PC screen To Watch the PC screen Audio cable Connect a VGA cable between the VGA D sub interface on the PC and the VGA input interfa...

Страница 19: ...recording 3 Press the Record button to begin recording To record program Audio cable Video cable External Amplifier W W R R Audio cable Connect the Audio cables between the Audio L R jacks on the uni...

Страница 20: ...4or3 2 Press button to enter the menu page 6 3 Within the menu use or to select use to adjust or enter sub menu In some situations press OK button to confirm or toggle some settings 6 5 3or4 4 Press M...

Страница 21: ...lear the screen 3 Basic Operations The menus can be shown on the screen in the selected language First select your language SYSTEM SETUP Language Screen Saver Transparency OSD Time Out Clock Setup Sou...

Страница 22: ...ay the main menu 1 Press to display SETUP menu page press to enter 4or3 CHANNEL 6 2 3 Press to select ress or to select AIR or CABLE 6or 5 TV Source item p 3 4 4 If you want to skip other unwanted cha...

Страница 23: ...ate to the CHANNELSETUP menu 1 2 You can create a favorite channel list into memory as follows 3 Highlight Current Channel item use 3or4to select your favorite channel Highlight Favorite Channel item...

Страница 24: ...jor channel number is same for both analog and digital channels It is equal to the NTSC channel number for existing broadcasters In US a minor channel number of zero is used for a broadcaster s analog...

Страница 25: ...e Tint 4 greenish 3 purplish Color Temperature Cool Warm User User Color Temperature Adjusts the color temperature of the image Sets to warm to enhance hotter colors such as red or set to cool to see...

Страница 26: ...izontally and at the same time still maintains a good aspect ratio at the center of the screen ZOOM This mode enlarges the picture in correct proportion FILLALL This mode displays a picture at full sc...

Страница 27: ...lect sub picture as focus window by pressing OK button and a green border will appear on it Within the menu use to 5or6 select item use3or4 to adjust Press EXIT button to return to TV viewing Press ME...

Страница 28: ...f you are having difficulty receiving a stereo signal When viewing analog channel press the MTS SAP button to call up the AUDIO MODE menu 1 2 Press 5or6to select your desired MTS mode Mono Stereo or S...

Страница 29: ...enu to setup auto clock or manual clock and On Off timer Making use of Source Name Edit sub menu to edit source name for your personal preference Making use of Closed Caption Setup sub menu to control...

Страница 30: ...ay menu page press to enter If your area uses Observe Daylight Time set Observe Daylight Time to ON in the menu otherwise set it to OFF 3 If your viewing area uses Observe Daylight Time set Observe Da...

Страница 31: ...plays information usually at the bottom position and is used for a data service generally not program related Caption Text if provided by the broadcaster would be available for both digital and analog...

Страница 32: ...d PARENTAL GUIDANCE SUGGESTED Some material may not be suitable for children PARENTALSTRONGLYCAUTIONED Some material may be inappropriate for children under 13 RESTRICTED Under 17 requires accompanyin...

Страница 33: ...uidance Suggested 14 Parents Strongly Cautioned MA Mature Audience Only content based FV V S L D Content Rating can be set but this Rating is not normally broadcast byTV Station Content Rating can be...

Страница 34: ...select Enable to activate the blocking scheme you set up If you want to disable the blocking scheme you set up select Disable 3or4 Use the password to access CONTENT menu Use the password to access CO...

Страница 35: ...Contains frequent scenes of violence or intense violence Only for adult viewing Could contain frequent violent scenes and extreme violence Canadian French Rating Setup 1 2 Highlight Canadian French us...

Страница 36: ...memorized channels one by one on the three mini windows while the main window remains the current program Note the main picture source can be any one kind except HDMI while the three mini windows onl...

Страница 37: ...mode you can press OK button to select main or sub picture as focus window and a green border will appear on it You may apply many operations to the focus window such as channel select volume control...

Страница 38: ...t and you may apply operations to it 2 If bottom half window of EPG is activated press 3 4button to select your desired channel once selected its relevant program information such as program list star...

Страница 39: ...r V position Freeze Image Select ON to freeze the image on the screen Select OFF to reactivate the image H width component mode only Adjusts the horizontal width of the image V width component mode on...

Страница 40: ...de for details Note you may directly press ZOOM button on the remote control to select When 1080i or 1080p signal is received then this item can not be adjusted Freeze Image Select ON to freeze the im...

Страница 41: ...working Replace if necessary Clean the remote control sensor lens on the unit Do not use the remote control under strong or fluorescent lighting The batteries should be inserted with polarity aligned...

Страница 42: ...ormal programs in the form of a stationary fixed image This type of irreversible LCD panel deterioration can be limited by observing the following steps A Reduce the brightness contrast setting to a m...

Страница 43: ...Specifications 81 6 lb Unit Dimensions WxHxD inch 45 7 x 35 6 x 10 7 320W Max 41 47 TV system C CADTV DTV 1 125 1 135 2 69...

Страница 44: ...For future reference write down each working device code below AUX Code CBL Code CD Code DVD Code SAT Code TNR Code VCR Code 7 Press set to save and exit Searching for your Code If your device does n...

Страница 45: ...hold SET until the red LED blinks twice then release 2 Enter 9 9 3 and then press VOL The LED blinks four times Volume is now independently controlled for all programmed devices Unlocking a Single Dev...

Страница 46: ...lory Horse 31263 Harman Kardon 30110 Hitachi 31273 Inkel 30027 Integra 30135 JBL 30110 JVC 30074 31263 Kenwood 31313 31570 30027 KLH 31428 Magnavox 31189 31269 30531 Marantz 31189 31269 30039 MCS 3003...

Страница 47: ...nic 00000 00008 00107 Panther 00637 Paragon 00000 Philips 00317 01305 Pioneer 01877 00877 00144 00533 Pulsar 00000 Quasar 00000 RadioShack 00883 Regal 00279 00273 Runco 00000 Samsung 00000 00144 Scien...

Страница 48: ...tic 30420 30179 Rotel 30157 30420 SAE 30157 Sansui 30157 Sanyo 30179 SAST 30157 Sharp 30861 30037 Silsonic 30888 30036 Sonic Frontiers 30157 Sony 30490 30000 30100 Soundesign 30145 TAG McLaren 30157 T...

Страница 49: ...hi 21521 20521 Nesa 20717 Norcent 21003 Onkyo 20503 20627 21924 20792 Oritron 20651 21980 Panasonic 20490 21762 21990 Philips 20503 20539 20646 21914 Pioneer 20525 20571 Polaroid 21086 21061 Polk Audi...

Страница 50: ...1250 HTS 00775 Hughes Network Systems 01142 00749 01749 01442 I Lo 01535 JVC 00775 LG 01414 01226 Magnavox 00724 00722 Memorex 00724 Mitsubishi 00749 Motorola 00869 NEC 01270 Next Level 00869 Panasoni...

Страница 51: ...2 Denon 20042 DirecTV 20739 Durabrand 20039 20038 Electrohome 20037 Electrophonic 20037 Emerex 20032 Emerson 20035 20037 20184 20240 20045 20121 20043 20209 20002 20278 20479 Fisher 20047 20104 Fuji 2...

Страница 52: ...ioneer 20042 20067 Polk Audio 20081 Profitronic 20240 Proscan 20060 Protec 20072 Pulsar 20039 Qisheng 20060 Quasar 20035 20162 Radix 20037 Randex 20037 RCA 20060 20035 20240 20042 20880 Realistic 2003...

Страница 53: ...048 20047 20081 20240 20042 20072 White Westinghouse 20209 20072 XR 1000 20035 20072 Yamaha 20038 Zenith 20039 20033 20209 20479 ZT Group 21972 CARE Keep the remote dry If it gets wet wipe it dry imme...

Страница 54: ...604 L47FE277 00 Ver 1 0 PRINTED ON RECYCLED PAPER...

Отзывы: