background image

u

SIng

 t

he

 ar5100

11

Connecting to  

a video display

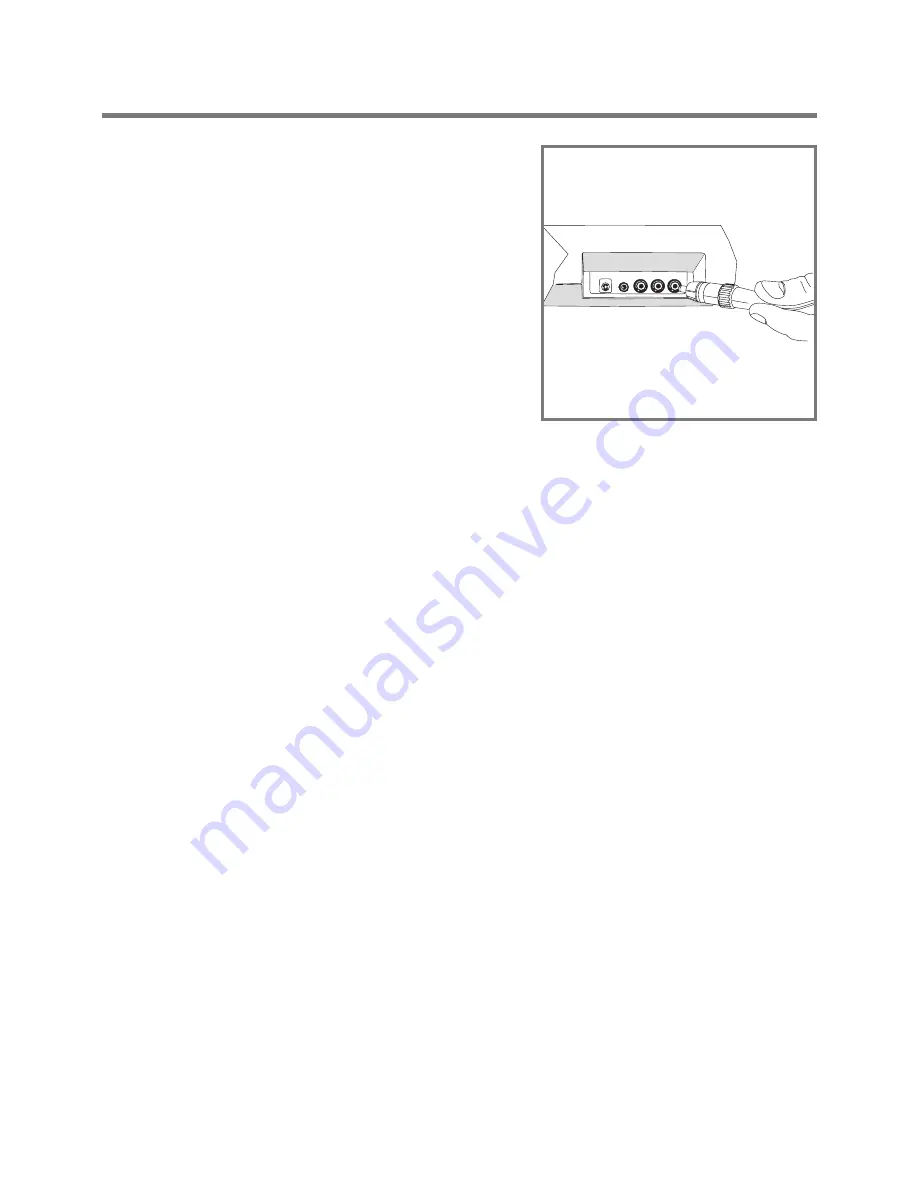
1.  Make sure the AR5100 and the video 

display device are both turned off.

2.  Connect a component video cable 

(not included) to the component video 
output jacks on the bottom of the 
AR5100. Make sure you match the color 
of each plug to a jack of the same color.


Note:

 You can also use a composite 

video cable to connect the AR5100 
to your video display. Connect the 
composite video cable to the Pb (blue) 
jack on the AR5100. Then connect 
the other end to the composite video 
input on your TV or monitor.

3.  Connect the other end of the 

component video cable to an available 
set of component video input jacks on 
the video display device.  Make sure 
you match the color of each plug to a 
jack of the same color.

4.  Turn on the video source and AR5100. 

Select the correct input on the video 
source to watch the signal from the 
AR5100. 

5.  Select a video on your iPod and play it. 

Important:

 Make sure the video settings 

on your iPod are adjusted correctly to 
watch video on a separate display. You 
might need to remove the iPod from the 
AR5100 dock to change these settings. 
See the user manual that came with your 
iPod for more information.

Содержание AR5100

Страница 1: ...HIGH PERFORMANCE AUDIO DOCKING SYSTEM USER MANUAL AR5100...

Страница 2: ...apparatus during lightning storms or when unused for long periods of time 11 Refer all servicing to qualified service personnel Servicing is required when the apparatus has been damaged in any way su...

Страница 3: ...l in a sleek wall mountable design You can also use the AR5100 as the perfect bridge between your iPod and HD display its component video outputs preserve the quality of the video on your iPod And the...

Страница 4: ...do is unpack the AR5100 package and make sure it includes all of the following contents Introduction Also Adapter inserts Screws and anchors for wall mounting Remote control AR5100 main unit AC adapt...

Страница 5: ...a flat surface Once you ve found where you d like to put the AR5100 you have two placement options Stand it up The AR5100 comes with removable legs for upright placement on a flat surface Simply attac...

Страница 6: ...To make sure the unit fits where you want to mount it hold it up where you plan to put it 2 Mark two holes 10 25 apart Make sure they re level 3 Drill holes for the anchors where you marked 4 Place th...

Страница 7: ...isplay Inserting your iPod 1 Push the front of the AR5100 s dock The docking door opens 2 Find the insert that goes with your iPod model or use the insert that came with your iPod The models compatibl...

Страница 8: ...ys flat 3 Press the power key on the front panel of the AR5100 Front Panel Keys Power Turns the AR5100 on and off Also brings a docked iPod out of sleep mode when the AR5100 turns on VOL VOL Turns the...

Страница 9: ...iPod out of sleep mode when the AR5100 turns on Play Pause Starts and pauses playback on your docked iPod Mute Lowers the AR5100 volume to its minimum level Skip back Goes to the previous track or to...

Страница 10: ...r example 3 5mm stereo mini jack 1 4 stereo jack or RCA stereo jacks 3 Connect the other end of the audio cable to the auxiliary input jack on the bottom of the AR5100 This end of the cable must be a...

Страница 11: ...her end to the composite video input on your TV or monitor 3 Connect the other end of the component video cable to an available set of component video input jacks on the video display device Make sure...

Страница 12: ...blish a secure connection No Sound Is Produced Inspect wall outlet and ensure that the power cord is firmly plugged into the outlet If you re trying to listen to an auxiliary audio source make sure th...

Страница 13: ...e around the room and try to use the remote from more than one location Press the remote control s power button on and off to verify that the remote signal is controlling the main unit If you still ca...

Страница 14: ...fications Model AR5100 15W RMS channel 2 way system 13mm horn loaded tweeters 76mm Neodymium mid bass drivers with ported enclosure Proximity sensor touch panel Component video output Auxiliary audio...

Страница 15: ...es not apply to damage caused by an AC adapter not provided with the product or by leaving non rechargeable batteries in the product while plugged into an AC outlet THE EXTENT OF THE COMPANY S LIABILI...

Страница 16: ...gned to connect specifically to iPod and has been certified by the developer to meet Apple performance standards Works with iPhone means that an electronic accessory has been designed to connect speci...

Отзывы: