background image

INSTALLATION INSTRUCTIONS

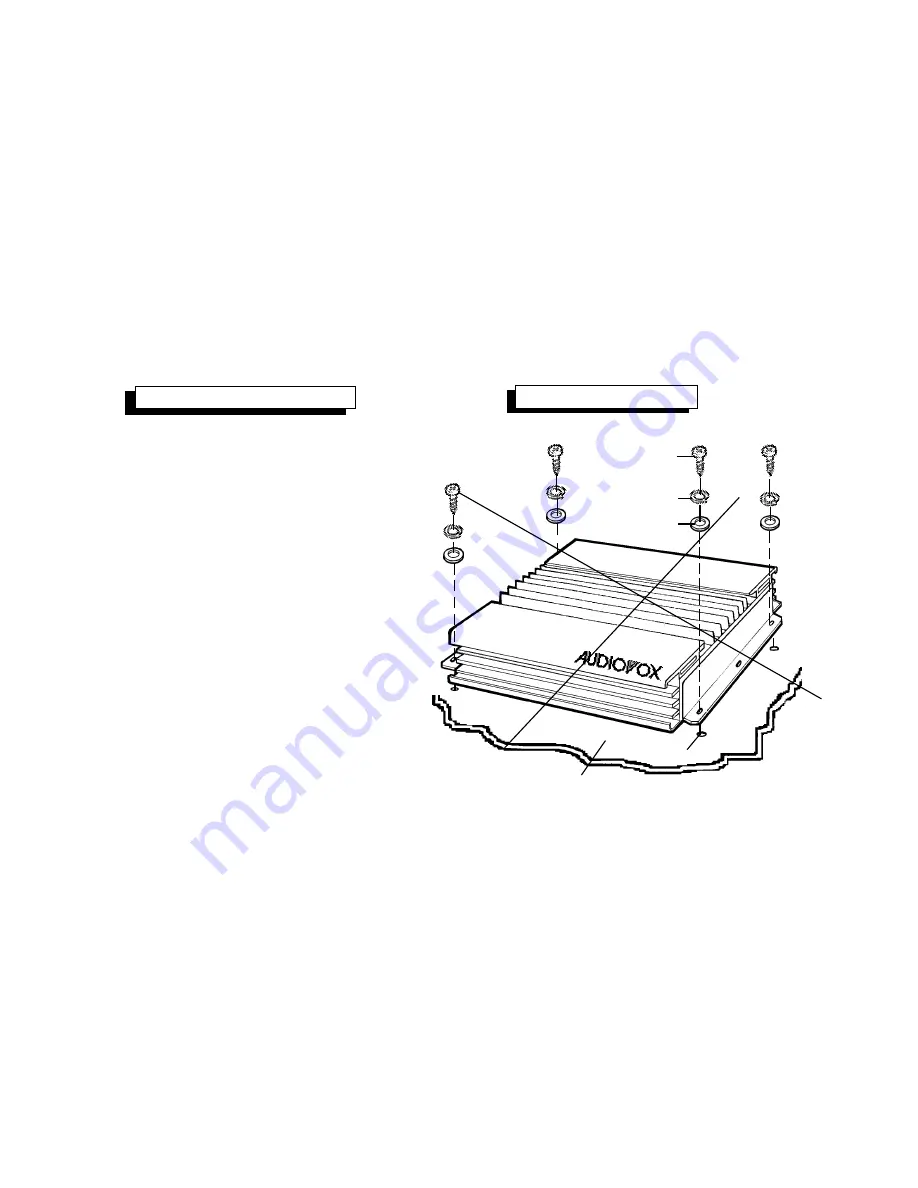
INSTALLATION DIAGRAM

1. Select a mounting area where the amplifier will

have sufficient air circulation for proper cooling.
Inadequate air circulation will cause the temperature
of the amplifier to rise and will trigger the
thermal protection mode.

2. Place the amplifier on the mounting surface

and mark the locations of the four mounting
holes as shown in the illustration.

3. Remove the amplifier and drill a 1/8" hole at

each of the four locations.

CAUTION:

Before drilling the holes, look at the

underside of the mounting surface. Always
check carefully to avoid drilling into wiring,
braces, fuel or brake lines.

CHECK BEFORE

YOU DRILL !

4. Secure the amplifier to the mounting surface

using the self-tapping screws provided.

MOUNTINGSURFACE

1/8"DIA.HOLE

SELF-TAPPINGSCREW

SPLITWASHER

FLATWASHER

-3-

Содержание AMP-591A

Страница 1: ...Owner s Owner s Owner s Owner s Owner s Manual Manual Manual Manual Manual ModelAMP 591A 300WattStereoAmplifier ...

Страница 2: ...stallation Instructions 3 Wiring Instructions 4 5 Stereo and Mixed Mono Input Wiring Diagram 6 Stereo and Mixed Mono Output Wiring Diagram 7 Mono Bridged Input Wiring Diagram 8 Mono Bridged Output Wiring Diagram 9 Operation 10 12 Warranty 13 ...

Страница 3: ...ONS 1 Due to continuing improvement Audiovox reserves the right to change features and design without notice Maximum Output Power Stereo Operation 150 watts x 2 Mono Operation 300 watts x 1 Output Power 1 T H D Stereo Operation 100 watts RMS x 2 Mono Operation 200 watts RMS x 1 Output Impedance 2 8 ohms stereo 4 8 ohms mono Frequency Response 10 50 000 Hz 1 dB Channel Separation 50 dB Signal Noise...

Страница 4: ...s will shut off operation until it has cooled down sufficiently 4 If fuse replacement is necessary use only fuses of the same ampere rating as originally supplied with the unit The use of fuses with incorrect ratings may cause serious damage to the amplifier If fuses blow consistently carefully check all electrical connections to the unit 5 Supply of adequate battery voltage is critical to the pro...

Страница 5: ...g surface and mark the locations of the four mounting holes as shown in the illustration 3 Remove the amplifier and drill a 1 8 hole at each of the four locations CAUTION Before drilling the holes look at the underside of the mounting surface Always check carefully to avoid drilling into wiring braces fuel or brake lines CHECK BEFORE YOU DRILL 4 Secure the amplifier to the mounting surface using t...

Страница 6: ...ge wire for this lead and connect it to the terminal of the battery after all other wiring is completed 2 Ground Connection The ground terminal GND connection is also critical to the correct operation of the amplifier Use a wire of the same gauge as the power connection 16 or thicker and connect it between the ground terminal GND of the amplifier and a metal part of the vehicle close to the mounti...

Страница 7: ...or high level inputs not both If low level outputs are provided from the car stereo it is recommended that the low level inputs be used for lowest distortion and best performance Use good quality shielded audio cables with RCA plugs at both ends to connect the stereo to the amplifier and keep the cable lengths to a minimum to avoid noise If the car stereo does not provide low level outputs the amp...

Страница 8: ...H LEVEL OR LOW LEVEL INPUTS NOT BOTH HIGH LEVEL SPEAKER OUTPUTS CAR STEREO USE THIS INPUT WIRING WITH OUTPUT WIRING ON PAGE 7 RCA TYPE SHIELDED CABLE NOT INCLUDED RIGHT RIGHT LEFT LEFT LOW LEVEL RCA OUTPUTS GREEN WHITE GRAY BROWN LEFT RIGHT BLACK CHASSISGROUNDONRADIO PROT PWR BASS BOOST X OVER GAIN HI INPUT ...

Страница 9: ...6 GAUGE WIRE SEE TEXT CAR STEREO CONNECT THIS WIRE LAST USE THIS OUTPUT WIRING WITH INPUT WIRING ON PAGE 6 EXISTING SCREW OR BOLT CLEAN PAINT RUST DIRT OR GREASE FROM AREA FOR GOOD CONNECTION GROUNDED METAL SECTION OF VEHICLE 12 VOLT VEHICLE BATTERY CHASSIS GROUND MIXED MONO SPEAKER OR SUB WOOFER WITH CROSSOVER 4 8 OHMS BRIDGED LEFT LEFT RIGHT RIGHT 20A GND REM BATT POWER FUSE SPEAKER OUT ...

Страница 10: ...EO LOW LEVEL RCA OUTPUTS Y RCA TYPE SHIELDED CABLE NOT SUPPLIED TO2nd AMPLIFIER IMPORTANT USE EITHER HIGH OR LOW LEVEL INPUTS NOT BOTH HIGH LEVEL SPEAKER OUTPUTS TO 2nd AMPLIFIER 5 PIN CONNECTOR USETHISINPUTWIRINGWITH OUTPUTWIRINGONPAGE9 GREEN WHITE GRAY BROWN BLACK CHASSIS GROUND ON RADIO HI INPUT ...

Страница 11: ... WIRE SEE TEXT CAR STEREO CONNECT THIS WIRE LAST EXISTING SCREW OR BOLT CLEAN PAINT RUST DIRT OR GREASE FROM AREA FOR GOOD CONNECTION GROUNDED METAL SECTION OF VEHICLE 12 VOLT VEHICLE BATTERY CHASSIS GROUND BRIDGED LEFT LEFT RIGHT RIGHT 20A GND REM BATT POWER FUSE SPEAKER OUT MONO SPEAKER OR SUB WOOFER 4 8 OHMS ...

Страница 12: ...icate that the unit is connected to the battery and that the Remote Turn On terminal is receiving 12 volts thus turning on the amplifier 2Protection Mode LED This LED illuminates red to indicate that the self protection circuits have been activated and have shut off operation of the amplifier The protection circuits may be triggered by the temperature of the unit rising above a safe level or by an...

Страница 13: ...s that permit the amplifier to be used to reproduce the entire audio range just the bass range or just the midrange treble range as follows FULL Position In this position of the switch the response is flat and unaffected so the entire audio frequency range is reproduced by the amplifier Use this setting if the amplifier is being used to power a full range speaker system LPF Position In the LPF Low...

Страница 14: ...tuate the bass frequencies by adding 10 dB of boost to the signal at 50 Hz 12 8Fuse The circuitry of the amplifier is protected from damage by an automotive type fast blow fuse If fuse replacement is necessary use only fuses of the same ampere rating as originally supplied with the unit The use of fuses with incorrect ratings may cause serious damage to the amplifier If fuses blow consistently car...

Страница 15: ...lect accident or by removal or defacement of the factory serial number bar code label s THE EXTENT OF THE COMPANY S LIABILITY UNDER THIS WARRANTY IS LIMITED TO THE REPAIR OR REPLACEMENT PROVIDED ABOVE AND IN NO EVENT SHALL THE COMPANY S LIABILITY EXCEED THE PURCHASE PRICE PAID BY PURCHASER FOR THE PRODUCT This Warranty is in lieu of all other express warranties or liabilities ANY IMPLIED WARRANTIE...

Отзывы: