background image

OPER

OPER

OPER

OPER

OPERA

A

A

A

AT

TT

TTING INSTRUC

ING INSTRUC

ING INSTRUC

ING INSTRUC

ING INSTRUCT

TT

TT IONS

IONS

IONS

IONS

IONS

6

6

6

6

6

OPEROPEROPEROPEROPER

AAAAA

TTTTT

ING INSTRUCING INSTRUCING INSTRUCING INSTRUCING INSTRUC

TTTTT

IONSIONSIONSIONSIONS

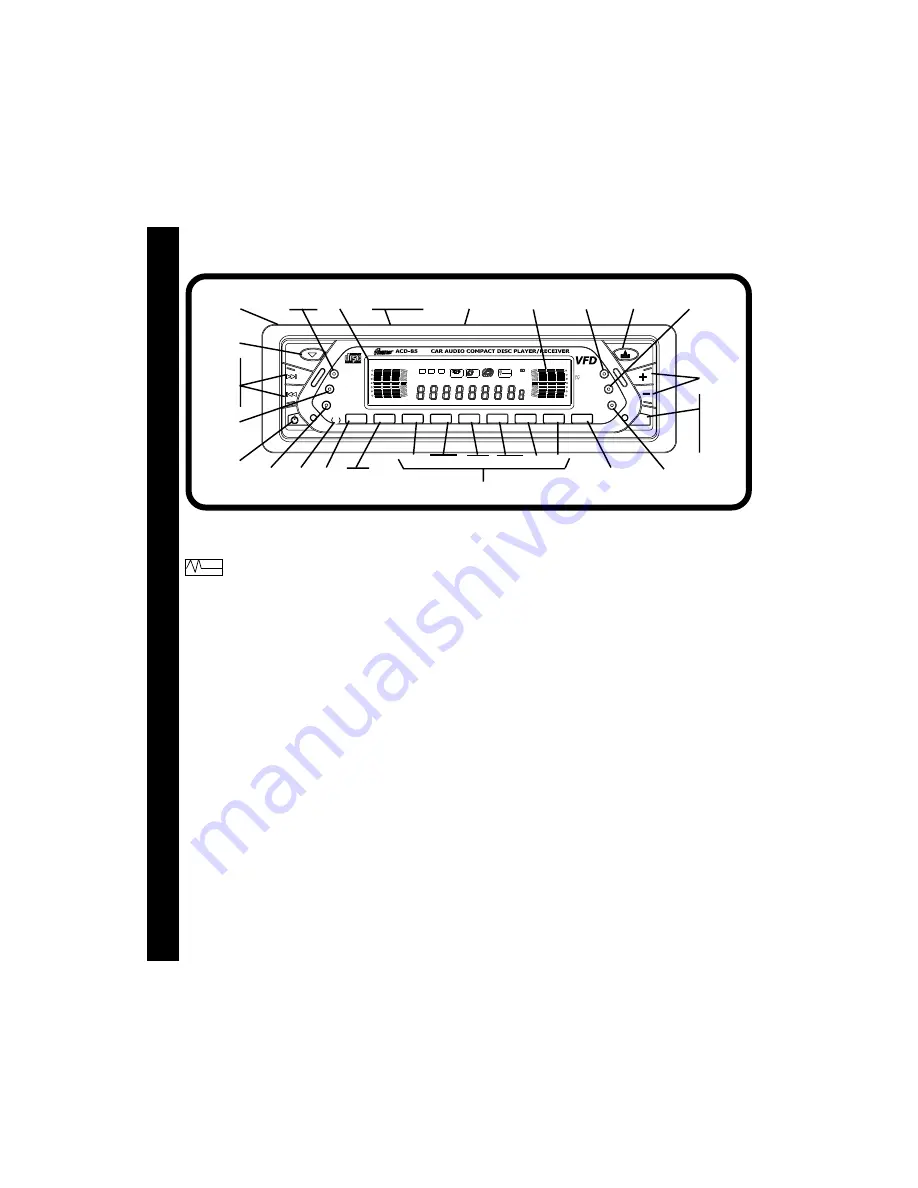
POWER ON/OFF AND DIM BUTTON

Momentarily press this button to  turn the  unit on; the

      icon appears on the display. Press the button

for at least 2 seconds to turn the unit off. If the ignition
switch is “on”, the unit will also turn on automatically
when a compact disc is inserted, or if any other front
panel control button is pressed.   While the unit is on,
each  time  the button is momentarily pressed  and
released, the VFD display panel  backlighting intensity
will change from low-to-medium-to-high, and then
back to low, thereby providing three different intensity
settings.

2

2

2

2

2


AUDIO CONTROL (VOL +/- ) BUTTONS

To increase the volume level, press the  +  button. The
volume will increase and the level will be shown on
the display panel from a minimum of 

VOL 00

 to a

maximum of 

VOL 100

.  To decrease the volume level,

press the - button. The display will automatically
return to the normal indication 5 seconds after the last
volume adjustment or when another function is
activated. These control buttons are also used in con-
junction with the Select  (SEL)   button


3


to adjust the

bass, treble, balance and fader levels as described
in 

4

,

5

6

 and


7

.

3

3

3

3

3

SELECT (SEL) CONTROL BUTTON

This button is used to select the audio


function

(volume, bass, treble, balance, or fade) whose

setting is  adjusted using the AUDIO CONTROL
buttons 

2

.  Pressing the  SEL button once will set the

unit for volume adjustment (

VOL

 will appear on the

display panel)  and  an audible beep will occur. Press-
ing the button additional times will select bass
adjustment (

BAS

 will appear on the display panel),

treble adjustment (

TRE

 on the display), balance

(

BAL

), or fader (

FAD

). The display will automatically

return to the normal indication 5 seconds after the the
last adjustment or when another function is activated.

NOTE:

Regardless of the Preset Equalizer setting,
whenever Base, Treble, Balance or Fader
settings are adjusted, the Equalizer setting
will always return to 

FLAT 

mode.

4

4

4

4

4

  BASS CONTROL

To adjust the bass level (Equalizer function inactive),
first select the Bass mode by pressing the SEL button
so the 

BAS

 indication appears on the display panel.

Within 5 seconds of choosing the Bass mode,
press the VOL - button to decrease the bass
response, or the VOL + button to increase it as
desired.  The level will be shown on the display panel
from a  minimum 

BAS -10

 to  a  maximum  of 

BAS +10

(

BAS 00

 indicates flat response). The display will

automatically return to the normal indication 5 seconds
after the last adjustment or when another function is
activated.

TUNER

15

29 26, 40 24, 41 25, 42

14

13

3
4

5

6
7

2

9

30

16

20

21(FAR SIDE)

32

33,34
(FAR SIDE)

19

18, 35

31

11
22
23

17

1

12

8, 10

28

SCAN

PRESET

UALIZER

REL

(AUX)

MODE

OPEN

LOUD

DISC-DN

DISC-UP

DIM

SEL

VOL

TUN

3

DISP

BAND

2

1

4

5

6

AMS

PAUSE

SCAN

REPEAT

SHUFFLE

LO/DX

MUTE

MONO

LOUD

ST

TUNER

CD

TAPE IN

PTY MTL EON

AF TA

TP

38
39

36 37

27(FAR SIDE)

Содержание 1286207

Страница 1: ...ITH SLIDE DOWN DETACHABLE FRONT PANEL COMPACT DISC PLAYER CD CHANGER CONTROLS WIRELESS REMOTE CONTROL AND QUARTZ CLOCK SCAN PRESET UALIZER REL AUX MODE OPEN LOUD DISC DN DISC UP DIM SEL VOL TUN 3 DISP...

Страница 2: ...ed with final mounting of the chassis 5 Carefully slide the radio into the mounting sleeve making sure it is right side up until it is fully seated and the spring clips lock it into place 6 Attach one...

Страница 3: ...ll need our help but if you do we re here to help you Just call our toll free telephone assistance line at 1 800 645 4994 during the days and hours shown U S A and Canada only 7 30AM 6PM 8AM 4PM FAST...

Страница 4: ...ANTENNAORAMPLIFIERMANUAL ANTENNA JACK 9PINPLUG SEEPAGE5FOR SPEAKERWIRING POSITIVE TERMINAL 12 VOLT BATTERY METALPARTOFDASH DRILLHOLEIFNECESSARY SCREW BLACK RED EXISTING ANTENNA CABLE BLUE ANTENNA AUTO...

Страница 5: ...E RADIO 8 30am 7 00pmEastern 9 00am 5 00pmEastern Monday Friday Saturday 1 800 645 4994 1 800 645 4994 1 800 645 4994 1 800 645 4994 1 800 645 4994 HELP GRAY VIOLET 4 PINPLUGS SEEPAGE4FOR RADIOWIRING...

Страница 6: ...ton is used to select the audio function volume bass treble balance or fade whose setting is adjusted using the AUDIO CONTROL buttons 2 Pressing the SEL button once will set the unit for volume adjust...

Страница 7: ...8 8 LOUDNESS CONTOUR LOUD When listening to music at low volume levels this feature will boost the bass and treble ranges to compensate for the characteristics of human hearing Press and hold the BAN...

Страница 8: ...indicating that the station is now set into that pre set memory position The station can now be re called at any time by pressing that button 4 Repeat the above procedure for the remaining pre sets on...

Страница 9: ...idly in the forward direction or the Re view button to advance rapidly in the back ward direction During either function the elapsed time within each track will automatically be shown on the display p...

Страница 10: ...CTOR DISP This unit can display either the clock time or radio frequency CD player functions Ordinarily the radio frequency or CD player track indication is displayed but the display can also show the...

Страница 11: ...displayed If a problem should develop while operating the CD player an error code ER 1 ER 2 ER 3 etc may appear on the display panel This can indicate a number of problems with the unit including a me...

Страница 12: ...round type designed for 4 speaker use Front and rear channels CANNOT be combined bridged for use with 2 speakers RCA low level outputs rear channels Output Impedance Compatible with 4 8 ohm speakers L...

Страница 13: ...CUE REVIEW FUNCTIONS High speed audible search to any section of the disc can be made by the Cue and Review functions Press and hold the Cue button to advance rapidly in the forward direction disc sy...

Страница 14: ...r the following error codes may appear on the display panel ER 1 Indicates that there is no magazine loaded in the CD changer ER 2 Indicates a problem with the magazine eject function ER 3 Indicates a...

Страница 15: ...6 CD TRACK SELECT See Main Unit cn and dt except press TR UP to advance to a higher CD track and press TR DN to return to a lower track 7 7 7 7 7 CD CUE REVIEW See Main Unit co and du and CD Track Sel...

Страница 16: ...e Main Unit bland 8 co co co co co DISC UP D UP SELECTOR See Main Unit ds cp cp cp cp cp DISC DOWN D DN SELECTOR See Main Unit dr INFRARED REMOTECONTROL INFR INFR INFR INFR INFRA A A A A RED REMO RED...

Страница 17: ...the disc slot as this can expose it to sunlight and other causes of damage Do not attempt to open the unit chassis There are no user serviceable parts or adjustments inside When the vehicle warms up...

Страница 18: ...THISPAGEINTENTIONALLYLEFTBLANK 18 18 18 18 18...

Страница 19: ...l s THEEXTENTOFTHECOMPANY SLIABILITYUNDERTHISWARRANTY ISLIMITEDTOTHEREPAIRORREPLACEMENTPROVIDEDABOVEAND INNOEVENT SHALL THE COMPANY S LIABILITY EXCEED THE PURCHASE PRICE PAID BY PURCHASER FOR THE PROD...

Страница 20: ...2001 Audiovox Electronics Corp Hauppauge NY 11788 128 6207 Printed in China 20 20 20 20 20...

Отзывы: