Audiovox 1285306 Скачать руководство пользователя страница 7

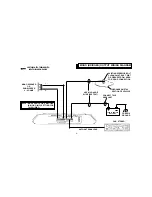
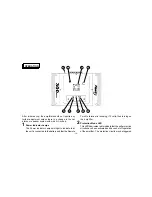
4. Speaker Connections

Depending on the type and number of speakers used with the amplifier, wire them to the speaker terminals as per
the appropriate wiring diagram. For most applications, #18 gauge wire should be used for the speaker leads but in
no case thinner than #20 gauge. For leads in excess of 10 feet, #16 gauge is recommended. When wiring the
speakers, pay careful attention to the polarity of the terminals on the speakers and make certain they correspond
to the polarity of the corresponding terminals on the amplifier.

DO NOT

ground any speaker leads to the chassis of

the vehicle.

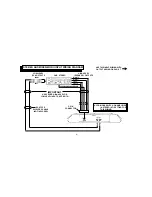
5. Input Connections

This amplifier features both high and low-level input capability. Use either the low-level or high-level inputs, not both.

If low-level outputs are provided from the car stereo, it is recommended that the low-level inputs be used for lowest
distortion and best performance. Use good quality shielded audio cables with RCA plugs at both ends to connect
the stereo to the amplifier and keep the cable lengths to a minimum to avoid noise.

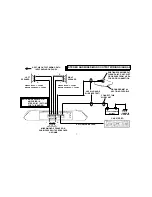
If the car stereo does not provide low-level outputs, the amplifier may be connected via the speaker (high-level)
outputs from the stereo. Wire the speaker leads from the car stereo to the 5-pin adaptor harness as shown in the
diagram (shielded cable is not required for this application) and plug the connector into the mating High-Level Input
socket on the amplifier. Carefully splice and insulate all wire connections.

CAUTION:

Use either the low-level or the high-level inputs on the amplifier.

DO NOT

use both input levels at the same time.

WIRING INSTRUCTIONS

-5-

Содержание 1285306

Страница 1: ...Owner s Owner s Owner s Owner s Owner s Manual Manual Manual Manual Manual ModelAMP 595 300WattStereoAmplifier...

Страница 2: ...2 InstallationInstructions 3 WiringInstructions 4 5 StereoandMixed MonoInput WiringDiagram 6 StereoandMixed MonoOutput WiringDiagram 7 Mono Bridged Input Wiring Diagram 8 Mono Bridged Output Wiring Di...

Страница 3: ...800 645 4994 HELP SPECIFICATIONS 1 Due to continuing improvement Audiovox reserves the right to change features and design without notice Maximum Output Power Stereo Operation Mono Operation Output P...

Страница 4: ...will shut off operation until it has cooled down sufficiently 4 If fuse replacement is necessary use only fuses of the same ampere rating as originally supplied with the unit The use of fuses with in...

Страница 5: ...surface and mark the locations of the four mounting holes as shown in the illustration 3 Remove the amplifier and drill a 1 8 hole at each of the four locations CAUTION Before drilling the holes look...

Страница 6: ...e wire for this lead and connect it to the terminal of the battery after all other wiring is completed 2 Ground Connection The ground terminal GND connection is also critical to the correct operation...

Страница 7: ...r high level inputs not both If low level outputs are provided from the car stereo it is recommended that the low level inputs be used for lowest distortion and best performance Use good quality shiel...

Страница 8: ...TS NOT BOTH HIGH LEVEL SPEAKER OUTPUTS CAR STEREO USE THIS INPUT WIRING WITH OUTPUT WIRING ON PAGE 7 RCA TYPE SHIELDED CABLE NOT INCLUDED RIGHT RIGHT LEFT LEFT LOW LEVEL RCA OUTPUTS GREEN WHITE GRAY B...

Страница 9: ...IRING ON PAGE 6 EXISTINGSCREWORBOLT CLEAN PAINT RUST DIRT OR GREASE FROM AREA FOR GOOD CONNECTION GROUNDED METAL SECTION OF VEHICLE 12 VOLT VEHICLE BATTERY CHASSIS GROUND NOTE MODE SWITCH ON AMPLIFIER...

Страница 10: ...SUPPLIED TO2nd AMPLIFIER IMPORTANT USE EITHER HIGH OR LOW LEVEL INPUTS NOT BOTH HIGH LEVEL SPEAKER OUTPUTS TO 2nd AMPLIFIER 5 PIN CONNECTOR USETHISINPUTWIRINGWITH OUTPUTWIRINGONPAGE9 GREEN WHITE GRAY...

Страница 11: ...ISOUTPUTWIRINGWITH INPUTWIRINGONPAGE8 NOTE MODE SWITCH ON AMPLIFIER IN MONO MO SETTING FOR THIS WIRING USE 14 GAUGE WIRE SEE TEXT CONNECT THIS WIRE LAST EXISTINGSCREWORBOLT CLEAN PAINT RUST DIRT OR GR...

Страница 12: ...The Power Indicator Lamps will light to indicate that the unit is connected to the battery and that the Remote Turn On terminal is receiving 12 volts thus turning on the amplifier 2Protection Mode LE...

Страница 13: ...m the system Once the correct setting is found this control should not require any further adjustment 4 Stereo Mono Mode Selector Set this switch to the Stereo ST or Mono MO position as appropriate fo...

Страница 14: ...lts is supplied to the Remote Turn On terminal 12 9Fuse The circuitry of the amplifier is protected from damage by an automotive type fast blow fuse If fuse replacement is necessary use only fuses of...

Страница 15: ...label s THE EXTENT OF THE COMPANY S LIABILITY UNDER THIS WARRANTY IS LIMITED TO THE REPAIR OR REPLACEMENT PROVIDED ABOVE AND IN NO EVENT SHALL THE COMPANY S LIABILITY EXCEED THE PURCHASE PRICE PAID BY...

Страница 16: ...1998 Audiovox Corporation Hauppauge N Y Printed in Korea 128 5306...

Отзывы: