www.audiosource.net
www.audiosource.net
www.audiosource.net
www.audiosource.net
AS515 SIDE VIEW
Removing the AS515 Speaker
Should it ever become necessary to remove the AS515 speaker
from the wall, simply remove the grill and turn the six mounting
screws counter-clockwise until the doglegs lock out of position
in their resting seats.
Grill removal
The grill uses a pressure fi t relying on the contact of both
surfaces to hold it in place. If the grill becomes distorted it
becomes diffi cult to remove or reinstall. Proper care should be
taken to not distort its shape while removing it.
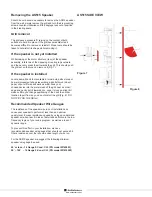
If the speaker is not yet installed
While looking at the motor structure (rear) of the speaker
assembly, rotate two of the opposing mounting legs outward
and then evenly press them towards the grill. This should push
the grill out so that you can remove it (Fig. 7).
If the speaker is installed
Locate a small hook tool available at most auto parts stores or
home improvement shops resembling a dentists pick (a bent
paper clip or stiff wire will work as well), hook your
chosen device into the metal mesh of the grill near a corner/
edge and gently pull it towards you, once it moves a slight bit
make certain you change positioning of the hook to another
location to pull from so you do not distort the grill (Fig. 8). DO
NOT PRY ON THE GRILL!
Recommended Speaker Wire Gauges
The resistance of the speaker wire in your installation can
cause your speaker to perform at less than an optimum
quality level. Excess resistance, caused by using an undersized
speaker wire, can result in loss of detail and defi nition in the low
frequency region of your audio program, as well as a loss of
dynamic range.
To prevent this effect in your installation, we have
recommended speaker wire gauges that should not exceed 0.5
Ohms resistance over the recommended length of wire run.
For the AS515 speaker, we suggest the following minimum
speaker wire gauge be used:
50’ or less – 16 Gauge 2-Cond. CL3 (PG model M1650W)
50’ – 100’ – 16 Gauge 2-Cond. CL3 (PG model M16100W)
Figure 7
Figure 8

