background image

2.7   Monitorfunctie aan / uit

De monitorfunctie stelt u in staat uw eigen stem 

via het systeem te horen. Ga als volgt te werk als 

u de monitorfunctie wenst in te schakelen:
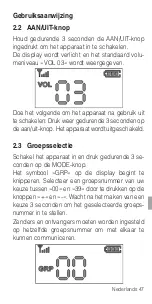
Houd op het ingeschakelde apparaat gedurende 

3 seconden de MODE-knop ingedrukt. Het sym-

bool »GRP« op de display begint te knipperen.
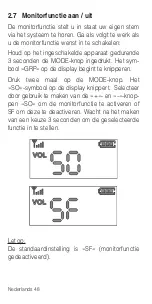
Druk twee maal op de MODE-knop. Het 

»SO«-symbool op de display knippert.  Selecteer 

door gebruik te maken van de »+«- en »-«-knop-

pen »SO« om de monitorfunctie te activeren of 

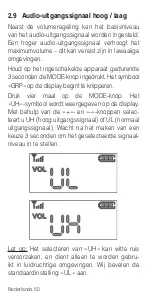
SF om deze te deactiveren. Wacht na het maken 

van een keuze 3 seconden om de geselecteerde 

functie in te stellen.

Let op:

De standaardinstelling is »SF« (monitorfunctie 

gedeactiveerd).

Nederlands 48

Содержание xepton TRX-1

Страница 1: ...2 4 GHz Tour Guide System xepton TRX 1 Transceiver xepton TRX 1 Transceiver xepton TRX 1 Émetteur récepteur NL Gebruiksaanwijzing Pagina 44 xepton TRX 1 Transceiver IT Istruzioni per l uso Pagina 58 xepton TRX 1 Transceiver ES Página 70 xepton TRX 1 Transceiver Instrucciones de servicio ...

Страница 2: ...Gruppenan wendungen vom einfachen Dialog bis hin zu Dolmetscher Team Teaching und Konferenz systemen Leicht und schlank im Design vereint es Qualität und Vielseitigkeit mit Bedienungsfreundlichkeit und dem neuesten Stand der Funktechnologie 1 2 Lieferumfang xepton TRX 1 Überprüfen Sie bitte ob alle nachfolgend aufge führten Teile enthalten sind xepton TRX 1 Headset HSB 01 Aufbewahrungs Softkoffer ...

Страница 3: ...00 m Vollständig digitale kristallklare Tonqualität Über 10 Stunden Betriebszeit pro Akkuladung Komfortables Laden über Micro USB kompatibel mit den meisten Mobiltelefon Ladegeräten 9 Lautstärkestufen 1 4 Lieferbares Zubehör TRP 1 Stationärer Repeater Sender A 5230 0 USB Netzteil A 5262 0 HSB 01 Mikrofon Headset A 5270 0 EBB 01 Mikrofon Headset A 5271 0 EHR 01 Mikrofon Headset A 5272 0 MCB 10 10 F...

Страница 4: ...h 4 2 Xepton TRX 1 Transceiver 2 1 Elemente und Anzeigen Antenne Ladestatus LED Sprechen Status LED MUTE Taste MODE Taste Power Taste Headset Buchse USB Anschluss Taste Taste LCD Anzeige Audio Ausgangs Buchse ...

Страница 5: ... die Power Taste über 3 Sekun den lang gedrückt 2 3 Gruppe auswählen Schalten Sie das Gerät ein und halten Sie die MODE Taste über 3 Sekunden lang gedrückt Das GRP Symbol innerhalb der LCD Anzei ge beginnt zu blinken Wählen Sie eine Grup pen Nummer von 0 39 unter Verwendung der und Tasten aus Warten Sie nach der Auswahl 3 Sekunden um die Auswahl zu übernehmen Miteinander zu verbindende Sender und ...

Страница 6: ...obald die ID auf 00 gesetzt wird Gehen Sie folgendermaßen vor um die ID zu setzen Halten Sie bei eingeschaltetem Gerät die MODE Taste über 3 Sekunden lang gedrückt Das GRP Symbol der Anzeige beginnt zu blinken Drücken Sie erneut die MODE Taste Die Anzei ge ID beginnt zu blinken Wählen Sie unter Ver wendung der und Tasten eine ID Nummer von 00 99 aus wobei jede Nummer inner halb einer Gruppe nur ei...

Страница 7: ... schaltet auf Empfang Soll der TRX 1 nur zum Empfang verwendet wer den ist eine weitere Betätigung nach dem Ein schalten des Gerätes nicht notwendig Es können drei Geräte zeitgleich senden Der Mastersender und zwei beliebige weitere sekun däre TRX 1 Bitte beachten Sie Wird das Senden auf einem zusätzlichen sekun dären TRX 1 darüber hinaus aktiviert so verliert der erste TRX 1 in der Reihenfolge se...

Страница 8: ... eingeschaltetem Gerät die MODE Taste über 3 Sekunden lang gedrückt Das GRP Symbol der Anzeige beginnt zu blinken Drücken Sie nun 2 mal die MODE Taste Das Symbol SO blinkt nun innerhalb der Anzeige Wählen Sie nun mit den und Tasten die Einstellung SO um die Monitorfunktion einzu schalten oder SF um die Monitorfunktion zu deaktivieren Warten Sie nach Auswahl der Mo nitorfunktionsart 3 Sekunden um d...

Страница 9: ...ei eingeschaltetem Gerät die MODE Taste über 3 Sekunden lang gedrückt Das GRP Symbol der Anzeige beginnt zu blin ken Drücken Sie nun 3 mal die MODE Taste Das Symbol C1 blinkt nun innerhalb der Anzeige Wählen Sie nun mit den und Tasten eine Einstellung von C1 niedrige Empfindlichkeit bis C5 hohe Empfindlichkeit aus Anmerkung Die Grundeinstellung ist C3 ...

Страница 10: ...etem Gerät die MODE Taste über 3 Sekunden lang gedrückt Das GRP Symbol der Anzeige beginnt zu blinken Drücken Sie nun 4 mal die MODE Tas te Wählen Sie nun unter Verwendung der und Tasten die Einstellung UH für den er höhten Grundpegel und UL für den normalen Grundpegel aus Warten Sie nach Auswahl des Grundpegels 3 Sekunden um die Auswahl zu übernehmen Anmerkung Die Einstellung UH kann zu Ne benger...

Страница 11: ...s Bei erfolgter vollständiger Ladung schaltet sich die LED aus Zum Aufladen mehrerer Einheiten empfiehlt sich die Verwendung des 10 Fach Ladekoffers MCB 10 Zubehör Artikelnummer A 5252 0 2 11 Technische Daten xepton TRX 1 Gerätetyp Sende Empfangseinheit Abmessungen 98 x 49 x 17 mm H x B x T Gewicht 88 g Funkfrequenzart ISM 2403 2480 MHz Übertragungsart ISM 2 4 GHz FSK Modula tion mit Frequenzhoppi...

Страница 12: ... pro Gruppe inkl Mastersender Konformität Dieses Gerät erfüllt die Anforderungen folgender EU Richtlinien 2011 65 EG RoHS Richtlinie 2002 96 EG WEEE Richtlinie Die Konformität mit den o a Richtlinien wird urch das CE Zeichen auf dem Gerät bestätigt Die vollständige CE Konformitätserklärung steht im Internet unter www humantechnik com zur Verfügung Technische Änderungen vorbehalten Deutsch 12 ...

Страница 13: ...gkeit gefüllten Gegenstände z B Vasen neben die Geräte Ebenfalls dürfen keine offenen Brandquellen wie z B brennende Kerzen in die unmittelbare Nähe der Geräte gestellt werden Garantie Alle xepton Geräte weisen eine hohe Betriebs sicherheit auf Sollten trotz sachgerechter Bedie nung Störungen auftreten setzen Sie sich bitte mit Ihrem Fachhändler in Verbindung oder wen den Sie sich direkt an den He...

Страница 14: ...auf dem Produkt oder seiner Verpa ckung weist darauf hin dass dieses Produkt nicht als normaler Haushaltsabfall zu behandeln ist sondern an einer Annahmestelle für das Recy cling von elektrischen und elektronischen Gerä ten abgegeben werden muss Durch Ihren Beitrag zum korrekten Entsorgen dieses Produkts schützen Sie die Umwelt und die Gesundheit Ihrer Mitmenschen Umwelt und Gesundheit werden durc...

Страница 15: ...Deutsch 15 ...

Страница 16: ...hin groups ranging from simple dialogue to inter preter team teaching and conference systems Being slim and light weight in design it combi nes quality and versatility with easy use and sta te of the art radio technology 1 2 Scope of delivery xepton TRX 1 Please check if all of the following components are included xepton TRX 1 headset HSB 01 soft carry case USB charging cable UC 01 Leather carry ...

Страница 17: ... m Fully digitalized crystal clear sound quality Over 10 hours of use per battery charge Convenient charging by Micro USB compatible with most mobile phone charging adapters 9 volume levels 1 4 Available accessories TRP 1 stationary transmitter repeater A 5230 0 USB power supply unit A 5262 0 HSB 01 microphone headset A 5270 0 EBB 01 microphone headset A 5271 0 EHR 01 microphone headset A 5272 0 M...

Страница 18: ...glish 18 2 Xepton TRX 1 Transceiver 2 1 Controls and displays Antenna charging status LED talk status LED MUTE button MODE button power button headset jack USB jack button button LC Display audio out jack ...

Страница 19: ...button again for 3 seconds The device will switch off 2 3 Group selection Switch the device on and press the MODE button for 3 seconds The symbol GRP in the display will blink Select a group number of your choice between 00 and 39 by pressing the and buttons After the selection wait for 3 seconds to set the selec ted group number Transmitters and receivers must be set to the same group number if t...

Страница 20: ... TALK are indicated on the display To set the ID continue as follows On the powered up device press and hold the MODE button for 3 seconds The symbol GRP on the display will blink Press the MODE button again The symbol ID will start to blink By using the and buttons select an ID from 00 to 99 while taking care that each device within the group has its own number After the selection wait for 3 seco...

Страница 21: ...ds TALK will disappear from the display and the device is set to reception only If a TRX 1 is only intended for reception no further action is neccesary after switching it on Up to 3 devices can send at the same time The master unit and 2 others Please note If transmission is activated on a further TRX 1 the first TRX 1 in the activation sequence loses its right to transmit The master unit is not ...

Страница 22: ...wered up device press and hold the MODE button for 3 seconds The symbol GRP in the display will blink Press the MODE button two times The SO symbol in the display blinks By using the and buttons select SO to activate the mo nitoring function or SF to deactivate it After the selection wait for 3 seconds to set the selected function Please note The default setting is SF monitoring deactiva ted ...

Страница 23: ...ental requi rements On the powered up device press and hold the MODE button for 3 seconds The symbol GRP in the display will blink Press the MODE button three times The C1 symbol in the display blinks By using the and buttons select between C1 low sensiti vity and C5 high sensitivity Please note The default setting is C3 ...

Страница 24: ... up device press and hold the MODE button for 3 seconds The symbol GRP in the display will blink Press the MODE button four times The UH symbol is shown in the display By using the and buttons select UH high output or UL normal output After the selection wait for 3 se conds to set the selected output level Please note Selecting UH can cause white noise and should only be used in loud environments ...

Страница 25: ...charge The LED switches off when the bat tery is fully loaded To charge multiple devices we recommend using the 10 bay charging case MCB 10 Accessory item no A 5252 0 2 11 Specificaions xepton TRX 1 Device type Transmitter receiver Dimensions 98 x 49 x 17 mm H x W x D Weight 88 g Frequency type ISM 2403 2480 MHz Transmission mode ISM 2 4 GHz FSK modula tion with frequency hopping Transmission powe...

Страница 26: ...nsmitters 3 per group incl master transmitter Conformity This device satisfies the following EU directives 2011 65 EG RoHS directive 2002 96 EG WEEE directive Compliance with the directives listed above is confirmed by the CE seal on the device The complete CE compliance declaration is avai lable on the internet at www humantechnik com Specifications subject to change English 26 ...

Страница 27: ...ton devices are very reliable products Should a malfunction occur despite the unit ha ving been set up and operated correctly please contact your dealer or the manufacturer directly This warranty covers the repair of the product and returning it to you free of charge It is es sential that you send in the product in its original packaging so do not throw the packaging away The warranty does not app...

Страница 28: ... has to be returned to a collecting point for the recycling of electrical and electronic units You protect the environment and health of your fellow man by the correct disposal of this product Environment and health are endangered by in correct disposal Material recycling helps to reduce the consump tion of raw material You will receive further infor mation on the recycling of products from your l...

Страница 29: ......

Страница 30: ...ogue jusqu aux systèmes d interprétation de formation en équi pe et de conférence Ce système au design épuré et fin associe la qualité et la polyvalence à la facilité d utilisation et aux progrès les plus récents en matière de technologie radio 1 2 Équipement standard xepton TRX 1 Veuillez vérifier si les pièces suivantes sont pré sentes xepton TRX 1 casque avec microphone HSB 01 coffret de rangem...

Страница 31: ...squ à 300 m Qualité de son cristalline entièrement numérique Plus de 10 heures d autonomie par charge Chargement confortable à l aide du Micro USB compatible avec la plupart des chargeurs de téléphones portables 9 niveaux de volume 1 4 Accessoires disponibles Émetteur stationnaire TRP 1 A 5230 0 Bloc d alimentation USB A 5262 0 Casque avec microphone EBB 01 A 5271 0 Casque avec microphone EHR 01 A...

Страница 32: ...metteur récepteur 2 1 Éléments et affichages Antenne LED d état de chargement Parler LED d état Touche MUTE Touche MODE Touche Power Connecteur pour le casque Port USB Touche Touche Écran LCD Sortie audio Français 32 ...

Страница 33: ...uche Power enfoncée durant 3 secondes 2 3 Sélectionner un groupe Mettez l appareil en marche et maintenez la tou che MODE enfoncée durant 3 secondes Le symbole GRP se met à clignoter sur l écran LCD Sélectionnez un numéro de groupe de 0 à 39 en utilisant les touches et Après avoir sélectionné le groupe attendez 3 secondes pour confirmer la sélection Les émetteurs et les récepteurs à connecter doi ...

Страница 34: ...dentifiant est réglé sur 00 Procédez comme suit pour régler l identifiant Lorsque l appareil est allumé maintenez la tou che MODE enfoncée durant 3 secondes Le sym bole GRP se met à clignoter sur l écran Appuyez à nouveau sur la touche MODE Le symbole ID se met à clignoter Utilisez les tou ches et pour sélectionner un numéro d identifiant compris entre 00 et 99 cha que numéro ne pouvant être attri...

Страница 35: ... TALK disparaît et l écran bascule à nouveau en mode transmission Si le TRX 1 est uniquement utilisé pour la récep tion aucune activation supplémentaire n est nécessaire après avoir mis l appareil en marche Trois appareils peuvent émettre simultanément l émetteur Master et deux autres TRX 1 secondai res au choix Remarque Si l émission est activée sur un TRX 1 secondaire de plus le premier TRX 1 da...

Страница 36: ...ncée durant 3 secondes Le symbole GRP se met à clignoter sur l écran Appuyez ensuite 2 fois sur la touche MODE Le symbole SO clignote sur l écran À l aide des touches et sélectionnez le réglage SO pour activer la fonction de monitoring ou SF pour désactiver la fonction de monitoring Après avoir sélectionné l activation de la fonction de monitoring attendez 3 secondes pour confir mer la sélection R...

Страница 37: ...la maintenez la touche MODE enfoncée durant 3 secondes lorsque l appareil est en mar che Le symbole GRP se met à clignoter sur l écran Appuyez ensuite 3 fois sur la touche MODE Le symbole C1 clignote sur l écran À l aide des touches et sélectionnez ensuite un réglage de C1 faible sensibilité à C5 forte sensibilité Remarque Le réglage de base est C3 ...

Страница 38: ... secondes lorsque l appareil est en marche Le symbole GRP se met à clignoter sur l écran Appuyez ensuite 4 fois sur la touche MODE À l aide des touches et choisissez ensui te le réglage UH pour un niveau de base plus fort et UL pour un niveau de base normal Après avoir sélectionné le niveau de base atten dez 3 secondes pour confirmer la sélection Remarque Le réglage UH peut entraîner des bruits pa...

Страница 39: ... ter miné la LED s éteint Pour recharger plusieurs unités il est conseillé d utiliser le coffret de chargement pour 10 appareils MCB 10 accessoire référence A 5252 0 2 11 Spécifications xepton TRX 1 Type d appareil Émetteur récepteur Dimensions 98 x 49 x 17 mm H x l x P Poids 88 g Type de fréquence ISM 2403 2480 MHz Type de transmission Modulation avec saut de fréquence ISM 2 4 GHz FSK Puissance d...

Страница 40: ... émetteurs 3 émetteurs par groupe émetteur Master compris Conformité Cet appareil est conforme aux exigences des di rectives communautaires ci dessous RoHS Directive 2011 65 EC WEEE Directive 2002 96 EC La conformité avec les directives ci dessus est attestée par le logo CE apposé sur l appareil Les déclarations de conformité CE sont consultables sur Internet sur le site www humantechnik com Franç...

Страница 41: ...ar exemple un vase près de l appareil De même ne pas poser près de l appareil une source de combustion comme par exemple une bougie allumée Garantie Tous les appareils xepton sont très fiables Si en dépit d un montage et d un em ploi corrects des dysfonctionnements apparaissaient veuillez contacter votre vendeur spécialisé ou vous adres ser directement au fabricant La garantie comprend la réparati...

Страница 42: ... produit ne doit pas être jeté comme les déchets ménagers ordinaires mais apporté à un point de collecte pour le recyclage des déchets électriques et électro niques En respectant ces règles pour votre équipement usagé vous apportez une con tribution importante à la protection de l en vironnement et de votre santé Le non respect de ces règles pour votre équipement usagé constitue une atteinte à l e...

Страница 43: ......

Страница 44: ...toe passingen variërend van eenvoudige dia loogsystemen tot tolk cursus en congressys temen Met zijn slanke en lichte ontwerp combineert het systeem kwaliteit en veelzijdigheid met gebruiks gemak en de modernste radiotechnologie 1 2 Leveringsomvang xepton TRX 1 Controleer of alle volgende onderdelen zijn bij gesloten xepton TRX 1 Headset HSB 01 Zachte houder USB laadkabel UC 01 Lederen houder met ...

Страница 45: ...igitaliseerde kristalheldere geluidskwaliteit Meer dan 10 uren gebruik per batterijlading Gemakkelijk oplaadbaar met behulp van micro USB compatibel met de meeste laadadapters voor mobiele telefoons 9 volumeniveaus 1 4 Verkrijgbare toebehoren TRP 1 stationaire zender versterker A 5230 0 USB adapter A 5262 0 EBB 01 microfoon headset A 5271 0 EHR 01 microfoon headset A 5272 0 MCB 10 laadkoffer voor ...

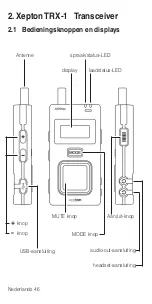
Страница 46: ...X 1 Transceiver 2 1 Bedieningsknoppen en displays Antenne laadstatus LED spraak status LED MUTE knop MODE knop Aan uit knop headset aansluiting USB aansluiting knop knop display audio out aansluiting Nederlands 46 ...

Страница 47: ...op de aan uit knop Het apparaat wordt uitgeschakeld 2 3 Groepsselectie Schakel het apparaat in en druk gedurende 3 se conden op de MODE knop Het symbool GRP op de display begint te knipperen Selecteer een groepsnummer van uw keuze tussen 00 en 39 door te drukken op de knoppen en Wacht na het maken van een keuze 3 seconden om het geselecteerde groeps nummer in te stellen Zenders en ontvangers moete...

Страница 48: ...y Ga als volgt te werk om het ID in te stellen Houd op het ingeschakelde apparaat gedurende 3 seconden de MODE knop ingedrukt Het sym bool GRP op de display gaat knipperen Druk nogmaals op de MODE knop Het symbool ID begint te knipperen Selecteer met behulp van de knoppen en een ID van 00 tot 99 en zorg er daarbij voor dat elk apparaat binnen de groep zijn eigen nummer heeft Wacht na het ma ken va...

Страница 49: ...rdwijnt van de display en het apparaat is alleen ingesteld op ontvangen Als een TRX 1 alleen is bedoeld voor ontvangst hoeft na het inschakelen geen verdere actie te worden ondernomen Er kunnen maximaal 3 apparaten tegelijkertijd zenden De masterunit en 2 andere Let op Als de zendfunctie wordt geactiveerd op nog een TRX 1 verliest de eerste TRX 1 in de activerings volgorde zijn recht om te zenden ...

Страница 50: ... de MODE knop ingedrukt Het sym bool GRP op de display begint te knipperen Druk twee maal op de MODE knop Het SO symbool op de display knippert Selecteer door gebruik te maken van de en knop pen SO om de monitorfunctie te activeren of SF om deze te deactiveren Wacht na het maken van een keuze 3 seconden om de geselecteerde functie in te stellen Let op De standaardinstelling is SF monitorfunctie ge...

Страница 51: ...akelde apparaat gedurende 3 seconden de MODE knop ingedrukt Het sym bool GRP op de display begint te knipperen Druk drie maal op de MODE knop Het C1 symbool op de display knippert Door gebruik te maken van de knoppen en kunt u een keuze maken tussen C1 lage gevoeligheid en C5 hoge gevoeligheid Let op De standaardinstelling is C3 Nederlands 49 ...

Страница 52: ...ngedrukt Het symbool GRP op de display begint te knipperen Druk vier maal op de MODE knop Het UH symbool wordt weergegeven op de display Met behulp van de en knoppen selec teert u UH hoog uitgangssignaal of UL normaal uitgangssignaal Wacht na het maken van een keuze 3 seconden om het geselecteerde signaal niveau in te stellen Let op Het selecteren van UH kan witte ruis veroorzaken en dient alleen ...

Страница 53: ...schakeld wanneer de bat terij volledig geladen is Om meerdere apparaten te laden raden wij aan ge bruik te maken van de 10 voudige laadkoffer MCB 10 Toebehoren artikelnr A 5252 0 2 11 Specificaties xepton TRX 1 Type apparaat Zender ontvanger Afmetingen 98 x 49 x 17 mm H x B x D Gewicht 88 g Type frequentie ISM 2403 2480 MHz Zendmodus ISM 2 4 GHz FSK modulatie met frequentiesprongen Zendvermogen Ma...

Страница 54: ...en 3 per groep incl master zender Conformiteit Dit apparaat voldoet aan de eisen van de volgen de EU richtlijnen 2011 65 EG RoHS Richtlijn 2002 96 EG WEEE Richtlijn De conformiteit met de voornoemde richtlijnen wordt bevestigd door het CE teken op het appa raat EG conformiteitsverklaringen staan online ter beschikking onder www humantechnik com Nederlands 52 ...

Страница 55: ...ver het systeem Garantie De xepton systeem is zeer betrouwbaar en veilig Mochten er ondanks correcte bediening storin gen optreden neem dan contact op met uw au dicien of rechtstreeks met de fabrikant De garantie omvat de kostenloze reparatie en het gratis terugsturen van defecte apparaten Voorwaarde voor de garantie is dat het apparaat in de originele verpakking teruggestuurd wordt Gooi de origin...

Страница 56: ...iet als normaal huisafval mag worden behandeld maar op een verzamel punt voor de recyclage van elektrisch en elektro nisch moet worden afgegeven Door uw bijdrage tot de correcte verwijdering van dit product be schermt u de het milieu en de gezondheid van uw medemensen Milieu en gezondheid worden door foute verwij dering in gevaar gebracht Materiaalrecyclage helpt het verbruik van grond stoffen te ...

Страница 57: ...Nederlands 55 ...

Страница 58: ...etariato team teaching e conferenza Con un design leggero e snello combina qualità e versatilità alla facilità d uso e ad una tecnologia wireless di ultima generazioney 1 2 Contenuto della scatola xepton TRX 1 Verificare che tutti i pezzi elencati di seguito siano contenuti nel volume di consegna xepton TRX 1 cuffie con microfono HSB 01 valigetta morbida di immagazzinamento cavo di carica USB UC 0...

Страница 59: ...mente digitale e cristallina Oltre 10 ore di esercizio per caricamento di batteria Carica confortevole mediante micro USB com patibile con la maggior parte dei caricabatterie per dispositivi mobili 9 livelli di volume 1 4 Accessori disponibili TRP 1 Ripetitore Trasmettitore fisso A 5230 0 Alimentatore USB A 5262 0 EBB 01 Set cuffie con microfono A 5271 0 EHR 01 Set cuffie con microfono A 5272 0 MC...

Страница 60: ...o 58 2 Xepton TRX 1 Transceiver 2 1 Elementi e indicatori Antenna Stato di carica LED Voce Stato LED Tasto MUTE Tasto MODE Tasto ON OFF Jack per cuffie Attacco USB Tasto Tasto Display LCD Jack di uscita audio ...

Страница 61: ...cora una volta il tasto di alimentazione per più di 3 secondi 2 3 Selezionare il gruppo Accendere l apparecchio e tenere il tasto MODE premuto per più di 3 secondi Il simbolo GRP inizia a lampeggiare all interno del display LCD Selezionare un numero del grup po da 0 a 39 utilizzando i tasti e Atten dere 3 secondi per consentire l acquisizione della selezione Sui trasmettitori e sui ricevitori da c...

Страница 62: ... ID viene impostato su 00 Procedere come segue per impostare l ID tenere premuto per più di 3 secondi il tasto MODE a dispositivo acceso Il simbolo GRP sul display inizia a lampeggiare Schiacciare di nuovo il tasto MODE L indicatore ID inizia a lampeggiare Selezionare un numero ID utilizzando i tasti e da 00 a 99 tenendo conto che ogni numero può essere as segnato solo una volta all interno di un ...

Страница 63: ...o TALK si spegne e l apparecchio inizia a ricevere Se il TRX 1 viene utilizzato per la ricezione non è necessario un ulteriore azionamento dopo l ac censione dell apparecchio 3 dispositivi possono trasmettere in contempo ranea il trasmettitore master e due altri TRX 1 secondari a piacere Osservare se la trasmissione viene attivata anche su un altro TRX 1 secondario il primo TRX 1 in fila perde il ...

Страница 64: ...e 3 secondi a dispositivo acceso Il simbolo GRP sul display inizia a lampeggiare Premere ora 2 volte il tasto MODE Il simbolo SO lampeggia ora all interno del display Con i tasti e selezionare ora l impostazione SO per attivare il funzionamento del monitor o SF per disattivarla Attendere 3 secondi dopo la selezione del tipo di monitor per accettare la selezione Nota nell impostazione di base la fu...

Страница 65: ...elli tenere premuto il tasto MODE per oltre 3 secondi a dispositivo acceso Il simbolo GRP sul display inizia a lampeggiare Premere ora 3 volte il tasto MODE Il simbolo C1 lampeggia ora all interno del display Con i tasti e selezionare ora un impostazione da C1 sensibilità bassa fino a C5 sensibilità alta Nota l impostazione base è C3 ...

Страница 66: ...premuto il tasto MODE per più di 3 secondi a dispositivo acceso Il simbolo GRP sul display inizia a lampeggiare Premere ora 4 volte il tasto MODE Utilizzando i tasti e selezionare l impostazione UH per il livello base aumentato e UL per il livello base normale Attendere 3 secondi dopo la sele zione del livello base per accettare la selezione Nota l impostazione UH può causare lo sviluppo di rumori...

Страница 67: ...di carica In caso di caricamento di successo e completo il LED si spegne Per caricare più unità si consiglia l uso della va ligetta di carica a 10 vani MCB 10 accessori codice articolo A 5252 0 2 11 Dati tecnici xepton TRX 1 Tipo di apparecchio Unità trasmittente ricevente Dimensioni 98 x 49 x 17 mm H x L x P Peso 88 g Tipo di frequenza ISM 2403 2480 MHz Tipo di trasmissione ISM 2 4 GHz FSK modula...

Страница 68: ...Z Numero massimo di trasmettitori 3 pezzi per gruppo incl trasmettitore master Conformità Il presente apparecchio è conforme ai requisiti delle seguenti direttive UE 2011 65 EG Direttiva RoHS 2002 96 EG Direttiva WEEE La conformità con le direttive di cui sopra viene confermata dalla marcatura CE sull apparecchio Le dichiarazioni CE di conformità sono disponibili sul sito Internet www humantechnik...

Страница 69: ...prodotto Garanzia La systema xepton ha un funzionamento estre mamente sicuro Se si dovessero però presentare dei guasti no nostante la si sia montata ed utilizzata corretta mente contattare il rivenditore specializzato o rivolgersi direttamente al produttore La prestazione di garanzia comprende la ripara zione gratuita e la spedizione di ritorno gratuita dopo che è stata inviata anche la confezion...

Страница 70: ...ito attraverso i normali canali di smaltimento dei rifiuti domes tici ma portato a un centro di rac colta per il riciclo delle apparecchiature elettriche ed elettroniche Il corretto smaltimento dell apparecchio rappre senta un contributo attivo alla protezione dell am biente e della sa lute dei cittadini Al contrario uno smaltimento non corretto costi tuisce un pericolo per l ambiente e la salute ...

Страница 71: ...Italiano 69 ...

Страница 72: ...ntérpretes programación en equipo y de con ferencias Ligero y delgado en su diseño reúne calidad y mul tifuncionalidad con facilidad de manejo y el más actualizado estado de la tecnología radioeléctrica 1 2 Volumen de suministro xepton TRX 1 Compruebe por favor si todas las piezas indi cadas a continuación están incluidas xepton TRX 1 Auriculares con micrófono HSB 01 Maleta suave de conservación C...

Страница 73: ...Calidad de sonido digital limpia completo Más de 10 horas de servicio por carga de batería Carga confortable a través de micro USB com patible con la mayoría de cargadores de telefonía móvil 9 niveles de volumen 1 4 Accesorios disponibles TRP 1 Repetidor transmisor estacionario A 5230 0 Fuente de alimentación USB A 5262 0 EBB 01 auriculares con micrófono A 5271 0 EHR 01 auriculares con micrófono A...

Страница 74: ...nsceiver 2 1 Elementos e indicaciones Antena LED de estado de carga Hablar LED de estado Tecla MUTE Tecla MODE Tecla ON OFF Hembrilla de auriculares con micrófono Conexión USB Tecla Tecla Indicación LCD Hembrilla de salida de audio ...

Страница 75: ...a nuevamente presionada la tecla ON OFF durante más de 3 segundos 2 3 Seleccionar grupo Conecte el dispositivo y mantenga oprimida la tecla MODE durante más de 3 segundos El símbolo GRP dentro de la indicación LCD comienza a parpadear Seleccione un número de grupo de 00 39 mediante el empleo de las teclas y Aguarde 3 segundos tras la selección para aceptarla Los transmisores y receptores a ser con...

Страница 76: ...to que el ID se establece en 00 Pro ceda de la siguiente manera para establecer el ID Con el dispositivo encendido mantenga oprimi da la tecla MODE durante más de 3 segundos El símbolo GRP de la indicación comienza a parpadear Oprima nuevamente la tecla MODE La indicación ID comienza a parpadear Mediante el empleo de las teclas y seleccione un número de ID de 00 99 en donde cada número dentro de u...

Страница 77: ...lo TALK se apaga y el apa rato conmuta a recepción Si el TRX 1 solo debe emplearse para la recep ción ya no es necesario ningún otro acciona miento tras conectar el aparato Pueden transmitir tres dispositivos simultánea mente El transmisor maestro y dos otros TRX 1 secundarios indistintos Por favor observe Si más allá de ello la transmisión en el TRX 1 secundario adicional se activa el primer TRX ...

Страница 78: ...do la tecla MODE durante 3 segundos El símbolo GRP de la indicación comienza a parpadear Oprima ahora 2 veces la tecla MODE El símbo lo SO parpadea en la indicación Seleccione ahora con la tecla y la configuración SO para conectar la función de monitor y SF para volver a desactivarla Tras la selección del tipo de función de monitor aguarde 3 segundos para aceptarla Observación En la configuración ...

Страница 79: ...primida con el dispositivo encendido la tecla MODE durante 3 segundos El símbolo GRP de la indicación comienza a parpadear Oprima ahora 3 veces la tecla MODE El símbolo C1 parpadea dentro de la indicación Seleccio ne ahora con las teclas y la configuración de C1 baja sensibilidad hasta C5 alta sen sibilidad Observación La configuración básica es C3 ...

Страница 80: ...ivo encendido la tecla MODE durante 3 segundos El símbolo GRP de la indicación comienza a parpadear Oprima ahora 4 veces la tecla MODE Mediante el empleo de las tecla y seleccione ahora la configuración UH para el nivel básico in crementado u UL para el nivel básico normal Tras la selección del tipo del nivel básico aguar de 3 segundos para aceptarla Observación La configuración UH puede conducir ...

Страница 81: ...este procedimiento Con la carga completa realizada el LED se apaga Para cargar varias unidades se recomienda el empleo del maletín de carga con 10 compartimien tos MCB 10 Accesorios Artículo nº A 5252 0 2 11 Datos técnicos xepton TRX 1 Tipo de dispositivo Unidad de transmisión recepción Dimensiones 98 x 49 x 17 mm H x A x P Peso 88 g Tipo de frecuencia ISM 2403 2480 MHz Tipo de transmisión ISM 2 4...

Страница 82: ...kHZ Cantidad de transmisores máx 3 unidades por grupo incl transmisor maestro Conformidad Este aparato cumple los requisitos de las sigu ientes Directivas de la UE Dir ectiva 2011 65 EG RoHS Dir ectiva 2002 96 EG WEEE La conformidad con las directivas anteriores está avalada por la marca CE que lleva el aparato Las declaraciones de conformidad CE están disponibles en Internet en www humantechnik c...

Страница 83: ...on agua como por ejemplo floreros ni objetos que produzcan una llama viva tales como velas encendidas encima o cerca del producto Garantie Todos los equipos xepton presentan una alta seguridad de funcionamiento En caso de que a pesar de haberse montado y operado de forma adecuada se presenten fallos le rogamos cont actar su establecimiento especializado o directa mente el fabricante La prestación ...

Страница 84: ...l producto o en su embalaje indica que este producto no debe eliminar junto con el resto de desechos sino que debe llevarse a un centro de recogida de residuos para el reciclado de equi pos eléctricos y electrónicos Desechando estos equipos correctamente cont ribuye de manera importante a la protección del medio ambiente y a su salud Desechar estos equipos incorrectamente pone en peligro el me dio...

Страница 85: ...Español 83 ...

Страница 86: ......

Страница 87: ......

Страница 88: ... 4057 Basel SMS Audio Electronique Sàrl 173 rue du Général de Gaulle F 68440 Habsheim Hoorexpert BV Gildenstraat 30 NL 4143 HS Leerdam Tel 49 0 76 21 9 56 89 0 Fax 49 0 76 21 9 56 89 70 E mail info humantechnik com GB Great Britain Tel 41 0 61 6 93 22 60 Fax 41 0 61 6 93 22 61 E mail info humantechnik com Tel 33 0 3 89 44 14 00 Fax 33 0 3 89 44 62 13 E mail sms audiofr com Tel 31 0 3 45 63 23 93 F...

Отзывы: