


2
■
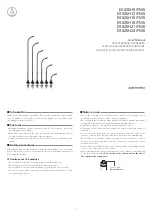
Assembly
• Insert the gooseneck assembly (c) while rotating it into the flush-mount power
module (d).
• Tighten until it does not rotate, and use the hex wrench (i) to tighten the set
screw (h) and set the gooseneck assembly in place.
• Connect the capsule (b) to the gooseneck assembly, and attach the windscreen (a).
* If the parts are not sufficiently tightened together, problems may occur such as
the LED colors of the gooseneck assembly and power module not matching or
sound is not output.
• Refer to the LED table to the right and set the LED color before attaching to
the mounting surface.
• If you are installing the flush-mount power module on a table without the isolators,
you must make a hole with a diameter of 20.5 mm in the mounting surface.
• If you are installing with the isolators, the hole must have a diameter of 23.5 mm.
Inserting the isolators between the mounting surface and power module allows
you to separate the flush-mount power module from the mounting surface.
• Attach the upper part isolator (e) to the mounting surface, and attach the flush-
mount power module (d). Attach the lower isolator (f) to the reverse side of the
mounting surface, and then tighten the nut (g).
a
b
c
d
e
f
g
h
i
■
Switch setting and functions
1
5
4
MIC
2
Contact
Closure
GND
1.
Action
5.
LED
status
4.
LED color
3.
Audio
status
2.
Contact
closure
status
■
LED color
1
2
3
OFF
RED
GREEN
YELLOW
4
5
6
7
BLUE
MAGENTA
CYAN
WHITE
■
Wiring
PIN1
(Ground)
PIN5
(LED control)
PIN4
(Contact closure)
PIN3
(Cold)
PIN2
(Hot)


