


12
LOCK CODE
9999
MUTE OFF
LOCK KEY
Lock
MUTE ON
0
***
9 9 9 9
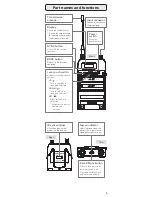
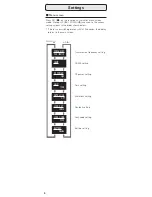
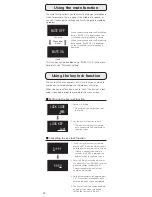
Using the key lock function
Using the mute function
The key lock function prevents entry into the menu screen to
avoid any unwanted changes to the product's settings.
When the key lock function is set to "Lock," the entry of a lock
code is required in order to proceed to the menu screen.
The mute function allows you to manually mute your microphone
when, for example, there is a gap in the middle of a speech, or
you want to change the settings and transmitting audio would be
a problem.
This function can be disabled using "MUTE LOCK" in the menu.
For details, see "Mute lock setting".
■
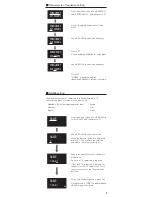
Setting up the key lock function
■
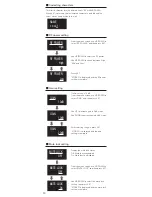
Cancelling the key lock function
1. Set up a lock code.
* Do not forget the 4-digit code that
you set up.
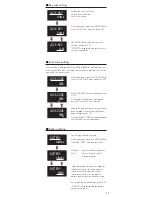
When you press and hold the Recall/Mute
button, "MUTE ON" is displayed on the
screen and your microphone is muted.
When you press and hold the Recall/Mute
button again, "MUTE OFF" is displayed
on the screen and your microphone is
unmuted.
1. If the key lock function is activated,
pressing SET when the main screen is
on displays the lock code entry screen.
* If there is no operation within 10
seconds or if BACK is pressed, the
display returns to the main screen.
2. Enter the 4-digit lock code which was
set up earlier. Use UP/DOWN to select
a desired number and press SET.
Repeat the operation until all four
numerals are entered.
3. Once all four numerals are entered, press
SET. If the correct lock code has been
entered, the menu screen is displayed.
4. The key lock function can be disabled
by going to the menu screen and
setting the function to "Unlock."
2. Set the key lock function to "Lock."
* The key lock function is activated
once you press BACK and return to
the main screen.
Unmuted
Muted
Press and
hold
Содержание ATW-T6001 S
Страница 15: ...15 Memo ...
Страница 16: ...232305380 01 01 ver 1 2016 11 22 Audio Technica Corporation 2016 Audio Technica Corp ...


