background image

5

Preparation for use

Installing the turntable


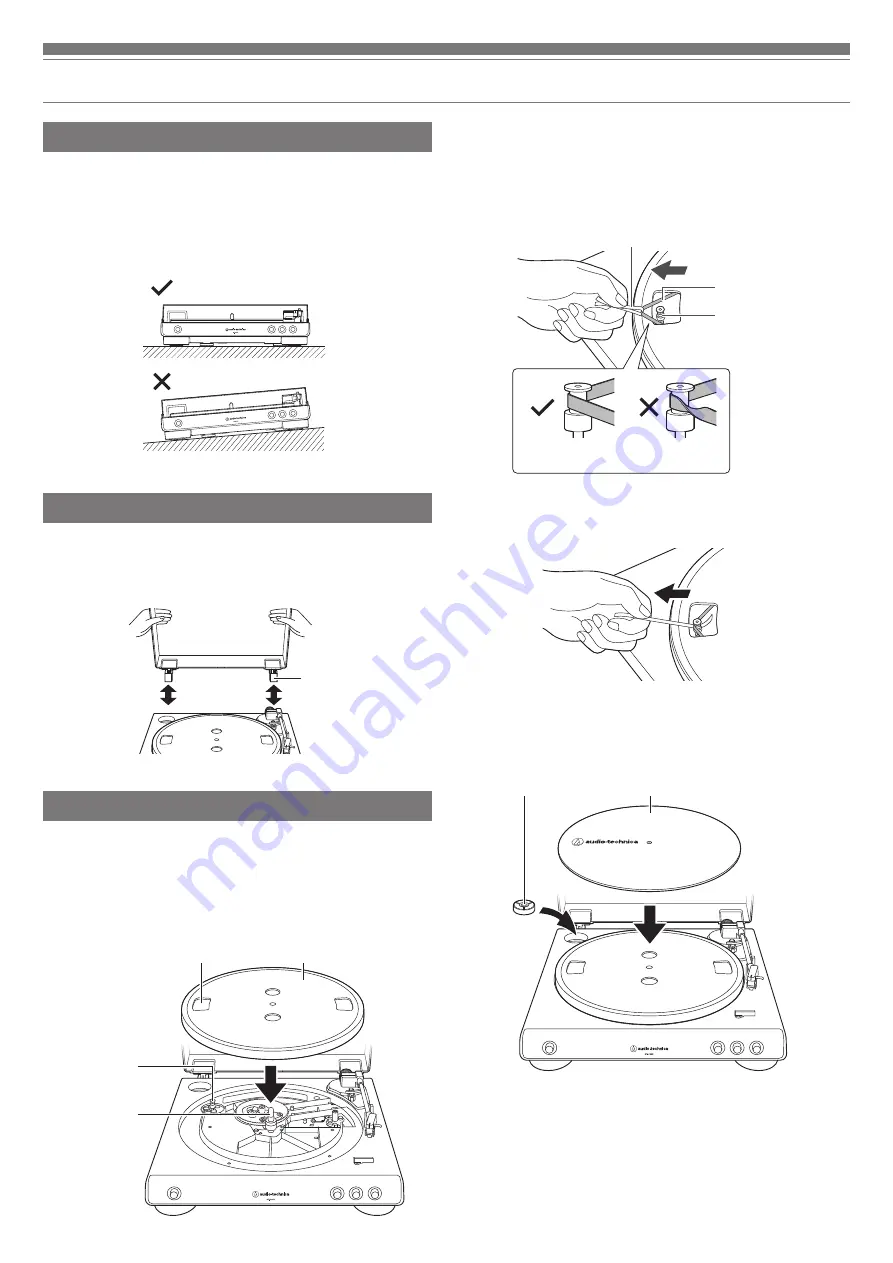
Mount the product on a level surface.


To avoid the effects of vibrations and acoustic pressure, do 

not mount the product next to such items as speakers.


The product may pick up radio static if placed next to a radio. 

Therefore, try to keep the product away from radios.


If the product is near equipment (cell phone, etc.) that emits 

strong radio waves, noise may occur.

Installing/removing the dust cover

When removing the dust cover, slowly pull the dust cover out 
from the dust cover hinge holders. When attaching the dust 
cover, insert the hinges of the dust cover into the two dust 
cover hinge holders on the back of the body.

Assembling the product

This product requires some assembly before using it for the 
first time.
Do not connect the AC adapter until assembly is complete.

1.  Set the platter on the spindle.

• 

Make certain that the platter is fully seated on the spindle.

2.  Place the belt on the motor pulley (brass-colored).

• 

Align one of the platter openings with the brass motor 

pulley, and, while pulling both ends of the red ribbon that 

comes attached to the belt, place the belt on the motor 

pulley, as per the diagram. When doing this, be careful not 

to twist the belt.

3.  Remove the red ribbon from the belt.

4.  Set the felt mat on the platter.

• 

After setting the felt mat, put the 45 RPM adapter into the 

space made for it on the upper left.

Felt mat

45 RPM adapter

Opening

Platter

Spindle

Motor pulley 

(brass-colored)

Hinge

Straight

Twisted

Motor pulley 
(brass-colored)

Belt

Red ribbon

Содержание AT-LP60X

Страница 1: ...User Manual Automatic Belt Drive Turntable AT LP60X ...

Страница 2: ...of AC adapter of the product are correct for the country you live in Package contents Make sure that you have all the included items listed below before using this product If some items are missing or damaged contact your local Audio Technica dealer Turntable body Felt mat Platter with drive belt AC adapter approx 1 5 m 4 9 Quick start guide Caution guide 45 RPM adapter RCA audio cable approx 1 2 ...

Страница 3: ...approved in this manual could void your authority to operate this equipment Note This equipment has been tested and found to comply with the limits for a Class B digital device pursuant to part 15 of the FCC Rules These limits are designed to provide reasonable protection against harmful interference in a residential installation This equipment generates uses and can radiate radio frequency energy...

Страница 4: ...r 11 Platter speed button Select the platter speed 33 1 3 or 45 RPM 12 START button Spins the platter and moves the tonearm 13 STOP button Returns the tonearm to its original position and stops the platter 14 Tonearm lift button Lifts and lowers tonearm for manual selection 15 Pre amplifier selector switch If using an amplifier with a PHONO input jack set this switch to the PHONO position If conne...

Страница 5: ...the body Assembling the product This product requires some assembly before using it for the first time Do not connect the AC adapter until assembly is complete 1 Set the platter on the spindle Make certain that the platter is fully seated on the spindle 2 Place the belt on the motor pulley brass colored Align one of the platter openings with the brass motor pulley and while pulling both ends of th...

Страница 6: ... pre amplifier selector switch This product has a built in phono equalizer function You can use the product even if you do not have a phono amplifier or connectable equipment with a built in phono amplifier Use the pre amplifier selector switch to set the output as shown below Connectable equipment being used Position of pre amplifier selector switch Where to connect RCA audio cable Device with ph...

Страница 7: ...ze with the size selector Select 12 for an LP record with a 12 diameter and 7 for a 45 RPM record with a 7 diameter 2 Press the speed with the platter speed button Select 33 for a 33 1 3 RPM record and 45 for a 45 RPM record 3 Press the START button Do not bump the product while the record is playing Do not switch the record size selection while the record is playing Doing either of these can caus...

Страница 8: ...he STOP button to complete this operation If the felt mat gets dirty it can easily scratch the record so remove the felt mat periodically and wipe off any dust To prevent the record from scratches and warping remove it after use Do not use a disk stabilizer Do not use a platter other than the one provided This product is not intended for DJs Do not touch the record or the platter while the record ...

Страница 9: ...ck 3 Make sure there is no gap between the headshell and the cartridge Replacing the belt The belt is a consumable part Replace the belt if the speed of playback slows down or irregular rotation occurs As a rule of thumb we suggest replacing the belt once a year Before replacing the belt be sure to disconnect the product s AC adapter from the outlet 1 Remove the felt mat 2 Remove the platter turn ...

Страница 10: ...ginal packing materials wrap the turntable in the reverse order from when you unwrapped it If you do not have the packaging materials take the following measures After disconnecting the AC adapter from the outlet remove the felt mat and platter and then wrap them so that they do not get damaged Attach the protector to the cartridge Use a string or something similar to tie the tonearm to the rest s...

Страница 11: ... is not loud enough the product is set to the PHONO position and connected to the amplifier s AUX LINE input If the volume is too loud or is distorted the product is set to the LINE position and the connectable equipment is connected to the PHONO input The stylus skips Is the record warped Check the record Is the record scratched Check the record There is howling Is the product picking up excessiv...

Страница 12: ...on 1 0 W AC adapter 12 V 2 A Dimensions 359 5 mm 14 15 x 97 5 mm 3 84 x 373 3 mm 14 70 W x H x D Weight 2 6 kg 5 73 lbs Accessories Dust cover Felt mat Platter with drive belt 45 RPM adapter RCA audio cable approx 1 2 m 3 9 AC adapter approx 1 5 m 4 9 Replacement stylus sold separately ATN3600L Replacement belt sold separately AT LP60X exclusive belt Specifications are subject to change without no...

Отзывы: