


English
5
Initial Setup
(continued)
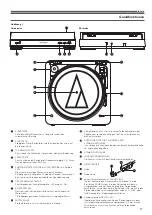
Operation
Automatic Operation
1. Remove the stylus guard from the stylus assembly
(Fig. 4).
2. Put a record on the turntable. If needed, use the
45 RPM adapter (Fig. 5).
3. Select the size of record: 12" or 7" (Fig. 6).
4. Select the speed: 33
1
/
3
RPM or 45 RPM (Fig. 7).
5.
Start:
Gently push the START button (Fig. 8a). The turntable
will start and the tone arm automatically will move to the
lead-in groove. When the record has finished playing, the
tone arm automatically will return to the tone arm rest and
the turntable will shut off.
6.
Stop:
To stop playing the record before it reaches the end,
press the STOP button (Fig. 8b). The tone arm will lift and
return to the tone arm rest, and the turntable will shut off.
7.
Pause:
To pause the record before it has completed playing,
press the tone arm Lift button (Fig. 8c). Press the Lift button
again to continue playing the record.
Connecting to Stereo System (Wireless Connection)
About Pairing
To connect the turntable to a
Bluetooth
receiver device, the turntable
needs to pair (register) with the device. Once it is paired, you will not
need to pair it again with that device, except in the following cases:
• If the turntable is deleted from the
Bluetooth
receiver device
connection history,
• If the turntable is sent out for repair,
• If the turntable is paired with 9 devices or more.
(The turntable can be paired with up to 8 devices. When you pair
with a new device after pairing with 8 devices, pairing information
for the device with the oldest connection date will be overwritten by
information for the new device.)
How to Perform Pairing
* Read the user manual for the
Bluetooth receiver device.
* Place the
Bluetooth receiver device within 1 meter of the turntable to
perform pairing correctly.
1. Set the
Bluetooth receiver device into “pairing mode”.
2. After connecting the turntable’s power cable plug to an AC
outlet, press and hold the wireless function button for about
4 seconds. The button’s Indicator LED will begin flashing red/
blue.
3. When the pairing is successfully performed, the Indicator will
turn blue.
Listening to Music
1. Once pairing has been performed, press and hold the wireless
function button for about 2 seconds to turn on the
Bluetooth
function. Turn on the
Bluetooth receiver device. Indicator will
turn blue when the signal is transmitted correctly.
2. Play and enjoy music according to the Automatic Operation
(See below) or Manual Operation (See Page 6) instructions.
3. Press and hold the wireless function button for 2 seconds to
cut the connection to the
Bluetooth receiver device. Indicator
will turn off.
About Indicator Display
The wireless function button’s Indicator LED displays the following
wireless operating status by flashing or turning on:
Operating status
Searching for device
Pairing
Connect
Waiting to be
connected
LED display patterns
Flashing
Lit
Connecting
Blue
Red
Figure 4
Stylus assembly
Stylus (“Needle”)
Stylus guard
Figure 5
45 RPM adapter
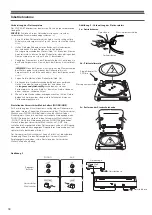
Connecting to Stereo System (Wired Connection)
1. Connect the output cable’s mini-plug to the ANALOG OUT on
the rear panel.
2. Connect the output cable’s red RCA-type pin-plug to the right
channel input and the white RCA-type pin-plug to the left
channel input of your stereo system (Fig. 3, page 4).
3. With the tone arm still fastened to the tone arm rest, slowly
turn the turntable platter
clockwise
ten times, to make certain
the automatic mechanism is fully cycled.
4. Remove the vinyl tie that holds the tone arm on its rest.
5. Connect the power cable plug to an AC outlet. Make sure the
AC outlet supplies the proper voltage for the AT-LP60-BT you
are using.