background image


WE  STRONGLY  RECOMMEND  THE  INITIAL  IO  LIMITED  POWER  SUPPLY 
INSTALLATION  AND  SET  UP  SHOULD  BE  CARRIED  OUT  BY  AN  APPOINTED 
AUDIO NOTE (UK) DEALER. 
 
IRREPARABLE  DAMAGE  NOT  COVERED  UNDER  WARRANTY  MAY  BE 
CAUSED  TO  THE  CARTRIDGE  AND  POWER  SUPPLY  BY  INCORRECT  INITIAL 
SET UP.


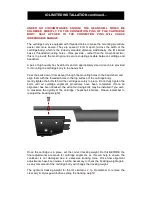
Once  all  cartridge  connections  have  been  made,  the  operating  voltage  for  the 
cartridge can be set. 
 

ENSURE THE 

ʻ

CARTRIDGE

ʼ

 SWITCH IS IN THE 

ʻ

OFF

ʼ

 POSITION 

(TURNED ANTICLOCKWISE / LEFT). 


Connect the power supply unit to the mains supply, via the IEC socket located on the 
rear  /  right  of  the  device.  Once  connected,  turn  the  unit  on  using  the 

ʻ

Mains  On

ʼ


switch, located on the right hand side of the front fascia. Turn the switch clockwise / 
right. The red 

ʻ

power

ʼ

 LED situated below the 

ʻ

Mains On

ʼ

 switch should glow RED. 

 
Next, switch on the meter using the 

ʻ

Meter

ʼ

 switch, located on the lower left hand side 

of the front fascia. Turn the switch clockwise / right. 
 
At this stage the meter on the front of the power supply unit should show a reading of 
1.8V DC – 2.0V DC (divide the value on the meter scale by 10). 
 
Turn the cartridge supply on using the 

ʻ

Cartridge On

ʼ

 switch, located on the left hand 

side of the front fascia. Turn the switch clockwise / right. 
 
With an accurate voltmeter set to the 2V DC scale, measure the voltage at the PSU 
connection pins on the cartridge. 
 

BE EXTREMELY CARFUL, AND DO TOUCH BOTH PINS WITH THE SAME TEST 
PROBE  OR  CREATE  A  SHORT  CIRCUIT;  THIS  WILL  POSSIBLY  DAMAGE  THE 
CARTRIDGE AND POWER SUPPLY!! 
 

The  voltage  at  the  PSU  connection  pins  on  the  cartridge  should  be  in  the  region  of 
1.2V DC to 1.3V DC. 
 
If the voltage is within the required region, proceed to the next section of this manual 
entitled 

ʻ

OPERATION

ʼ

.  If  it  is  higher  or  lower  than  required,  the  voltage  must  be 

adjusted as follows: - 
 
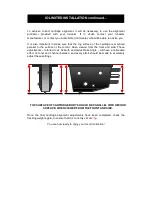
On  the  rear  of  the  power  supply  unit  is  the  cartridge  voltage  potentiometer.  Viewed 
from the rear of the PSU, turn this switch 

ANTICLOCKWISE

 to 

INCREASE

 cartridge 

voltage and 

CLOCKWISE

 to 

DECREASE

 cartridge voltage. 

 
Check  the  cartridge  voltage  again,  and  repeat  the  above  steps  until  a  voltage  of 
between 1.2V DC and 1.3V DC is achieved. 
 

NEVER SET THE CARTRIDGE VOLTAGE TO GREATER THAN 1.3V DC!


IO LIMITED PSU INITIAL SET UP 

Содержание IO LIMITED

Страница 1: ... IO LIMITED MOVING COIL CARTRIDGE AND POWER SUPPLY OWNERʼS INFORMATION ...

Страница 2: ...E DECLARATION OF CONFORMITY DISPOSAL POWER REQUIREMENTS 3 INTRODUCTION 4 OVERVIEW UNPACKING AND INSTALLATION 5 VALVE INSTALLATION 6 CONNECTION 7 OPERATION 8 TECHNICAL SPECIFICATIONS 9 WARRANTY INFORMATION 10 CONTACT INFORMATION CONTENTS ...

Страница 3: ...e provided Do not restrict airflow through any ventilation slots or place the unit on any surface that may restrict airflow Valve equipment operates at extremely high temperatures KEEP OUT OF THE REACH OF CHILDREN AND ANIMALS Do not store or operate this unit in areas of high humidity or in close proximity to water moisture Do not expose or immerse the unit in liquid of any kind This product must ...

Страница 4: ...normal household waste To prevent possible harm to the environment please separate the product from other waste to ensure that it can be recycled in an environmentally safe manner Please contact your retailer or the appropriate local government office for collection facilities We declare under our sole responsibility that this product is in conformity with the following standards or standardized d...

Страница 5: ...ts specifications are subject to change without notice Therefore it is important to refer to the manual that is supplied with your product for the most accurate information manuals downloaded from our website or obtained from other sources may no longer fully apply to your product If you have any questions regarding the information contained within this document or your new component please feel f...

Страница 6: ...anical movement of the stylus is accurately translated into an electrical signal Any extraneous excitations arising as a result of vibrations in the cartridge housing must be eliminated Therefore in the design of the Audio Note UK cartridges considerable attention has been paid to the rigidity and structural integrity of the body and to ensuring that the adopted mechanical construction stores the ...

Страница 7: ...ng all unnecessary connections Cantilever Material and Design It is on the design and construction of the cantilever that much of the quality of a cartridge depends Many materials were investigated Boron Beryllium Sapphire Diamond and Titanium and all except Titanium were disregarded in the final analysis due to deficiencies in one or more areas It is vitally important for the cantilever and stylu...

Страница 8: ...th the offerings from the various stylus manufacturers around the globe in 1995 we contracted a company to develop a process which would allow them to cut and polish a perfect natural octagon to a level of the best surgical instruments used for eye and other fine surgery on a diamond less than half the size of the closest readily available option at that time This remains to the best of our knowle...

Страница 9: ...itial installation procedure Carefully remove the wooden insert Underneath you should find an appropriately sized hex head wrench Gently hold the cartridge by its side cheeks and identify the two mounting bolts that secure it to the wooden insert Carefully remove the two mounting bolts and once removed retain these as they can be used to attach the IO Limited to your tonearm heashell Once the cart...

Страница 10: ...ernal power supply unit an additional pair of internal or external arm wires and a two core twisted pair external arm cable of suitable length to reach the external power supply unit will be required PLEASE REMEMBER THAT THE POWER SUPPLY UNIT CONNECTION CABLES MUST BE OF SUITABLE SIZE AND FLEXIBILITY SO THAT THE TRACKING AND OPERATION OF THE TONEARM IS NOT DISRUPTED Audio Note UK manufacture dedic...

Страница 11: ...and align them with the threaded holes in the top surface of the cartridge body Gently tighten the bolts to hold the cartridge securely in place Do not fully tighten the bolts until all cartridge alignment procedures have been completed Once all alignment has been finalized the extra four fixing bolts may be installed if you wish to maximize the rigidity of the cartridge headshell interface Please...

Страница 12: ...hen viewed from the front and side These adjustments referred to as Azimuth and Stylus Rake Angle will have a noticeable effect on tonal and channel balance and every effort should be made to accurately adjust these settings Once the final cartridge alignment adjustments have been completed check the tracking weight again to ensure that it is correctly set at 2 5g You are now ready to enjoy your r...

Страница 13: ...ading of 1 8V DC 2 0V DC divide the value on the meter scale by 10 Turn the cartridge supply on using the ʻCartridge Onʼ switch located on the left hand side of the front fascia Turn the switch clockwise right With an accurate voltmeter set to the 2V DC scale measure the voltage at the PSU connection pins on the cartridge BE EXTREMELY CARFUL AND DO TOUCH BOTH PINS WITH THE SAME TEST PROBE OR CREAT...

Страница 14: ...e cartridge is not in use Cartridge On switch in the ʻOFFʼ anticlockwise position and secondly it allows the supply to be disconnected when not in use which prolongs the life of the Io Limited THE CARTRIDGE SHOULD ALWAYS BE SWITCHED OFF WHEN NOT IN USE Meter On Located on the lower left hand side of the front fascia this switch is used to activate the test meter positioned on the front of the powe...

Страница 15: ...should a small soft artistʼs brush be used to clean the diamond of cantilever moving the brush slowly gently and extremely carefully from back to front never in the opposite direction or from side to side Cartridge Life The operational life of a cartridge can be affected by a variety of factors such as frequency of use ambient temperature humidity quality of vinyl being played etc Our approximate ...

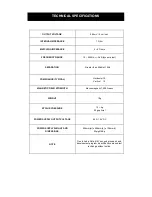
Страница 16: ...rizontal 10 Vertical 15 MAGNETIC FIELD STRENGTH Electromagnetic 1 200 Gauss WEIGHT 19g STYLUS PRESSURE 1 5 4g 2 5g optimal POWER SUPPLY OUTPUT VOLTAGE 0 4A 1 2V DC POWER SUPPLY WEIGHT AND DIMENSIONS 300mm w x 250mm d x 100mm h Weight 5Kg NOTE Due to Audio Note UK ʼs ongoing research and development program specifications are subject to change without notice TECHNICAL SPECIFICATIONS ...

Страница 17: ...or after the Warranty period If the product must be shipped please use the original packaging materials and include a copy of the original sales receipt along with a note explaining in as much detail as possible the problems you are experiencing with the unit Only use a reputable Courier Service or Shipping Agent and ensure that your product is insured during transit Any servicing repairs or modif...

Страница 18: ...31 498 e mail info audionote co uk CONTACT INFORMATION If in the future your Audio Note UK product requires servicing or if you require technical support or have any questions regarding this or any of our other products please contact your local Audio Note UK dealer Alternatively please feel free to contact us directly ...

Отзывы: