background image

Owner’s Enjoyment Manual

AudioControl

®

17

Dash Control

Placement And Mounting 

The dash control may be mounted under the 

dash using its own bracket or through a custom 

hole in the dash.  It should be within 

reach of the driver and in a 

spot where the LED is 

plainly visible.

Dash Bracket Installation

The dash control mounts with two screws, 

which attach to the underside of the dashboard.  

Slide under the dash and place the dash control 

in its mounting position, mark the two mount-

ing holes, drill pilot holes, and secure with two 

screws.

Custom Installation

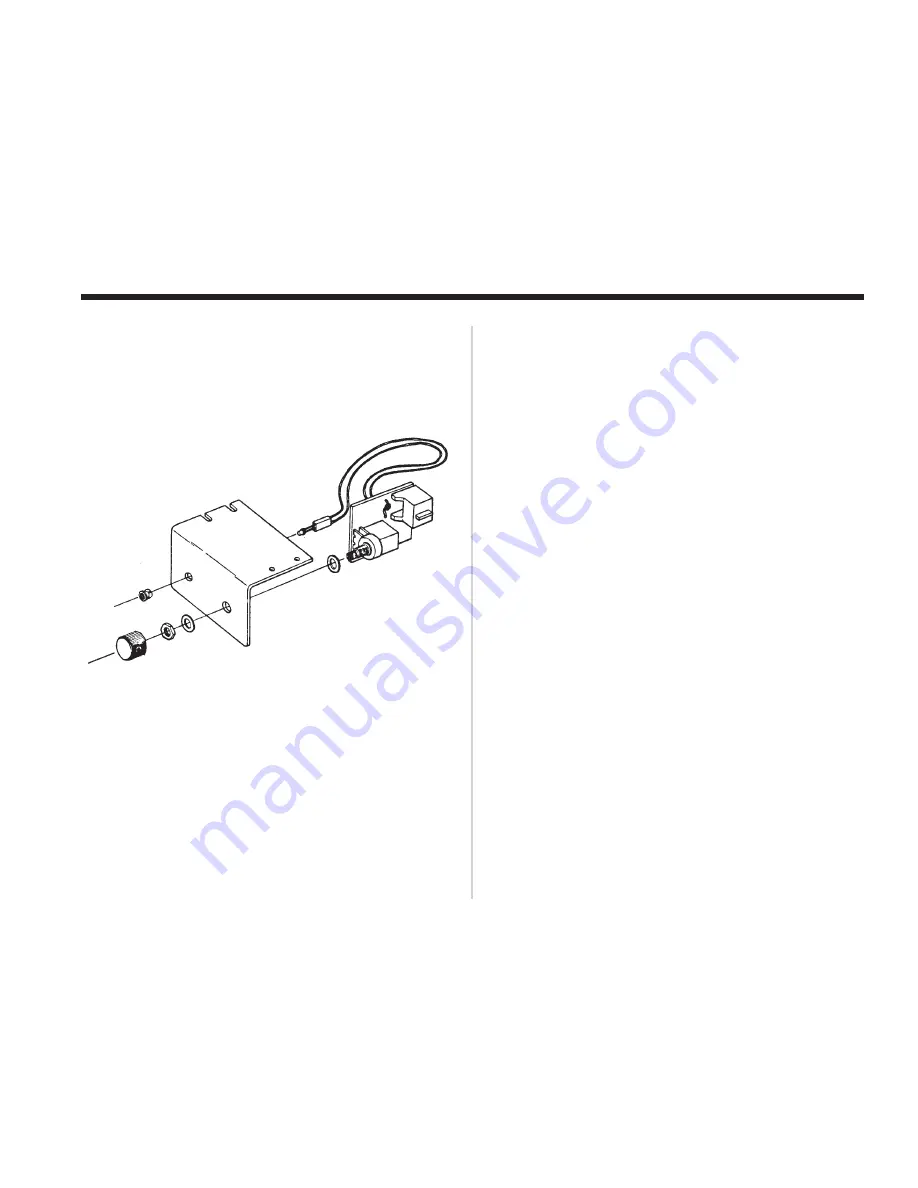
For that custom, finished look, the dash con-

trol can be flush mounted directly on the dash-

board (or anywhere else).  We have provided an 

extra label to help make this happen.  Referenc-

ing Figure 7, disassemble the dash control from 

the mounting bracket.  Start by pushing the LED 

from its holder followed by removing the circuit 

board and rotary control from the bracket.  Drill 

a 9/32 hole in the dashboard for the control 

along with a 1/8 hole for the lock tab and a 13/64 

hole for the LED holder.  Reassemble the dash 

control components on the dashboard and ap-

ply the new label over the openings

Figure 7:  Dash Control Assembly

Содержание DQL-8

Страница 1: ... Enjoyment Manual Eight Channel Line Output Converter with Digital Signal Processing and Auxiliary Input AudioControl 22410 70th Avenue West Mountlake Terrace WA 98043 USA Phone 425 775 8461 Fax 425 778 3166 www audiocontrol com tm Digital ...

Страница 2: ...Owner s Enjoyment Manual AudioControl This page was intentionally left blank ...

Страница 3: ...ghts 2 Quick Installation Information 5 Guided Tour of the DQL 8 7 Installation 10 Placement and mounting 10 Power wiring 10 Audio wiring 11 System diagrams 11 Level matching 16 Dash Control 17 Navigating the DQL 8 Menu Screens 18 Equalization adjustment 22 Troubleshooting 27 Warranty 28 Specifications 33 ...

Страница 4: ...t the home of AudioControl the world s leading designer and manufacturer of high performance signal pro cessing for autosound systems If you are read ing this manual you have most likely made a decision to maximize the performance of your factory installed system and wisely purchased the DQL 8 eight channel line output converter with digital signal processing This product is a unique combination o...

Страница 5: ...rametric Equalization Controls Car interiors vary widely in size and acoustic make up Doors kick panels and rear decks don t make the best location for speaker placement causing your high performance speaker system to sound somewhat lackluster The DQL 8 offers 130 individual one third and one half octave graphic equalization controls for your front rear and subwoofer channels plus two parametric b...

Страница 6: ...puts and memories 5 through 8 are available specifically for use with the auxiliary inputs Al though some of us have foggy memories for one reason or another the memories in your DQL 8 are non volatile This means they won t go away when you leave your dome light on at night and kill your battery 12 Volt Output Trigger Since you will be using an external amplifier s and processor in your system you...

Страница 7: ...flessly designed and manufactured in our factory located in the rainforests of the Pacific Northwest We take every effort to ensure that you will have many years of enjoyment out of your DQL 8 To ensure optimal performance we highly recommend that you allow your authorized AudioControl dealer to perform the installation Not only do they have all the right knowledge and tools but also in the unlike...

Страница 8: ...u need to know more then read on Heck if you don t think you need to know more you should still read on because you can never know too much 5 4 Adjust the Input Level control on your DQL 8 to match the source unit s output and then adjust the Output Level controls to match your amplifier inputs Note You will want to turn the gains on your amplifiers DOWN to maximize your systems perfor mance 5 Scr...

Страница 9: ...Owner s Enjoyment Manual The Strength of Digital 6 Figure 1 Basic DQL 8 System Push dash control to select auxiliary input ...

Страница 10: ...f your source unit has front rear and subwoofer speaker level outputs connect them to the appropriate inputs on your DQL 8 If the source unit only has front and rear inputs the Auto Mode circuitry in your DQL 8 automatically routes the Channel 3 Rear input channels to the subwoofer channels Input Level These knobs allow you to maximize the signal level that goes from your source unit into your DQL...

Страница 11: ...Owner s Enjoyment Manual The Strength of Digital 8 Figure 2 Top view of the DQL 8 ...

Страница 12: ...to any home appli ances like your toaster Power Connections This incredibly handy connector is a godsend to those who have tried to wire up their gear with their body crammed in the trunk You can wire up the power ground and remote turn on from the convenience of outside your car and then casu ally plug it into your DQL 8 Output Mode These cool blue lights indi cate the input mode of your DQL 8 as...

Страница 13: ...ting wiring Nothing ruins your day more than an expen sive repair bill Drill a few small pilot holes and secure the chassis of the DQL 8 with self tapping screws 2 DQL 8 Power Wiring WARNING Failure to disconnect the negative terminal of your battery prior to the installation of your DQL 8 can result in a warm tingly feeling Remote Turn On Connect an 18 to 22 gauge wire from the head unit s remote...

Страница 14: ...e numerous ways to configure the DQL 8 in your audio system Spend a little quality time planning out your system and even sketching it out on paper The diagrams on the following pages are just a few of the system options Figure 3 Eight channel inputs with six channel out Crossed over front inputs summed together ...

Страница 15: ...Owner s Enjoyment Manual The Strength of Digital 12 Figure 4 Four channel inputs with six output channels Subwoofer output fed by crossed over main input ...

Страница 16: ...Owner s Enjoyment Manual AudioControl 13 Figure 5 Four input channels with Auxiliary input with six output channels Subwoofer output fed via automode from rear input ...

Страница 17: ...tructed cables are less problematic in rugged environments like your car system Summing The Outputs The software in your DQL 8 allows you to receive signals from the Main Inputs along with Channel 2 Channel 3 and or Channel 4 which can then be summed together internally The LED indicators on your DQL 8 will indicate which channels are being summed The shipped from the factory setting is in the Non...

Страница 18: ... each input until your RTA is displaying a smooth or flat response curve 5 If you need to make any additional frequen cy response adjustments you can use the equal izers built in to the DQL 8 Figure 6 Using an AudioControl real time analyzer to measure the summed front factory outputs ...

Страница 19: ...ng at this point If you are hearing music go back to step 2 If you are hearing voices go see a doc tor 4 Starting with the DQL 8 Input Level con trols adjust the control knobs until the Input Maximized LED s begin to flicker steadily with the music 5 Now adjust the output level control until the 2 volt or 5 volt light starts to flicker You will want the output voltage to match up to your amplifier...

Страница 20: ...s drill pilot holes and secure with two screws Custom Installation For that custom finished look the dash con trol can be flush mounted directly on the dash board or anywhere else We have provided an extra label to help make this happen Referenc ing Figure 7 disassemble the dash control from the mounting bracket Start by pushing the LED from its holder followed by removing the circuit board and ro...

Страница 21: ...ince there are only a few knobs navigating through the DQL 8 s functions is quite simple When you first apply power to your DQL 8 it will go through a few wake up screens including some subliminal promotion of the AudioControl brand It will then display a friendly blue screen not the scary blue screen found on many computers Fear not because the blue screen on the DQL 8 is actually a good thing 18...

Страница 22: ...AudioControl 19 Figure 8 DQL 8 Menu Tree ...

Страница 23: ...ans that if your factory installed system is actively crossed over you can sum the signals together into a full range signal Here are the SumChs options None All Inputs and are independent Main Inputs feed signals to Front Highpass out 1 Digital Status Display This cool blue screen will tell you which mode your DQL 8 is in 2 Select Every time you tap this button you will scroll through the various...

Страница 24: ...er receiving signal from your Front signals 21 Independent Sub Outputs to the Front Rear and Subwoofer outputs with the Subwoof er being fed from the Channel 4 Inputs The and buttons will allow you to select an Output Mode that matches up with the outputs of your source unit i e 2 channel 4 channel or Independent Sub Once you have selected the proper mode tap the Select button and the DQL 8 will p...

Страница 25: ...begins where the subwoofer midrange meet and where the midrange highpass outputs cross over Using the Left and Right arrows you 6 ch FH 90 RH 90 Mode PFM 250 Sub 90 can scroll between the following settings FH Lowest frequency of your Front output RH Lowest frequency of your Rear output Sub Subwoofer crossover frequency PFM The Programmable Frequency Match PFM is a high pass filter that serves as ...

Страница 26: ...alizing on the right channel When the cursor highlights this screen you can now apply boost or cut using the and controls to the frequency you selected in the previous step Once you have made your equalization set tings you will want to tap the Select button go to the Memories screen and save your settings in one of the eight memory locations Keep in mind you have the ability to equalize your Fron...

Страница 27: ...as SA VED or RECALLED all your settings it will begin flashing again Memories Recall 1 Save 1 24 Figure 15 Sub Parametric Equalizer screen Freq uency This corner of the screen indi cates which frequency you are boosting or cut ting If you wish to select another frequency tap the left or right arrow buttons until the cursor is flashing on the number next to Freq Then use the and controls to select ...

Страница 28: ...iver s seat Take a careful look at the curve on your analyzer and how one frequency combines with the next There is no one curve that will satisfy every person as we all have different tastes How else can you explain Liberace Brittany Spears or rice cakes The key is to use your DQL 8 to help balance your system from one frequency to the next and give your speakers the sparkle sizzle detail or punc...

Страница 29: ...st autosound systems have too much mid bass due to the fact that speakers mounted in the doors or kick panels cause resonances or peaks in the response curve These peaks in the mid bass can actu ally mask or block sounds in the all important midrange area causing your system to sound dull and lifeless 26 Midrange 300Hz to 3kHz Musical instruments vocals mid range percussion and many things we asso...

Страница 30: ...Sounds Distorted Should your system sound distorted or your speakers are moving way too much you should make sure you have your levels matched properly and that your ampli fier gains are set at minimum If this checks out 27 okay you will want to look at your EQ controls to insure that your boost levels are not overly boosted Still Sounds Distorted Look at the fre quencies that you have selected fo...

Страница 31: ...nt THE WARRANTY People are scared of warranties Lots of fine print Months of waiting around Well fear no more this warranty is designed to make you rave about us to your friends It s a warranty that looks out for you and helps you resist the temp tation to have your friend who s good with electronics try to repair your AudioControl product So go ahead read this warranty and then take a few days to...

Страница 32: ...t here is all we mean by it Unwarranted abuse is A physical damage don t use the DQL 8 for a jack stand B improp er connections 120 volts into the power jack can fry the poor thing C sadistic things This is the best mobile product we know how to build but if you mount it to the front bumper of your car something will go wrong 6 If an authorized United States AudioControl dealer installs your DQL 8...

Страница 33: ...Owner s Enjoyment Manual The Strength of Digital DQL 8 BLOCK DIAGRAM Two Channel Mode 30 ...

Страница 34: ...Owner s Enjoyment Manual AudioControl 31 DQL 8 BLOCK DIAGRAM Four Channel Mode ...

Страница 35: ...Owner s Enjoyment Manual The Strength of Digital 32 DQL 8 BLOCK DIAGRAM Six Channel DQL 8 BLOCK DIAGRAM Independent Sub Mode ...

Страница 36: ...alization Controls Front 30 bands 1 3 octave 25 Hz 20 kHz Rear 19 bands 1 2 octave 32 Hz 16 kHz Sub 14 bands 1 3 octave 25 Hz 500 kHz Parametric Equalization Controls 2 bands 25 Hz 20 kHz Adjustable Centers Parametric Equalization Bandwidth 1 12 to 3 octaves Equalization boost cut 12 dB Power supply High headroom PWM switching Power draw 1 Amp Recommended fuse rating 2 Amp Remote Trigger Output Cu...

Отзывы: