


Figure 2.
Figure 3.
Figure 4.
Software Installation
Apply AC power to the PC and the Access System. After the operating system is
finished loading, insert the CD into the CD-ROM drive and the install program
will autoload. This program will guide you through the installation process.
Please be sure to read the end user license agreement. After the installation
process is complete, please follow the manufacturer’s instructions for calibrating
your touchscreen. Next, select “START” then “Maid2000 Database Converter” and
place the Maid2000 CD into the selected drive; follow the onscreen directions.
Now double click the AccessPC icon on the desktop to load the program. During
this first run the software may display error messages because the hardware does
not match the defaults. This is normal. Once the software is loaded, touch the
small text on the bottom of the blue frame (see Figure 5, detail 7) to bring up the
administrative password dialog. The default password is “111”. Once the correct password has been entered the
administrative dialog will appear (Figure 2). Touching the edit field on the numeric keypad will clear it.
System Setup
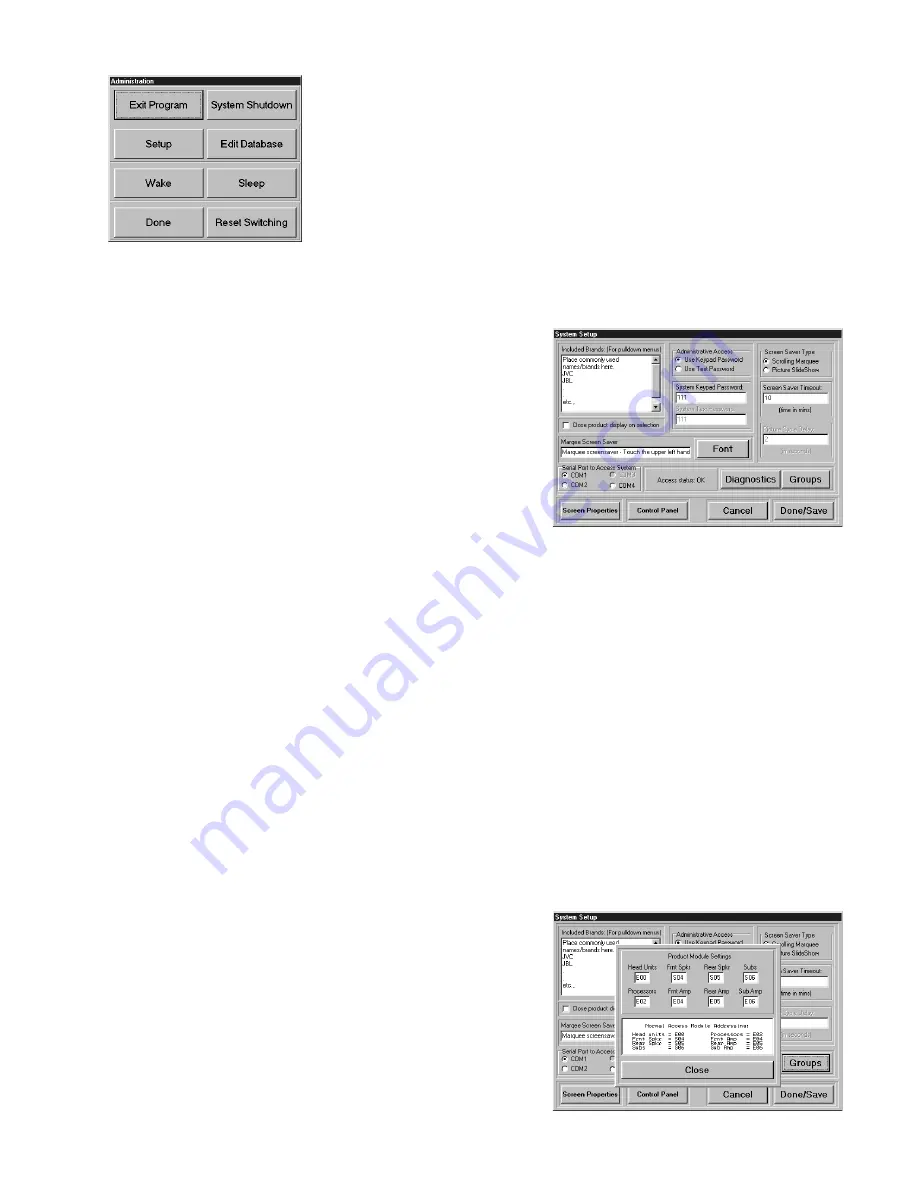
Press “Setup” to display the system configuration dialog (Figure 3).
Refer to the section below to configure AccessPC to your prefer-
ence. Select “Done/Save”. Then press “Exit Program” and reload
AccessPC. If you encounter any errors at this point please double
check all connections and PC hardware for mis-configurations
before
calling Audio Authority technical support. At this point you may
begin building the product database for the display (see Editing the
Product Database).
•
Included Brands:
place commonly used brands in this box.
These items will be accessible when editing the product
database via pull-down menus.
•
Administrative Access:
this option allows for the selection of either a numeric password that can be entered
via on screen numeric keypad or an alphanumeric password entered via the keyboard.
•
Screen Saver Type:
this item allows for the selection of either a marquee scrolling a user defined message or
displays a picture slide show which is user defined. All files reside in the SCRNSAVR directory (C://
PROGRAM FILES/AUDIO AUTHORITY/ACCESS PC/SCRNSAVR). These files must be BMP format.
Pressing the upper left hand corner of the display terminates the screen saver.
•
Time-out:
this is period of inactivity in minutes before the screen saver becomes active.
• Cycle delay: the number of seconds to display each picture in the picture side show.
•
Marquee Settings:
enter the message you wish to display when the marquee screen saver runs, and choose a
font for the marquee text.
•
Serial Port Selection:
you may manually select the serial port to which the Model 970 is connected.
(AccessPC detects the 970 automatically, so no adjustment should be needed.)
•
Access diagnostics:
displays a list of detected modules, a list of the currently selected modules/positions
and displays an error message if required modules are not found or if modules are not addressed correctly.
In the diagnostics dialog, pressing the “Reset/Check” resets the Access system and forces the Model 970 to
poll the system modules, and check for system changes.
•
Groups:
allows modification of default product group settings
on Access switch modules. Make sure all group addresses in
this dialog box match your switch module settings.
•
Screen Properties:
calls up the Windows95/98 display
properties dialog.
•
Control Panel:
calls up the Windows95/98 system control
panel.
•
Cancel:
exit but save no changes.
•
Done/Save:
exit and save all changes.
•
Close Product Display on Selection:
automatically closes the
product display list when a selection is made.


