background image

3

Connections and Controls

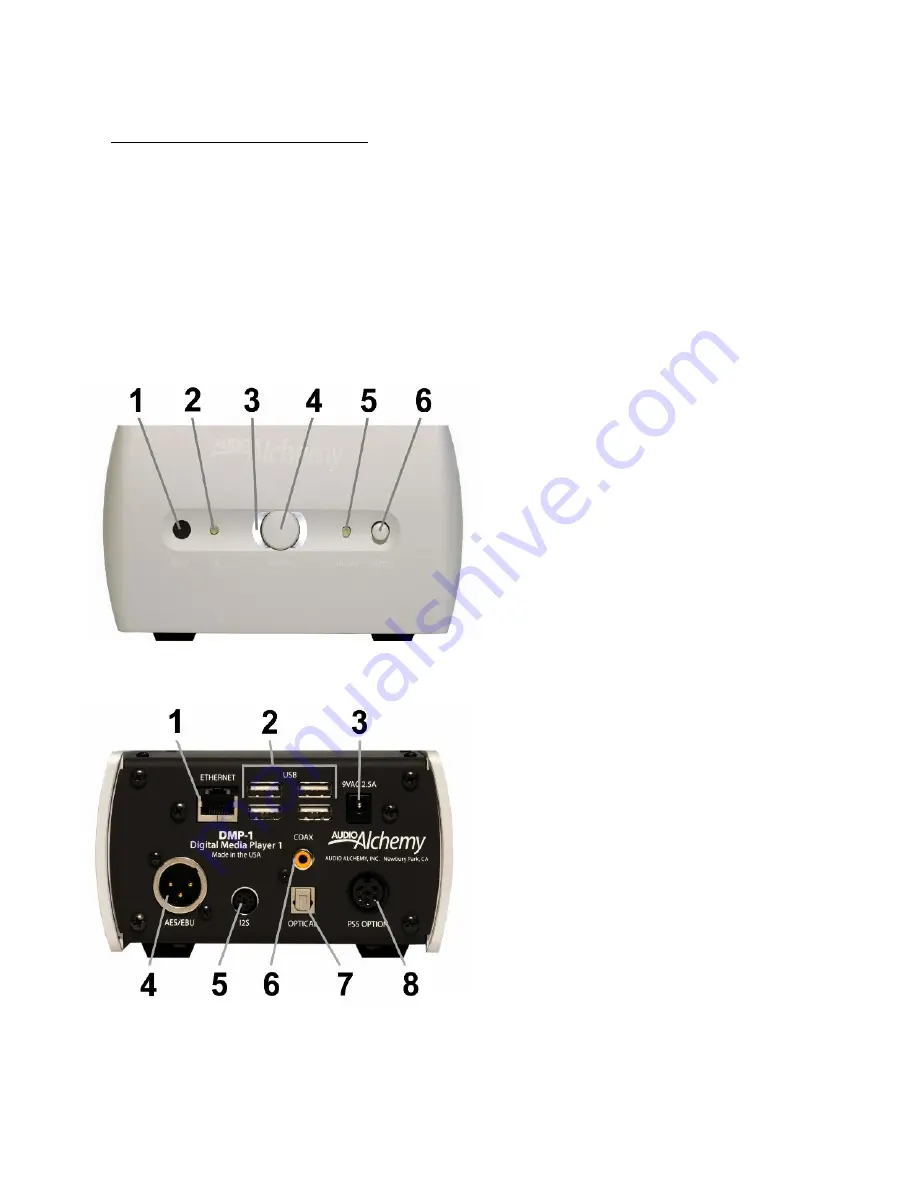
Front Panel

1. IR input for remote control
2. LED input indicator
3. LED power indicator
4. Power button
5. LED on/off (pause/mute) indicator
6. Mute button

Rear Panel

1. RJ-45 Ethernet jack
2. USB jacks
3. Standard AC power supply input
4. AES/EBU digital output

5. I

2

S digital output

6. Coaxial SPDIF digital output
7. Optical Toslink digital output
8. Optional PS-5 power supply input

Important Guidelines for Installation and Use

Do not place the power supply on a carpet. It can get warm during operation and some carpets can be damaged by di-

rect contact with warm surfaces. Place the power supply on a solid surface, such as a tabletop, shelf or rack shelf.

Do not connect the DMP-1's power supply until all audio connections have been made.

Place the DMP-1 where it will not be exposed to moisture or direct sunlight.

Install the DMP-1 and its power supply where they can get some ventilation. They don't produce a great deal of heat, but

using them in a sealed enclosure with no airflow could have long-term negative effects on the unit's circuitry.

Use a soft microfiber cloth to clean dust and fingerprints off of the DMP-1's surface. Stubborn fingerprints or dirt may be

removed by spraying a small amount of water or window cleaner onto the cloth, then using the moistened cloth to clean the
DMP-1. Do not spray any cleaner or other moisture directly onto the DMP-1.

You will get the best and most reliable performance from the DMP-1 by using high-quality digital audio cables. We rec-

ommend against using the "freebie" cables included with some components.

Содержание DMP-1

Страница 1: ...Tips 3 Connections and Controls 3 Front panel Rear panel Optional remote Connecting the DMP 1 to Your System 4 Power supply Ethernet connection USB connections Digital audio connections Initial Setup and Basic Playback 5 Roon Ready Setup and Playback 7 Maintenance 8 Troubleshooting 8 Owner s Manual ...

Страница 2: ... must be packaged in the original container and must include a photocopy or computer printout of the original purchase receipt If the original container has been lost or discarded contact Audio Alchemy for a replacement 6 This warranty covers only defects in Audio Alchemy products It does not cover incidental or consequential damages or damage to other products resulting from defects in Audio Alch...

Страница 3: ...nect the DMP 1 s power supply until all audio connections have been made Place the DMP 1 where it will not be exposed to moisture or direct sunlight Install the DMP 1 and its power supply where they can get some ventilation They don t produce a great deal of heat but using them in a sealed enclosure with no airflow could have long term negative effects on the unit s circuitry Use a soft microfiber...

Страница 4: ...o one of the multipin DC outputs on the back of the PS 5 then into the multipin Power Station input near the lower right corner of the DMP 1 Do not plug the PS 5 into the AC wall socket until you have finished making all audio connections Be sure to disconnect the stock AC power supply before you connect the PS 5 Power Station Note that when the PS 5 is used the power button on the DMP 1 is bypass...

Страница 5: ...ilable drives In the screen shot at right these are NAS or network attached storage i e a networked computer or hard drive and usbhd sda1 a USB stick Click on any available drive or stick to show a list of the artists available then click on an artist name to see what albums are available from that artist Click on an album name to show the list of tunes on the album You can play the entire album b...

Страница 6: ...ill bring up a list of all the albums you have in that genre As with the album playback you can click the play button purple arrow at right to play all the tunes within a genre If you want to play a specific work within a genre click on that album A list of the tunes on the album will come up and you can play them just as you would any other album or tune as outlined in step 3 on the previous page...

Страница 7: ... that lists the various audio devic es and drivers associated with your computer and network Scroll down and you will see a category for Networked devices You may see the Audio Alchemy DMP 1 listed already If you don t click on Add Network Device and select it in the window that pops up The I2S and USB outputs of the DMP 1 will show up as separate end points Click the blue Enable button that appea...

Страница 8: ...No Sound If the front LED is illuminated but the system produces no sound check the following things in order 1 Go to the DMP 1 s webpage or the Roon app and make sure a file is playing 2 Make sure the correct digital input is selected on your DAC or digital preamp 3 Check the preamp and amp or integrated amp to make sure they are powered up and running 4 Check the connections between your compone...

Отзывы: