background image

4

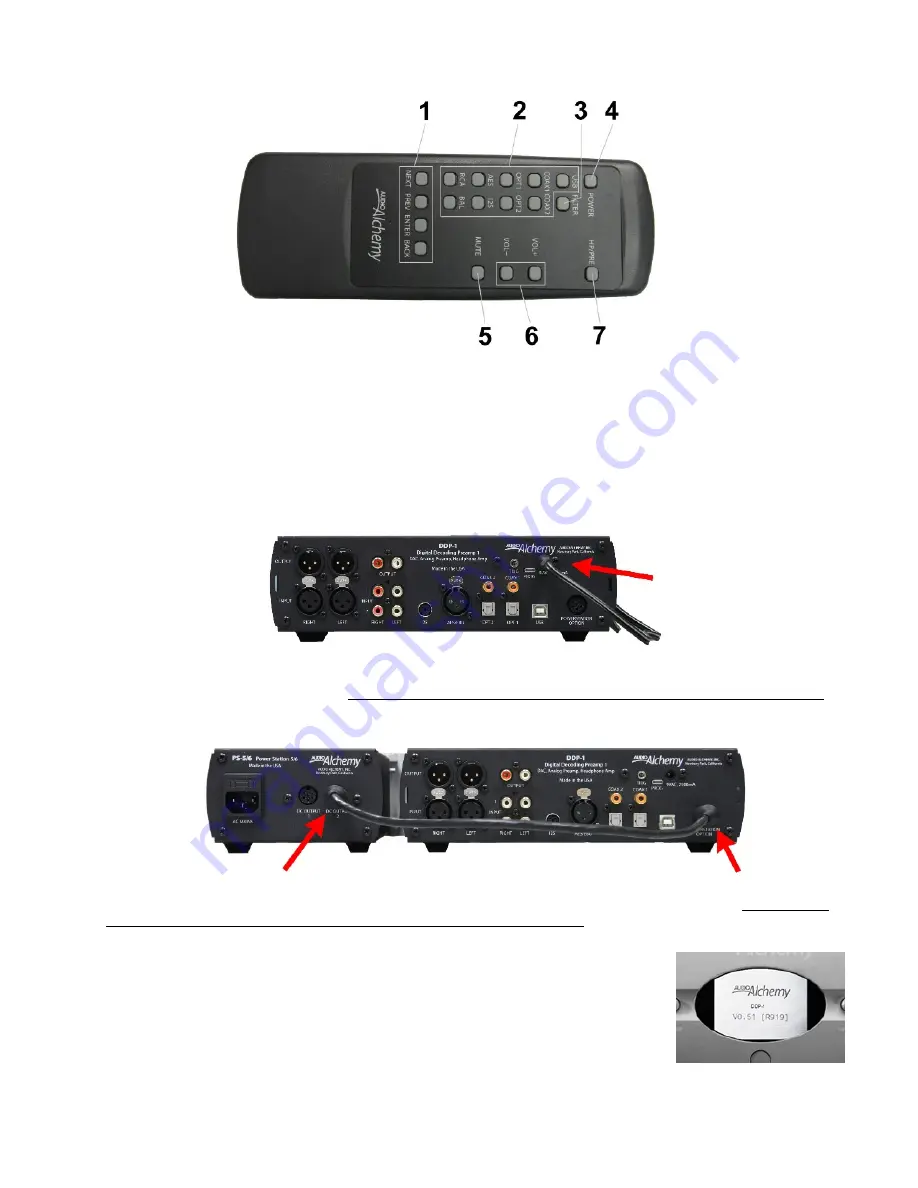
Remote Control

1. Front LCD menu buttons
2. Input selector buttons
3. Filter/Resolution Enhance button

4. Power button
5. Mute button
6. /- controls

7. Headphone/Preamp selector

Connecting the DDP-1 to Your Audio System

First, turn your power amp off. Do not connect the DDP-1's power supply until all audio connections have been made.

Power Supply Connection: Stock Power Supply

To connect the stock AC power supply that comes with the DDP-1, connect the power supply's cable to the coaxial AC
power input on the upper right corner of the back of the DDP-1. Do not plug the power supply into the AC wall socket until
you have finished all audio connections. Do not connect the stock power supply if you are using the PS-5 Power Station.

Power Supply Connection: Optional PS-5 Power Station

If you are using the optional PS-5 Power Station power supply, plug the cable that comes with the power supply into one of
the multipin DC outputs on the back of the PS-5, then into the multipin Power Station input near the lower right corner of the
DDP-1. Do not plug the PS-5 into the AC wall socket until you have finished making all audio connections. Be sure to dis-
connect the stock AC power supply before you connect the PS-5 Power Station.

USB Programming Input

The DDP-1 is field-upgradeable, so you can update its firmware to add features and improve
operation. This input does not accept audio signals. To update the firmware, check the DDP-
1's screen during power-up to find out what firmware version you have, then check the Audio
Alchemy website to see if a new version is available. The website explains how to download
and install the new firmware. All you need is a computer and a USB cable with a USB-A plug
on one end and a USB-micro-B plug on the other. (This cable is commonly available; it's used
to charge Android phones and tablets as well as most Bluetooth speakers and headphones.)

Содержание DDP-1

Страница 1: ...Remote control Connecting the DDP 1 to Your System 4 Power supply Interconnect cables 12 volt DC trigger output USB programming input Operation 5 Powering Up the DDP 1 Selecting an Input Adjusting the Volume Mute Using Headphones Using the DAC Display Setup Setting Startup Volume Installing the USB Driver 7 Maintenance 7 Troubleshooting 8 Owner s Manual ...

Страница 2: ...e must be packaged in the original container and must include a photocopy or computer printout of the original purchase receipt If the original container has been lost or discarded contact Audio Alchemy for a replacement 6 This warranty covers only defects in Audio Alchemy products It does not cover incidental or consequential damages or damage to other products resulting from defects in Audio Alc...

Страница 3: ...er supply on a solid surface such as a tabletop shelf or rack shelf Do not connect the DDP 1 s power supply until all audio connections have been made Place the DDP 1 where it will not be exposed to moisture or direct sunlight Install the DDP 1 and its power supply where they can get some ventilation They don t produce a great deal of heat but using them in a sealed enclosure with no airflow could...

Страница 4: ... supply plug the cable that comes with the power supply into one of the multipin DC outputs on the back of the PS 5 then into the multipin Power Station input near the lower right corner of the DDP 1 Do not plug the PS 5 into the AC wall socket until you have finished making all audio connections Be sure to dis connect the stock AC power supply before you connect the PS 5 Power Station USB Program...

Страница 5: ...ized volume control will automatically calibrate itself by turning back to 0 then returning to the last volume setting you used No audio signals will pass through the unit while it s warming up When the front display shows the two digit volume read out the DDP 1 is ready to use Adjusting Volume To adjust volume press the Volume buttons on the remote or turn the Volume knob on the front panel The s...

Страница 6: ...nel controls and LCD screen to preset the digital filter and resolution en hancement for each digital input To do this select the desired digital input using the remote or the front panel controls and LCD Now hold the Enter button on the front panel down for 3 seconds You will see a menu that lets you choose filter resolution enhancement on off and startup volume Turn the left knob to select among...

Страница 7: ...ter where the driver is stored feel free but the simplest installation we recommend sticking with the default location Now click Install Once the installation of the driver is complete you will see the Installation Complete dia log box shown at right Click Next You will now see a Completing the Digital Decoding Devices Setup Wizard dialog box Click Finish and the driver installation will be comple...

Страница 8: ...d comes back replace the damaged cables 7 If these steps do not fix the problem please contact your dealer Sound Comes From Only One Channel If only one channel is working check the following things in order 1 Check the connections between the sources and the DDP 1 and the connections between the amp and DDP 1 and the amp and the speakers If any cables are disconnected reconnect them and if they a...

Отзывы: