background image

www.audatex.co.uk

4.2.1  Searching for the Vehicle


 To carry out a Diagnostic scan on a vehicle you can automatically or manually search 
for the vehicle.


Automatic Vehicle Search:


VIN Search:


If the VCI unit is connected to the vehicle you will be able to select Vinscan (located    


at the top left of the screen). The VHC2 will scan the vehicle and automatically select   


the correct model.


REG Search:


By entering the vehicle’s Registration details into the Number Plate, the VHC2 will  


automatically select the correct model.  

 (

Note

 – You must be connected online for this function to work)


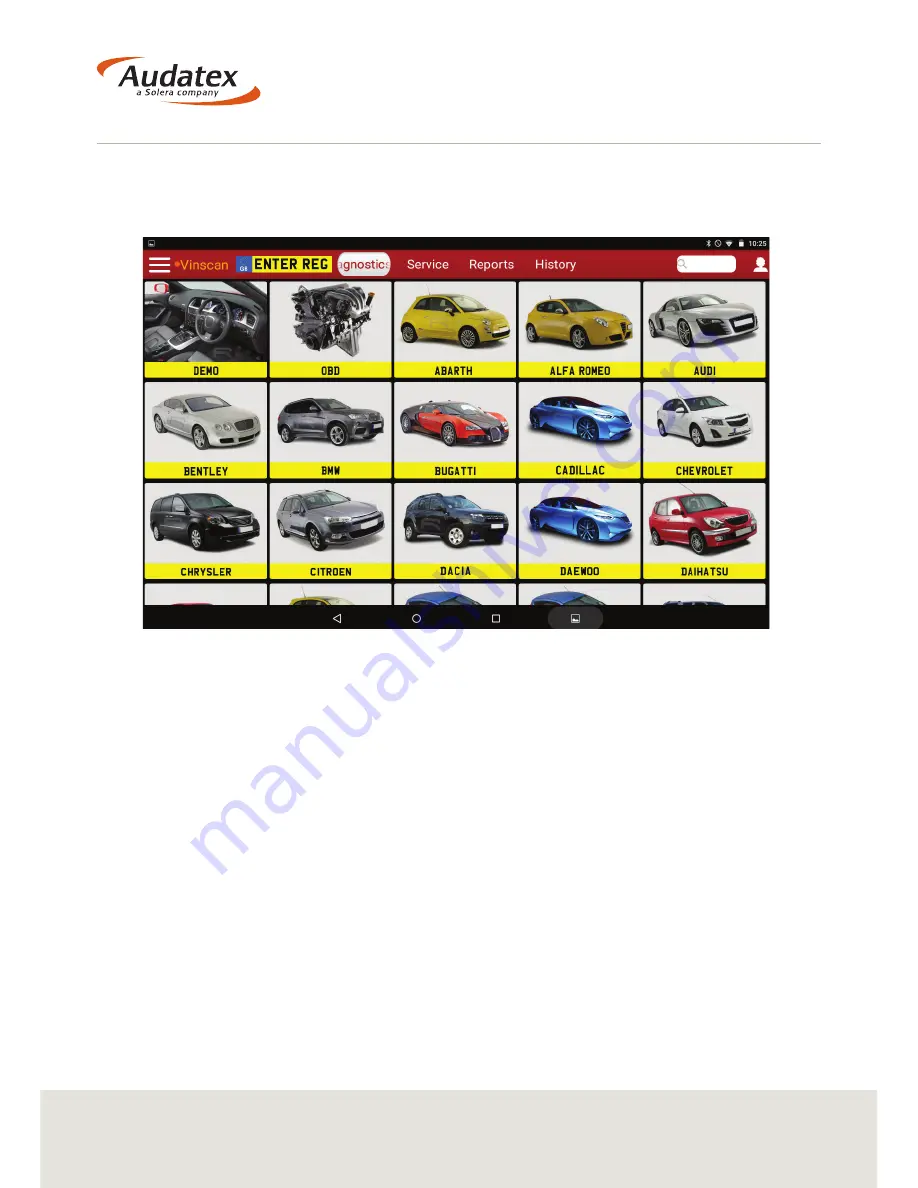
Manual Vehicle Search:


To manually select the vehicle you must first start by selecting the relevant  


Manufacturer and Model.

7                      


8

Содержание VHC2

Страница 1: ...VHC2 User Guide www audatex co uk Version 1 3 ...

Страница 2: ...k 5 3 1 Wireless Network 5 3 2 Wired Ethernet Network 5 4 Using the VHC2 6 4 1 Navigating the Dashboard 6 4 2 Diagnostics 6 4 2 1 Searching for the Vehicle 7 4 2 1 1 Saving a Report Revision History Date Version Description Author 30 06 16 v1 0 Initial Version Dean Weller 11 07 16 v1 1 Log in Removed Dean Weller 28 10 16 v1 2 AEG Integration Dean Weller 06 02 17 v1 3 AEG integration Dean Weller Sm...

Страница 3: ... 4 3 3 Delete a Report 12 4 3 4 Setting up Company details 12 4 4 AudaGarage 13 4 5 HPI Check 13 4 6 MOT Check 13 4 7 Help Support 13 5 Updating your VHC2 15 5 1 Vehicle Data Updates 15 5 2 VHC2 Software Updates 16 6 Supporting Guides 17 6 1 Gmail 6 1 1 Setting up a Gmail Account 17 6 1 2 Sharing via Gmail 17 6 2 Dropbox 18 6 2 1 Setting up a Dropbox Account 18 6 2 2 Sharing on Dropbox 18 Contents...

Страница 4: ...tions Interface is linked to you VHC2 unit The VCI is connected to the VHC2 using a Bluetooth connection giving you the ability to work from any part of the car unrestricted by the length of traditional cabling The VCI plugs into the vehicles EOBD port For further information on EOBD port locations see 4 2 2 NOTE The VCI will only work with its partnered VHC2 and not with any other unit If you exp...

Страница 5: ... in Standby If the battery runs completely flat then the VHC2 unit will take a while to charge enough to allow normal use 2 1 Charging the VHC2 The VHC2 is charged via a micro USB slot on the side of the unit For best charging results we recommend that you use the VHC2 s docking station 2 1 1 Quick charge Charging the VHC2 unit using a wall socket or the docking station for 15 minutes will allow e...

Страница 6: ...onnection has been made you will be returned to the VHC2 home screen and the network connection icon will now be green 3 2 Wired Ethernet Network The VHC2 is also compatible with a wired internet connection 1 To set up a wired connection Connect the network adapter to the VHC2 unit an Ethernet cable is supplied with the VHC2 unit 2 Connect your Ethernet cable into the adapter 3 If your network is ...

Страница 7: ... be taken to the VHC2 Main Menu the Dashboard 4 1 Navigating the Dashboard From the Dashboard you can access the VHC2 s core operations Diagnostics My Reports AudaGarage HPI Check MOT Check Help Support 4 2 Diagnostics Selecting the Diagnostics icon will allow you to carry out the following Perform a vehicle scan Update the VHC2 unit Create reports Edit settings 6 ...

Страница 8: ... to select Vinscan located at the top left of the screen The VHC2 will scan the vehicle and automatically select the correct model REG Search By entering the vehicle s Registration details into the Number Plate the VHC2 will automatically select the correct model Note You must be connected online for this function to work Manual Vehicle Search To manually select the vehicle you must first start by...

Страница 9: ...ctive Select the Share icon and you will be given the ability to share the report To save select Report You will see a pop up information form Input the details requested All information will be displayed in the final report then select Confirm At the bottom of the screen you will see icons for New Session Online Information Report Freeze frame Help You will then be shown the final report to save ...

Страница 10: ... 2 EOBD Port Locations The location of the EOBD port can be found by selecting the EOBD icon at in the top of the VHC2 Dashboard Enter the vehicle Manufacturer and Model and an image will show you the location of the port 9 ...

Страница 11: ...ws you to carry out procedures on the most common occurring faults 4 2 4 Reports See My Reports 4 3 4 2 5 History Within History you can view restore or delete previous diagnostic scans These reports are stored within the date range on the left side of the screen 10 ...

Страница 12: ...n selecting to save the report 4 3 2 Share a Report Select the report s that you wish to share by selecting the check box to the left of the file name You are able to select more than one report When you have selected the report s that you wish to share select Share at the bottom of the screen You now have the option to share the assessment For information on setting up a Gmail or Dropbox account ...

Страница 13: ...eport s that you wish to delete by pressing and holding down on the file name You are able to select more than one report or select all Once you have selected the report s that you wish to delete select the Delete icon from the bottom of the screen NOTE Once deleted it is possible to retrieve the report by going to the History Menu see section 4 2 5 4 3 4 Setting up Company details 12 From the VHC...

Страница 14: ... history of a vehicle i e VIN build date engine size fuel type finance theft and total loss information NOTE You must be connected to the internet for this function to work 4 6 MOT Check By selecting the MOT Check icon you are able to check the MOT history on a vehicle The current and previous MOT data is then visible i e failures mileage history and advisories NOTE You must be connected to the in...

Страница 15: ...o save time you are able to update each Manufacturer separately and are therefore able to only update the Manufacturers that you require NOTE You must have an internet connection to update the device Updates can take from 10 15 minutes this is dependent on the speed of your internet connection and the size of the update being downloaded 1 To carry out an update you must enter the Diagnostics optio...

Страница 16: ... You will be shown all the available updates select the update you wish to carry out by selecting the tick box next to the description 4 Selection of the Update icon at the bottom of the screen will begin the download 15 ...

Страница 17: ...ate with the latest changes 1 To carry out an update you must enter the Help Support option from the main menu 2 By selecting Update SmartHub on the right of the screen the unit will begin the software download An Updating icon will appear for up to 10 seconds 3 Once the icon has disappeared select the at the bottom of the screen You will be returned to the VHC2 home page 4 Within 30 seconds a new...

Страница 18: ...send as an attachment touch the photo and choose Send as attachment From the tablets Home screen select the Gmail icon Read the Terms and Conditions of Use and if you agree select I Agree Once the Account has been set up successfully then Gmail will sync the account Select the Create New icon and complete the required fields Once complete select Create Account Reports from the VHC2 can now be emai...

Страница 19: ...lete select Create Account Select the icon Include Videos and then select the Turn On Camera Uploads icon 6 2 2 Sharing on Dropbox 1 Install the Dropbox app on your device https www dropbox com downloading 2 When installing you will be prompted to either sign in or create a new account Sign in to your Dropbox account 3 Sign in to your account after installing the Dropbox desktop application 4 Once...

Страница 20: ...Service Desk 0118 923 5645 ...

Отзывы: