

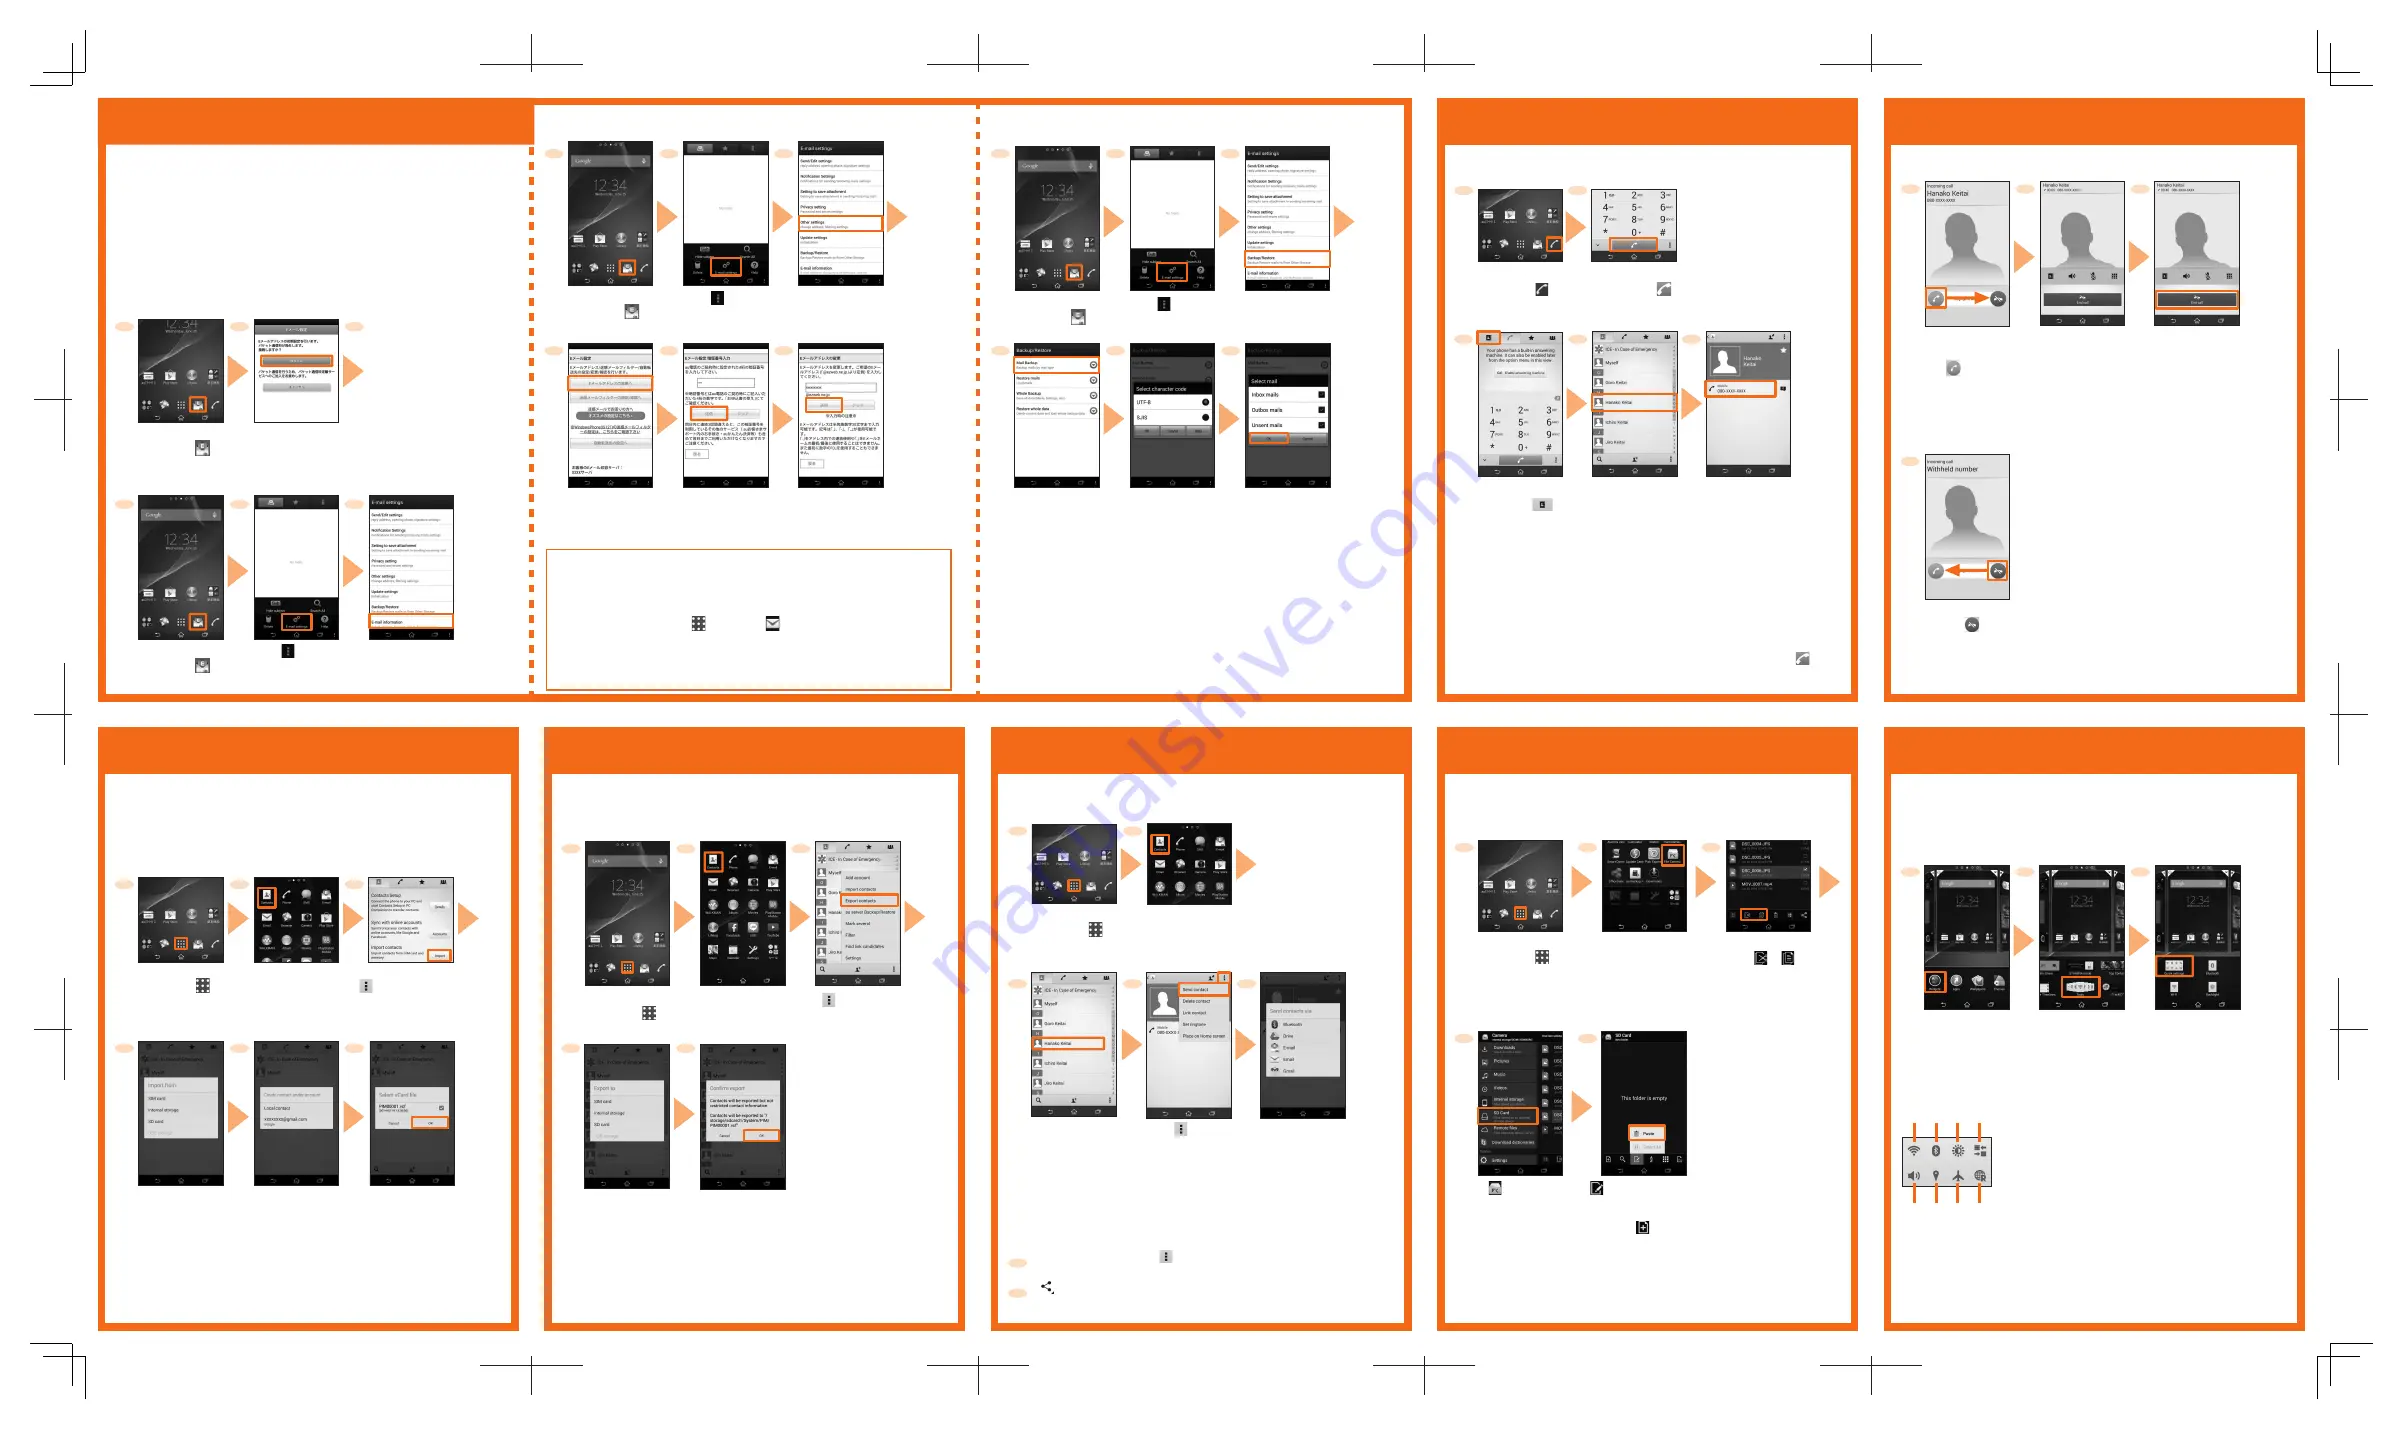
Making a call
Saving battery power
■
Direct input calling
■
Calling from call log
Tap a phone number of the party from call log displayed on the phone
number input screen.
■
Quick settings widget
Use Quick settings widget to set Wi-Fi
®
function, Bluetooth
®
function,
backlight, mobile data communication, etc. Switching the settings
frequently can reduce the battery power consumption.
From the Home
screen, [ ]
1
2
Enter a phone
number
→
[
]
Sending contacts
You can send contacts to another phone.
Exporting contacts
Importing contacts
Transfer (import) contacts data from your previous au phone to this
product using microSD memory card, au Micro IC Card (LTE), etc.
1
Save (export) contacts etc. regularly to microSD memory card etc. to
secure your data.
1
Long-touch an area of
the Home screen where
no icons are displayed
→
[Widgets]
[Quick settings]
From the Home
screen, [
]
[Contacts]
2
3
From the Home
screen, [
]
[Local contact]/
Synchronized account
5
2
3
■
Calling from Contacts
1
2
Tap a party to
call
3
Tap a phone
number
Phone number input
screen, [
]
■
Adding Quick settings widget
4
Select a location to
export
[
]
→
[Export
contacts]
6
Select a vCard file
→
[OK]
* Contacts are imported.
[Contacts]
[Import]
* [
]
→
[Import contacts] for
the second time or later.
①
Wi-Fi: Wi-Fi
®
On/Off
②
Bluetooth: Bluetooth
®
On/Off
③
Backlight: Switch backlight brightness
④
Data communication: Mobile data
communication On/Off
⑤
Sound: Silent mode (Vibrate/Mute) On/Off
⑥
Location: Location On/Off
⑦
Airplane mode: Airplane mode On/Off
⑧
Roaming: Data roaming On/Off
■
Calling overseas from au phones
(au International Call Service)
You can make international calls without any special procedure from the product.
On the phone number input screen
→
Enter an access code, country
code, area code*, and the phone number of the other party
→
[
]
* If the area code starts with "0", dial it without including the "0". (There are some
exceptions such as fixed-line phones in Italy or Moscow).
Select data location
4
5
Confirm contents
→
[OK]
* Contacts will be exported.
E-mail setting
To use E-mail (@ezweb.ne.jp), subscription to LTE NET is required. If you
did not subscribe it when you purchased the product, contact an au shop
or Customer Service Center.
This is a service with which you can send/receive mails using E-mail
(@ezweb.ne.jp). Your E-mail address is determined automatically after
initial setting. You can change the E-mail address later.
* For model change from au phone, E-mail address used on the previous model can
be used continuously after initial settings.
1
From the Home
screen, [
]
Check the contents
→
[
接続する
(Connect)]
2
3
After E-mail initial settings,
your E-mail address
appears.
■
Initial settings
1
From the Home
screen, [
]
[
]
→
[E-mail settings]
2
3
■
Checking E-mail address
[E-mail information]
→
Check your E-mail
address
1
From the Home
screen, [
]
[
]
→
[E-mail settings]
2
3
■
Changing E-mail address
[Other settings]
→
Confirm the content
→
[
接続する
(Connect)]
4
[E
メールアドレス
の変更へ
(To
change E-mail
address)]
Enter the security code
→
[
送信
(Send)]
→
Check the
contents
→
[
承諾する
(I agree)]
5
6
Enter E-mail
address
→
[
送信
(Send)]
→
[OK]
PC-mail
You can use mail addresses except for E-mail (@ezweb.ne.jp).
You need to set up a PC-mail account to use PC-mail. For the first time
use, make settings as follows.
From the Home screen, tap [
]
→
[Email (
)]
→
Enter Email address and
password
→
[Next]
→
[Next]
→
Enter account name and display name
→
[Next]
*For details, refer to the "Instruction Manual" (Japanese) application
installed on the product or "
取扱説明書(詳細版)
(Full Instruction
Manual)" (Japanese) available on the au homepage.
* If you do not set any
accounts, contacts
will be saved to "Local
contact".
FRA/KDDI/Setting guide
■
Backing up Email
1
From the Home
screen, [
]
[
]
→
[E-mail settings]
2
3
[Backup/Restore]
4
[Mail Backup]
→
[OK]
Select character
code for backup
data
→
[OK]
5
●
Mail data is saved in the internal storage (/storage/emulated/0/private/au/
email/BU).
If a microSD memory card is attached, data is saved in the microSD card
(/storage/sdcard1/private/au/email/BU).
●
To back up mail data or mail settings (notification settings, filtering
settings etc.) all at once, back up from "Whole Backup".
Receiving a call
■
Receiving a call
1
■
Rejecting a call
When you reject receiving calls, the caller hears a guidance of no
response, etc.
1
* The call is rejected,
then caller hears the
guidance.
On the receiving
screen, drag
"
" right
Start a call
To end the call,
[End call]
2
3
On the receiving screen,
drag "
" left
Backing up to microSD memory card
1
From the Home
screen, [
]
[Contacts]
2
3
Tap a contact to
send.
[
]
→
[Send contact]
4
Confirm the content
→
[OK]
→
Select how to send
a contact
→
Follow the
onscreen instructions
Use the "File Commander" application to back up data saved in the
product to a microSD memory card.
1
From the Home
screen, [
]
[
ツール
(Tool)]
→
[File Commander]
* For the first activation, follow the
displayed registration screen.
2
3
4
Mark files
→
[ ]/[
]
[
]/Slide the
screen right
→
[SD card] from
the item list
5
[
]
→
[Paste] on the
desired location
●
When recovering backed up data, files in the microSD memory
card are copied to original locations. To recover email, use an email
application to restore backup.
Sending one contact
Sending several contacts
3
Contact list screen
→
[ ]
→
[Mark several]
→
Mark contacts to
send
[
]
→
Select an application
→
Follow the onscreen instructions
* Operation differs depending on the application you selected.
4
* You can create a new folder
by tapping [
]
→
[Folder].
5
* Depending on the
data location, you
may need to select
contacts to import.
* If you select "SIM
card", select
contacts and tap
"Export" and then
follow the onscreen
instructions.
[Tools]
●
When an external storage is connected, you can import from "USB
storage".
* Save contacts data to a microSD card or au Micro IC Card (LTE) in advance.
●
When an external storage is connected, you can export to "USB storage".
1
2
3
●
In the step 4, if you select "Internal storage",
data is saved in "/storage/emulated/0/System/
PIM/", if you select "SD card", data is saved in
"/storage/sdcard1/System/PIM/".
⑤ ⑥ ⑦ ⑧
① ② ③ ④
Mark to back up
mails
→
[OK]
6
* For character code, tap
[Help] to check.
* You can add/display contacts,
create a SMS or make a call
on call end screen.
* Operation differs
depending on the
application you selected.


