For detailed operation methods, refer to "Basic Manual" application installed on
the product.
Basic Manual
MBM65403002(1.0)
May 2016, 1st Edition
- 1 -
- 2 -
- 3 -
- 4 -
- 5 -
- 7 -
- 8 -
- 9 -
- 10 -
- 11 -
- 13 -
- 14 -
- 15 -
- 16 -
- 17 -
- 18 -
- 20 -
- 21 -
- 22 -
- 23 -
- 24 -
- 25 -
Sold by: KDDI CORPORATION,
OKINAWA CELLULAR TELEPHONE COMPANY
Manufactured by: LG Electronics Inc.
Imported by: LG Electronics Japan Inc.
Keitai Guarantee Service Center
Business hours 9:00 – 20:00 (7 days a week)
For loss, theft or damage
(toll free)
From fixed-line phones/au cell phones,
0120-925-919
Cell phone and PHS operators collect and
recycle unused telephones, batteries and
battery chargers at stores bearing the
logo regardless of brand and manufacturer
to protect the environment and reuse
valuable resources.
For inquiries, call:
From fixed-line phones:
For general, charge, operations
(toll free)
0077-7-111
PRESSING ZERO WILL CONNECT YOU TO AN OPERATOR
AFTER CALLING 157 ON YOUR au CELL PHONE
From au cell phones:
157
area code not required
From fixed-line phones:
For service canceling procedure in case of loss or theft
(toll free)
0120-977-033
(except Okinawa)
0120-977-699
(Okinawa)
In case above numbers are not available,
From au cell phones:
113
area code not required
0077-7-113
Customer Service Center
Business hours 24-hour (7 days a week)
Business hours 9:00 – 20:00 (7 days a week)
It is very dangerous to charge
the product in a wet state,
this could cause abnormal
heat generation or a burnout.
- 6 -
- 12 -
- 19 -
- 26 -
Preface
Thank you for purchasing the "Qua phone PX" (simply
called the "product" from here on).
Before using the product, be sure to read the supplied
"Setting Guide", "Notes on Usage", "Basic Manual"
(this manual) or "User Guide 取扱説明書 詳細版 (Full
Instruction Manual)" (Japanese) available on the au
homepage to ensure correct use. After you have
finished reading this manual and the printed manuals
supplied, be sure to store them in safe places so that
you can retrieve them whenever needed. If you lose
the printed manuals (supplied), contact an au shop or
Customer Service Center.
List of Packaged Items
Before your start using the product, make sure that
you have all the following packaged with the product.
●Main unit
● IC card opener for
LGV33 (sample)
● 設定ガイド (Setting
Guide) (Japanese)
● ご利用にあたっての注意事
項 (Notes on Usage)
(Japanese)
● 取扱説明書 (Basic
Manual) (Japanese)
● 保証書 (Warranty)
(Japanese)
The following items are not included in the package.
●microUSB cable
●microSD memory card
●AC adapter
●Earphone
memo
• Purchase a specified charger (sold separately).
• The battery is built into the product.
• The illustrations of the cell phone in the manual
are used only for explaining. They may differ from
the actual product.
About Operating Instructions
●取扱説明書 (Basic Manual) (Japanese)
Handles only basic operations for main features. For
detailed descriptions on various functions, refer to the
"Basic Manual application" installed on the product
or "User Guide 取扱説明書 詳細版 (Full Instruction
Manual)" (Japanese) available on the au homepage.
http://www.au.kddi.com/support/mobile/guide/
manual/
• All company names and product names in this
manual are either trademarks or registered
trademarks. The
TM
,
®
marks may be omitted in this
manual.
Basic Manual application
You can use the "Basic Manual application" on the
product to confirm detailed operational procedures.
Certain functions can be directly activated from the
application screens on which their operations are
described.
● Operation procedures
a
On the Home screen
u
[au Supports]
u
[Basic
Manual]
• When you activate for the first time, follow the
onscreen instructions to download and install the
application.
Downloading Manuals
You can download the English version of the
Basic Manual from the au website (available from
approximately one month after the product is released).
You can find "Basic Manual" (English excerpts from
Instruction Manual) on au homepage.
Download URL: http://www.au.kddi.com/support/
mobile/guide/manual/
* You can use the English version of the manual from
the Basic Manual application.
Regarding Notations Used in This
Manual
■
■
Key/button■indications
In this manual, keys/buttons are represented by
simplified illustrations as shown below.
Volume key Power key
■
■
Description■of■operations■for■selecting■item/icon/
button■etc.
The notations used for operation procedures in this
manual are as follows.
Tap means to lightly touch and release the button or
icon shown on the display to select it.
Description
Explanation
On the Home
screen
u
[ ]
u
[1] [4] [1]
u
[ ]
Tap (Phone) on the bottom
of Home screen. Tap , ,
then tap .
Description
Explanation
On the Home
screen
u
" "
Tap on the bottom of Home
screen.
■
■
Illustrations■and■screen■displays■
Illustrations and screens shown in this manual may
look different from the actual product or screen.
In some cases, minor details or a part of a screen
may be omitted.
Actual screen
Screen in this
manual (example)
In this manual,
icons, etc. of
a screen are
omitted.
memo
• In this manual, screenshots for body color "White"
are provided as examples.
• In this manual, except as specified, the descriptions
of operation procedures are those with keys/
buttons.
• Descriptions in this manual are based on the
operations of portrait screen. Menu items/icons/
buttons on a screen may be different from the
ones in the horizontal display.
• In this manual, operation procedures are described
based on au Basic Home. When the home
application is changed by "Select Home" etc.,
operation procedures may be different.
• Items, title levels, and icons in this manual may look
different based on different functions you use or
different conditions, etc.
• In this manual, "microSD™ memory card",
"microSDHC™ memory card" or "microSDXC™
memory card" is called "microSD memory card" or
"microSD" for short.
• All of the indicated amounts exclude tax unless
otherwise specified.
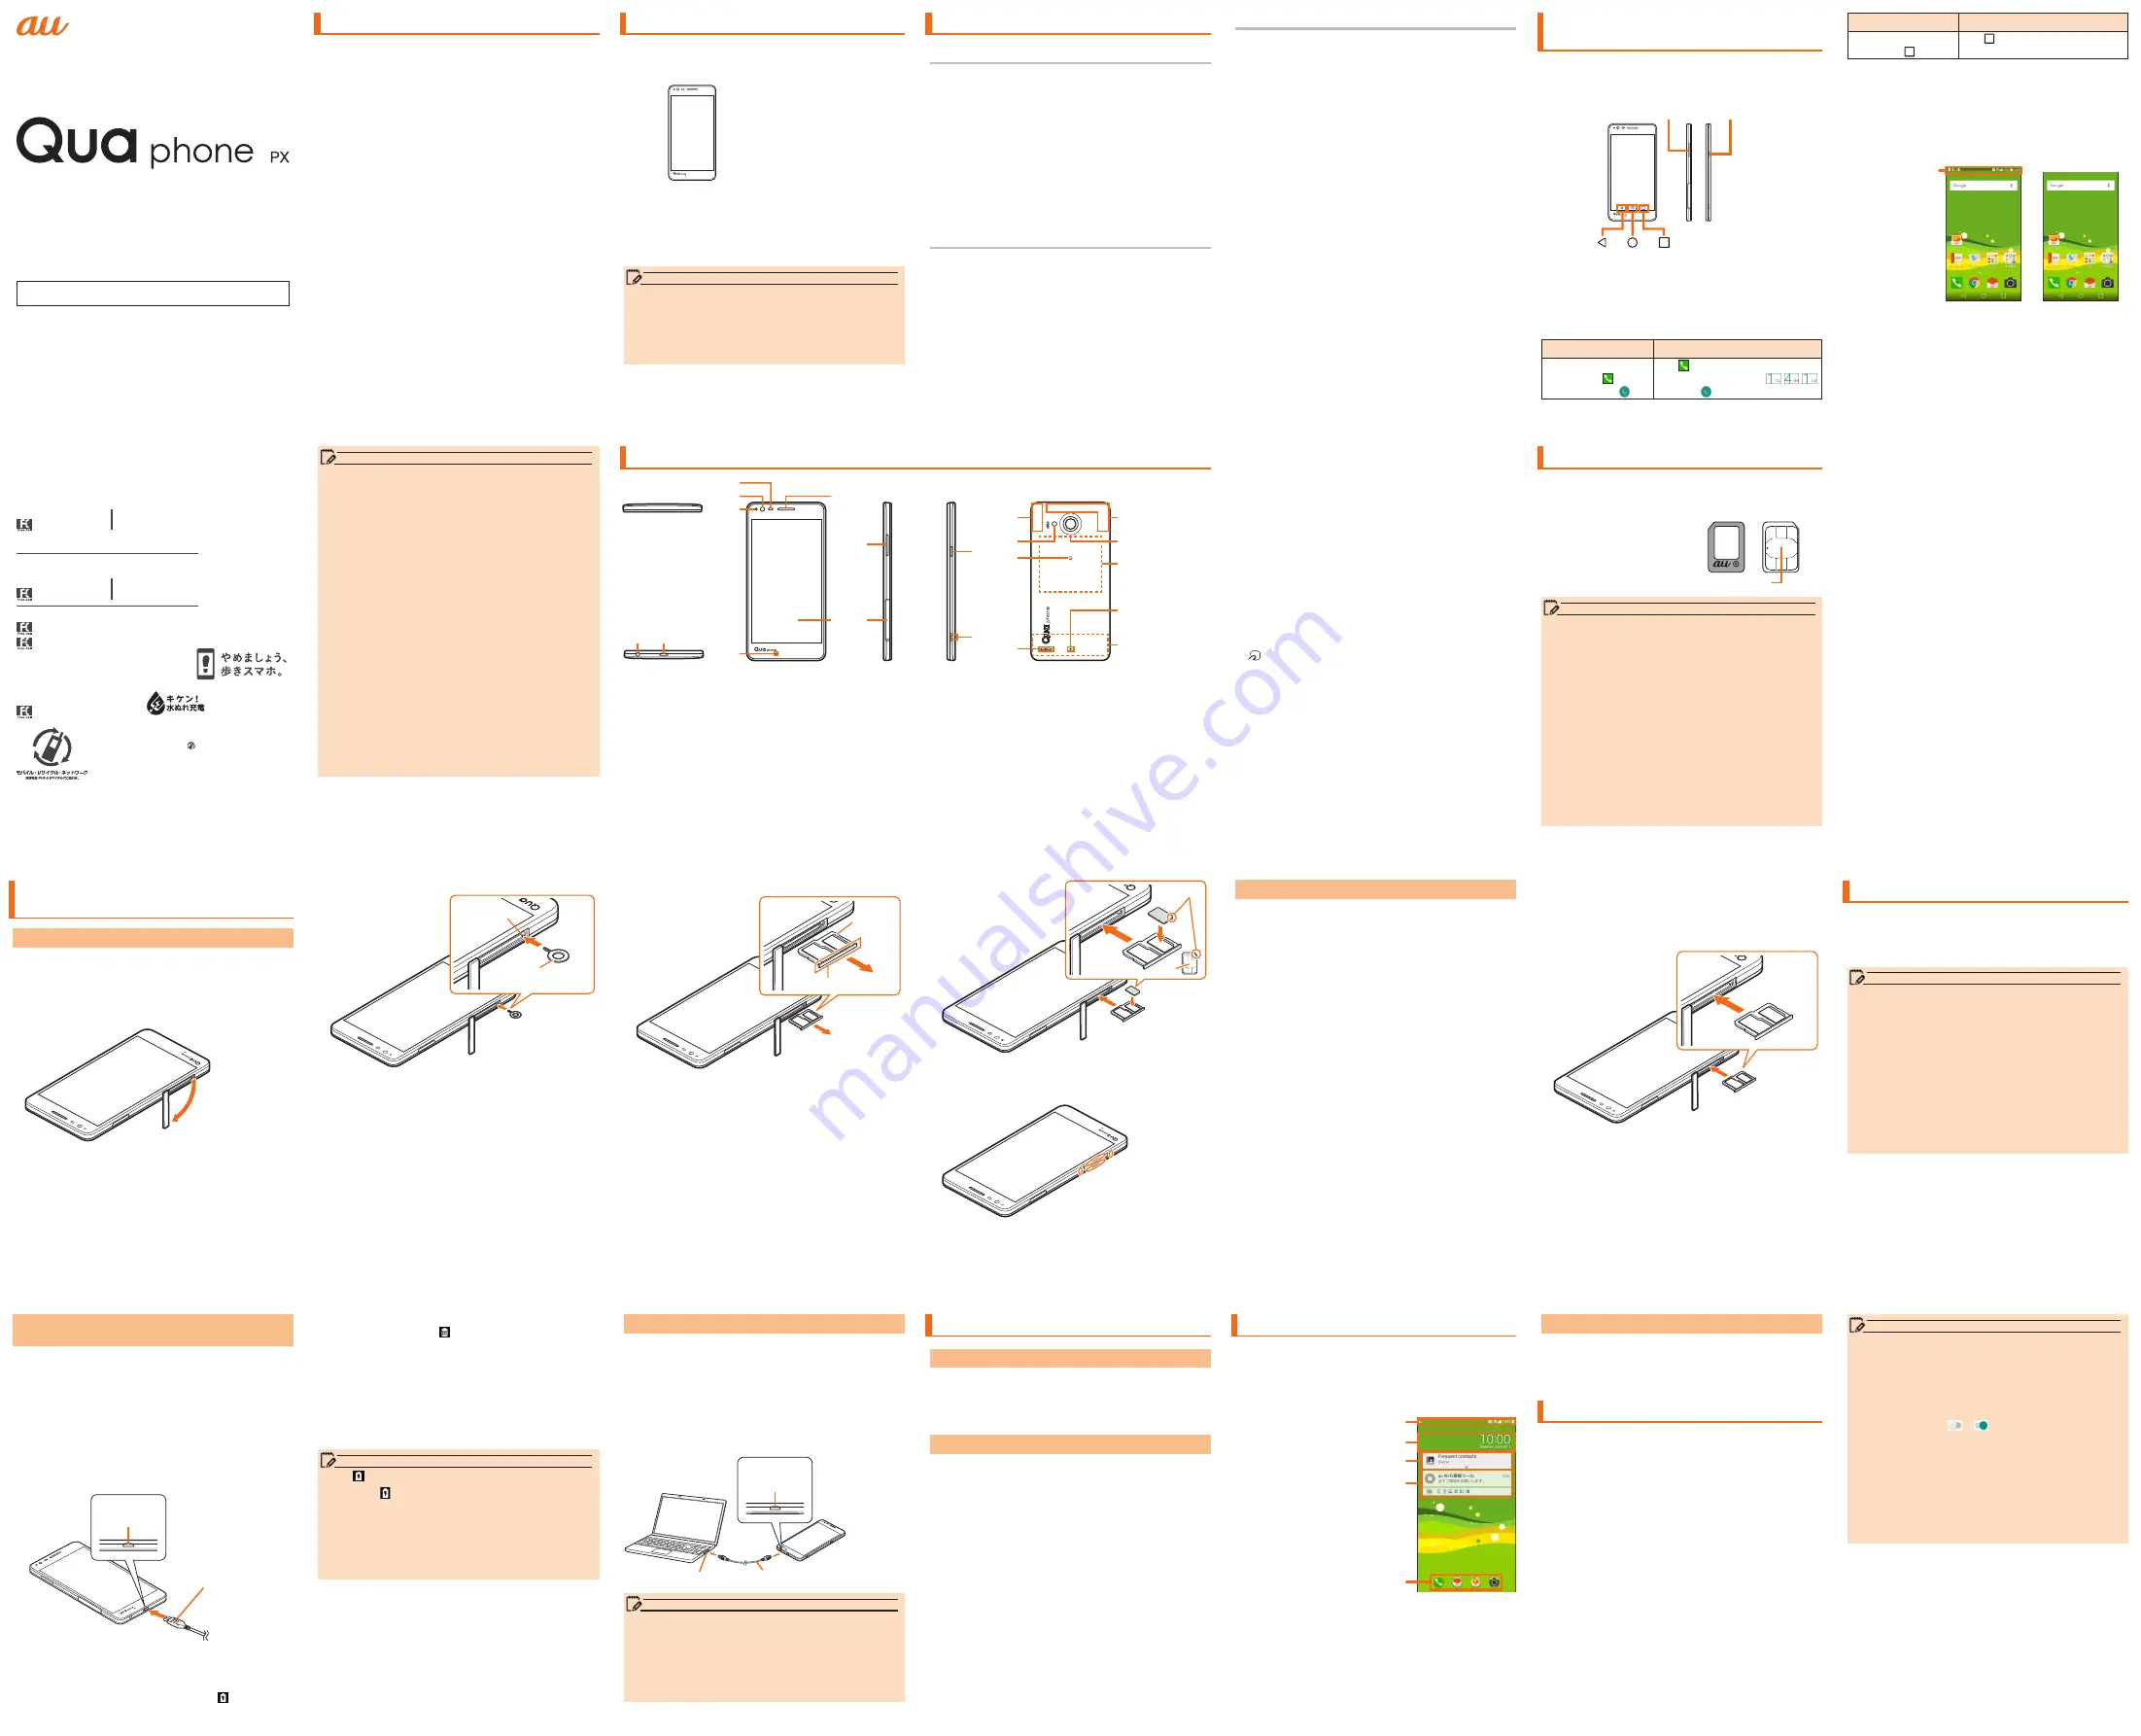
Names and Functions of Parts
b
a
g
h
i
j
k
l
e
f
d
c
《Top side》
《Bottom side》
《Front side》
《Left side》《Right side》
p
m
o
n
q
r
t
u
s
《Back side》
a
Earphone■jack
b
External■connection■terminal
c
Proximity■sensor/Light■sensor
d
Inward-facing■camera■(lens)
e
LED■Notification
f
Mouthpiece■(Microphone)
g
Earpiece■(Receiver)/Sub■microphone
h
Display■(Touch■panel)
i
Volume■key■(UP/DOWN)
j
Card■slot■cover
Inside the cover, there are trays and slots for the au Nano IC
Card 04 and microSD memory card.
k
Power■key
l
Strap■hole
m
Built-in■antenna■(Wi-Fi
®
,■Bluetooth
®
)
*
n
Photo■light
o
■Mark
p
Speaker
q
Built-in■antenna■(Call,■Internet,■GPS)
*
r
Outward-facing■camera■(lens)
s
Built-in■antenna■(FeliCa/NFC)
*
t
Vent■hole
u
Built-in■antenna■(Call,■Internet)
*
* Do not cover the built-in antenna with your hand or
put stickers etc. Call/data communication quality
becomes worse.
Attaching/Removing au Nano IC
Card 04
Attaching■au■Nano■IC■Card■04
Before attaching the au Nano IC Card 04, make sure
to turn the product off.
a
Hook the groove with your fingernail and open
the card slot cover in the direction of the
arrow to open it.
b
Insert the IC card opener for LGV33 (sample)
into the hole for extracting tray and slowly
push it in the direction of the arrow.
The microSD memory card/au Nano IC Card 04
tray is pushed out.
IC card opener for
LGV33 (sample)
Hole for
extracting
tray
c
Hook the projecting part of the tray with your
fingernail and pull it out straight to remove the
tray from the main unit.
Tray
Projecting part
d
Put the au Nano IC Card 04 into the tray with
the IC (metal) part downwards, insert the tray
into the main unit, and then push it all the way
straight into the slot.
• Note the direction of the notch.
• Insert the au Nano IC Card 04 so that it is tightly
attached to the tray.
• Make sure that there is no gap between the tray and
the main unit.
Notch
IC
e
Close the card slot cover, push part firmly
○
and make sure that there is no gap between
the cover and the main unit.
Removing■au■Nano■IC■Card■04
Before removing the au Nano IC Card 04, make sure
to turn the product off.
a
Hook the groove with your fingernail and open
the card slot cover.
b
Insert the IC card opener for LGV33 (sample)
into the hole for extracting tray and slowly
push it.
The microSD memory card/au Nano IC Card 04
tray is pushed out.
c
Hook the projecting part of the tray with your
fingernail and pull it out straight to remove the
tray from the main unit.
d
Remove the au Nano IC Card 04, insert the
tray into the main unit, and then push it all the
way straight into the slot.
• Make sure that there is no gap between the tray and
the main unit.
e
Close the card slot cover, push it firmly, and
make sure that there is no gap between the
cover and the main unit.
Charging with the Specified AC Adapter
(Sold Separately)
Describe how to charge by using the common AC
adapter 05 (sold separately).
For details on the specified AC adapter (sold
separately), refer to "Introduction of Related
Accessories".
a
Insert the microUSB connector of the common
AC adapter 05 (sold separately) straight into
the external connection terminal of the product
• Insert the microUSB connector straight with the "▲"
mark facing up.
microUSB connector
("▲" mark facing up)
External
connection
terminal
b
Insert the power plug of the common AC
adapter 05 (sold separately) into a 100 V AC
power outlet
On the status bar of the screen top, is displayed
to show the charging is starting. When the
charging is finished, is displayed.
c
When charging is completed, remove the
microUSB connector of the common AC
adapter 05 (sold separately) straight from the
external connection terminal of the product
d
Remove the power plug of the common AC
adapter 05 (sold separately) from power
outlet
memo
When■ ■is■not■displayed
• Wait until is displayed on the status bar of
the top screen. Bad connection is assumed if it
does not appear after a while. Check if Common
AC Adapter 05 (sold separately) is securely
connected. If it still does not appear, stop charging
and contact an au shop or a Secure cell phone
support center.
Charging■with■a■PC
a
Insert the microUSB connector of the
microUSB cable (sold separately) directly into
the external connection terminal of the product
• Insert the microUSB connector straight with the "B"
mark facing up.
b
Insert the microUSB connector of the
microUSB cable (sold separately) straight into
the USB port of the PC
USB port of a PC
microUSB cable (sold separately)
a
b
External
connection
terminal
memo
• Although charging with the power of the product
on is available, it takes longer.
• It may take longer to charge with USB than the
specified AC adapter (sold separately).
• When the "Start new hardware search wizard"
window appears, select "Cancel".
Turning the Power On/Off
Turning■the■Power■On
a
Power key (Press and hold for more than 2
seconds)
The lock screen appears.
Swipe the screen to unlock.
Turning■the■Power■Off
a
Power key (Press and hold for more than 2
seconds)
b
[Power off]
u
[POWER OFF]
Lock Screen
This■screen■is■displayed■when■turning■the■power■on■
or■sleep■mode■is■canceled.
On■the■Lock■screen,■you■can■check■the■date■and■
time,■and■notification■information■as■well■as■use■
application■shortcuts.
a
Status■bar
b
Date■&■time
c
Address■Book■Plus
Displays various
information registered
in the Address Book.
You can also display
information about
favorites and contacts
that you contact
frequently in the
notification area.
d
Notification■information
New informaiton such
as a missed call, auシェ
アリンク (au ShareLink)
etc.
e
Application■shortcut
Swipe to launch an
application.
* The application
shortcuts to display
can be changed.
a
c
d
e
b
Unlocking■the■Lock■screen
a
Swipe on the lock screen
The Home screen appears.
• The unlock method differs depending on the screen
lock settings.
Setting Application Authority
When■activating■the■applications/functions■that■
access■the■functions■or■information■of■the■product■
for■the■first■time,■the■confirmation■screen■appears■to■
request■the■permission■for■the■access■authority.
When■the■confirmation■screen■appears,■confirm■the■
content■and■tap■"DENY"■or■"ALLOW".
Example:■To■activate■Photo
a
On the Home screen
u
[Google]
u
[Photos]
u
[ALLOW]
The application launches.
au Nano IC Card 04
The■au■Nano■IC■Card■04■contains■a■phone■number■
and■other■information.
• The product is
compatible with au Nano
IC Card 04.
IC (metal) part
《au Nano IC Card 04》
memo
• Note the following points, which may cause
malfunction or damage, when handling the au Nano
IC Card 04.
- Do not touch the IC (metal) part of the au Nano
IC Card 04.
- Insert in the correct direction.
- Do not use force to attach or remove the IC
card.
• When the au Nano IC Card 04 is not attached
properly or the au Nano IC Card 04 is abnormal, an
error message appears.
• Do not lose the au Nano IC Card 04 after it has
been removed.
• Do not insert the au Nano IC Card 04 with a
conversion adapter. Doing so may cause a fault.
■
■
When■au■Nano■IC■Card■04■is■not■inserted
When the au Nano IC Card 04 is not inserted, the
following operations are not available.
• Making a call
*
/receiving a call
• Receiving/sending and initial settings of e-mail (@
ezweb.ne.jp)
• Receiving/sending SMS
• Checking the phone number and mail address of this
product.
• Setting up SIM card lock
Besides the above, some functions requiring your
phone number might not be available.
* Emergency calls to 110 (Police), 119 (Fire department
or ambulance service), 118 (Japan Coast Guard), and
157 (Customer Service Center) are also not available.
However, when the signal strength is other than "out
of service area" during GSM/UMTS/LTE roaming,
calling is available (calls may not be connected
since emergency call numbers differ depending on
countries).
■
■
Restriction■settings■with■PIN
You can set the product to restrict the use of the
product by others through changing the PIN code
or locking the SIM card in order to protect your
important private information while you are using your
au Nano IC Card 04.
Charging
When■you■purchase■your■cell■phone,■the■internal■
battery■is■not■fully■charged.■Charge■the■internal■
battery■when■you■use■it■for■the■first■time■or■when■its■
battery■is■not■enough.
memo
• While charging, the product and its internal battery
might become hot (when activating camera or
communicating data while charging, the internal
battery becomes hot).
• It may take longer to charge the internal battery
when you use camera function, etc. while charging
the battery.
• Operating with the specified charging equipment
(sold separately) being connected might cause
short-time charge/discharge repeatedly. Life of
the internal battery becomes shorter when you
repeatedly charge it frequently.
memo
• If the application authority is not allowed,
applications/functions may not be activated or
using functions may be restricted.
• To change the authority setting, on the Home
screen
u
[基本機能 (Basic functions)]
u
[Settings]
u
[Apps]
u
select the application to be changed
u
[Permissions]
u
[
]/[
].
• The explanation screen may be displayed
depending on the application/function.
Also, the confirmation screen may be displayed
several times or the display may be different.
Carefully check the displayed content and follow
the onscreen instructions.
• In this manual, description of the confirmation
screens may be omitted.