4
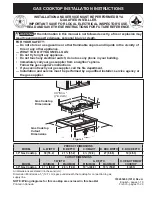
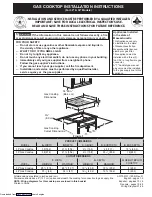
2. To replace the range top:
a. RV & CV Models - Place top on range (
FIG
4) so the tabs on the
spring clips fit into the slots on top (
FIG
4-B). Push backwards on
the top until the bracket(s) on the front of top fits into center
notch or side tabs in the front control panel (
FIG
5).
b. RA & CA Models - Place the top on the range (
FIG
4) so that the
tabs on the spring clips fit into the slots on the top (
FIG
4-B).
Attach spark wires to burners (
FIG
4-A), routing the wires away
from the center of the burner, burner tube gaskets must be in
place. Rotate the top downward, all three burner tubes must fit
up into the burner caps (
FIG
4-C). Use a side to side motion when
rotating the top down. Once the tubes are up into the burner
caps, push backwards on the top until the bracket(s) (
FIG
5) on
the front of top fits into the center notch or side tabs in front of
the control panel (
FIG
5).
3. To remove burner grates:
a. RV and CV Models - simply lift grate up and remove. Replace by
placing two legs at a time into the retaining grommets.
b. RA & CA Models - lift grate up by rotating up away from center of
stove (fig 2). Replace by placing legs into silicone retaining grom-
met and rotating back down on cooktop.
Clean all surfaces quickly after boil over or spillovers.
Use a dry towel or
cloth to soak up spills.
ALL SURFACES
- When surface is cool, clean with warm soapy water,
rinse and dry with soft cloth. Additional cleaning measures:
• Control Knobs - pull the knobs straight off the stems to clean.
• Control Panel - You may use a spray glass cleaner, applying
cleaner to a paper towel (do not spray directly on panel.)
• Cook Top Surface - You may use a mild liquid cleaner/glass cleaner.
• Surface Burner Grates - They should be cleaned as soon as they
become dirty. You may need to use a non-abrasive plastic scrub-
bing pad.
• Surface Burners, Burner Ports or Orifices - if clogged, gently
brush perforated areas with a lightweight brush (toothbrush) or
carefully clean holes out with a toothpick.
NOTE
: Heavy burned on soil may require repeated cleaning steps
until the soil is completely removed.
NOTE
: The grate and surface of the cook top is covered with porce-
lain coating. Porcelain is a glass/ceramic coating glazed to the
surface of the metal. Porcelain is designed to provide a sur-
face that can withstand high temperatures and maintain an
attractive appearance and make it easier to clean.
After top burners have been on for a period of time, you may experi-
ence a popping sound when the burner is turned off. This is normal
and does not create a safety hazard.
STORAGE
Dry all surfaces and burner box, then spray surfaces with an oil base
substance to preserve the surface from rusting during long term stor-
age. Wipe off oil coating before reuse.
RANGE MAINTENANCE & CARE INSTRUCTIONS
CARE OF PORCELAIN
The grates and surface of the cook tops are coated with porcelain. Porcelain is
a glass/ceramic coating glazed to the surface of the metal. Porcelain is
designed to provide a surface that withstands high temperatures, has an
attractive appearance and is easy to care for and clean.
UNACCEPTABLE - WHICH WILL VOID YOUR WARRANTY
• NEVER use steel wool, abrasive cleaners, or acid type cleaners such as
chlorine bleach or dish detergents with lemon fruit acid on any part of your
cook top or grate system.
•
DO NOT
drop pans on the cook top surface, you may crack or chip the
porcelain surface.
Should the porcelain become cracked, chipped or affected by excessive heat,
the porcelain surface will become unsightly and its effectiveness will be reduced.
GENERAL COOKING INSTRUCTIONS
To quickly bring liquids to a boil or to begin a cooking procedure use a high
flame setting. Reduce the flame to a lower setting to continue cooking. using a
higher flame setting than is necessary to maintain a gentle boil will not cook
food more quickly. After top burners have been on for a period of time, you
may experience a popping sound when the burner is turned off. This is nor-
mal and does not create a safety hazard.
COOKWARE
Acquire cookware that fits the RV environment. Proper cookware will reduce
cooking time, using less energy with better cooking results.
ACCEPTABLE
• A heavy gauge (aluminum or copper) metal pan with a smooth flat bottom
(no more than 10” diameter), straight sides, and a tight fitting lid.
• Cover pan with a lid, food cooks faster when covered, because more heat
is retained.
• Lowering flame size, increases cooking efficiency.
• Use cookware with appropriate utensils.
UNACCEPTABLE - WHICH WILL VOID YOUR WARRANTY
Oversized cookware causes a build up of excessive heat, which results in dam-
age to the burner grate, burners, and cook top. Including the following cook-
ware - but not limited to:
• Griddles
• Any cookware that extends beyond 1” of the grate edge.
• Any cookware that comes into contact with the cook top.
• Woks with support rings which restrict air circulation around the burners.
Excessive heat will cause grates and tops to lose their protective coating,
becoming unsightly in appearance. Airflow is important for cooking, the
warmed air must be allowed to mix with air around the burner.
COOKWARE
Use cookware that fits the RV environment, Proper cookware will reduce cook-
ing time, use less energy, and produce better cooking results.
OVEN HEAT CONTROL AND GENERAL USE
PREHEATING OVEN
For best results, preheat the oven for 15 minutes before use. For baking, do
not select a higher than required temperature to preheat the oven faster, it may
have a negative effect on baking results.
AIR CIRCULATION
Warmed air must circulate freely throughout the oven for food to cook proper-
ly. To prevent undercooked or burned food:
•
DO NOT
cover or block ventilation holes in the oven broiler shelf
(shelf above the burner).
•
DO NOT
cover the bottom of the oven with aluminum foil to catch “over flow”.
•
DO NOT
cover oven racks
with aluminum foil.
• Place the food to be baked
in the center of the oven
with 1”-2” inches space
from the oven wall on all
sides allowing at least 1”-
2” of space on all sides of
the container.
•
DO NOT
crowd the oven with
assorted pans or block air
passage with an oversized
pan.