Страница 1: ......
Страница 2: ......
Страница 3: ...ERATES USES AND CAN RADIATE RADIO FREQUENCY ENERGY AND IF NOT INSTALLED AND USED IN ACCORDANCE WITH THE INSTRUCTION MANUAL MAY CAUSE HARMFUL INTERFERENCE TO RADIO COMMUNICATIONS OPERATION OF THIS EQUI...
Страница 4: ...nel 13 Damage requiring Service Unplug this equipment from the wall outlet and refer servicing to qualified service personnel under the following conditions A When the power supply cord or the plug ha...
Страница 5: ...nt Panel Controls 7 Camera Buttons 7 HDD LED 7 Alarm LED 7 Arrow Buttons 8 Play Pause Button 8 MENU Button 8 PTZ Zoom Button 8 Group Sequence Button 8 Search Button 8 Display Button 9 Panic Button 9 U...
Страница 6: ...Device Setup 39 Audio 39 Alarm Out 39 Remote Control 40 Network Setup 41 General 41 LAN 42 FEN 44 RTSP 45 WebGuard 46 NetFS 46 VNC 48 Notification Setup 49 Callback 49 Mail 50 SNS 52 FTP 52 Schedule 5...
Страница 7: ...l 3 Figure 3 DVR front panel 7 Figure 4 Infrared remote control 9 Figure 5 Login screen 12 Figure 6 Logout screen 12 Figure 7 Setup screen 12 Figure 8 System General setup screen 13 Figure 9 System Da...
Страница 8: ...il setup screen 50 Figure 36 Notification SNS setup screen 52 Figure 37 Notification FTP setup screen 52 Figure 38 Notification Schedule setup screen 53 Figure 39 Display OSD setup screen 54 Figure 40...
Страница 9: ...ion to replacing both a time lapse VCR and a multiplexer in a security installation your DVR has many features that make it much more powerful and easier to use than even the most advanced VCR The DVR...
Страница 10: ...User s Manual 2 Figure 1 Typical DVR installation...
Страница 11: ...ll the DVR Refer to the installation manuals for the other items that make up part of your system Figure 2 DVR rear panel Video Input Audio In Out Alarm Input Output Factory Reset Switch Video Out Net...
Страница 12: ...n Outs AI 1 to 16 Alarm Inputs 1 to 16 GND Chassis Ground COM Relay Common NO Relay Alarm Out Normally Open Factory Reset Switch The DVR has a Factory Reset switch to the left of the HDMI connector on...
Страница 13: ...n 2 RXD Receive Data Pin 3 TXD Transmit Data Pin 5 GND Ground RS485 Port Connector Pin Outs Master Unit Slave Unit To TX RX To TX RX The DVR can be networked using the 10Mb 100Mb 1Gb Ethernet connecto...
Страница 14: ...CARPET THE POWER CORD HAS A GROUNDING PIN IF YOUR POWER OUTLET DOES NOT HAVE A GROUNDING PIN RECEPTACLE DO NOT MODIFY THE PLUG DO NOT OVERLOAD THE CIRCUIT BY PLUGGING TOO MANY DEVICES IN TO ONE CIRCU...
Страница 15: ...r when the alarm is activated However when you are in the menu or PTZ mode you have to exit the menu or PTZ mode first to reset alarm output The infrared sensor on the DVR is just to the right of the...
Страница 16: ...gain hides the menu icons During menu setup pressing the button closes the current menu or setup dialog box Pressing and holding the MENU button for three seconds or longer enters the cameo mode and a...
Страница 17: ...e provided with the hard disk drive to connect it to the DVR A USB mouse not supplied can be connected to one of the ports You can use the mouse to navigate through the screens and menus much like you...
Страница 18: ...ns are also used to control Pan and Tilt when in the PTZ mode When in the PIP display format pressing the Up and Down arrow buttons moves the position of the small screen counter clockwise and clockwi...
Страница 19: ...his button is also used to enter the Cameo mode in the Live Monitoring mode or Search mode Alarm Button Pressing the ALARM button resets the DVR s outputs including the internal buzzer during an alarm...
Страница 20: ...enter the password by pressing the appropriate combination of Camera number buttons and then the button There is no default password when logging in the admin user for the first time If you do not kno...
Страница 21: ...t input devices and will be useful when performing Text In Searches System Setup General Figure 8 System General setup screen Highlight the Site box and press the button A virtual keyboard appears tha...
Страница 22: ...the USB device containing the setup file dat to the DVR If you enabled the NetFS function Network menu NetFS tab you can download the setup file from the registered NetFS site Highlight Setup Import...
Страница 23: ...b you can upload the log information on the registered NetFS site Highlight Export and press the button Select USB Storage or NetFS If you select NetFS select a NetFS site from the registered NetFS si...
Страница 24: ...you through configuring the system for basic operation Select either Quick wizard or Network wizard and select the Next button to start the selected setup wizard NOTE Selecting the Cancel button throu...
Страница 25: ...he system date and select the date format Time Set the system time and select the time format Time Zone Select your time zone The Time Zone can be selected on the map Use Daylight Saving Time Selectin...
Страница 26: ...ing High Video Quality Priority Profile High when selecting Standard Recording Profile and Standard when selecting Longer Recording Time Priority Profile NOTE The recording quality and recording speed...
Страница 27: ...Select the Finish button to finish the Quick Setup Wizard and select the Go to Network Setup button to start the Network Setup If you selected the Go to Network Setup select the Next button to start...
Страница 28: ...Configuration allows the DVR to automatically obtain LAN parameters IP address Gateway Subnet Mask and DNS Server address Selecting Manual Configuration allows you to set up LAN parameters manually T...
Страница 29: ...name or a name already registered on the DVNRS server an error message displays Select the Finish button to finish the Setup Wizard Highlight System Shutdown and press the button The Shutdown screen d...
Страница 30: ...one can also be selected on the map below by pressing the Left and Right buttons or scrolling the mouse wheel up and down Highlight Use Daylight Saving Time and press the button Pressing the button to...
Страница 31: ...re is a in front of the Group Name it indicates that the group has been expanded and all of the User Names within that group are displayed below the Group Name If there is a in front of the Group Name...
Страница 32: ...ystem or a PC running RAS Clip Copy The user can copy video clips on a local system or a PC running RAS Setup The user without Setup authority cannot establish any system settings excluding system shu...
Страница 33: ...o format the device for recording When selecting Not Using from Use As and highlighting the Format button the device will not be used for recording The Information column displays whether the device i...
Страница 34: ...On you can select the day time range and interval that you want the DVR to run self diagnostics on the recorder The Interval can be selectable from 1 min to 7 days or Never Highlight the and press th...
Страница 35: ...l Figure 13 Record General setup screen Highlighting Recycle and pressing the button toggles between On and Off In the Recycle mode the DVR records over the oldest video data once all available storag...
Страница 36: ...ct No Limit if you want to stop panic recording manually Highlighting the Panic Recording ips and pressing the button allows you to set the images per second for Panic recording You can select from 1...
Страница 37: ...rding When the DVR is in the Pre Event mode the red and display when any event occurs and the DVR starts recoding When the DVR is in the Time Event mode the DVR will follow the Time settings and the i...
Страница 38: ...button allows you to set the length of time you would like to record for the associated event Advanced Mode Only Pre Event Figure 16 Record Pre Event setup screen When the DVR is in the Event Record...
Страница 39: ...area of the image where you want to detect motion e g a doorway Highlight the box under the Zone heading and press the button The Motion Zone screen displays The Motion Zone screen is laid over the v...
Страница 40: ...on viewing mode the detection zone of video will be displayed Any detected motion within the zone will be displayed in red Highlight the box under the Actions and press the button The DVR can be set t...
Страница 41: ...and or move PTZ cameras to preset positions Video Loss Figure 19 Event Video Loss setup screen Highlighting the box under the Video Loss Interval heading allows you to set the duration of a signal lo...
Страница 42: ...VR will report a Video Blind The DVR will not consider any blinded camera to be a Video Blind if the detected blindness is less than the Activation Time set on this screen Highlight the box under the...
Страница 43: ...e detected from several channels at the same time Highlight the box beside Port and press the button Select from None RS232 RS485 USB Serial 1 8 and LAN 1 16 NOTE If you have set the Port as None you...
Страница 44: ...characters can be created using and a capital letter e g J for NL New Line M for CR Carriage Return Refer to the device manufacturer s documentation for Line Delimiter character s Highlight the box be...
Страница 45: ...a title and status icons on the covert video When selecting the Covert 2 the DVR displays only camera title on the covert video A user who does not have Covert Camera View authority cannot view video...
Страница 46: ...d to connect the camera to the RS232 or RS485 connector on the back of the DVR following the camera manufacturer s instructions You can assign IDs to each camera by highlighting the box under the ID h...
Страница 47: ...o input Highlight Enable Audio Out and press the button This toggles between enabling and disabling audio out Alarm Out Figure 25 Device Alarm Out setup screen Highlighting the box beside Dwell Time a...
Страница 48: ...ring the scheduled time When set to Event the Alarm Out is only active when there is an Event during the scheduled time The Channels box allows you to set which alarm outputs will be active You can al...
Страница 49: ...width Highlight the box beside Network Bandwidth Limit and press the Up and Down arrow buttons to set the desired maximum bandwidth from 100Kbps to 1Gbps NOTE When limiting the network bandwidth the r...
Страница 50: ...ress Gateway and Subnet Mask from your network administrator Highlight the box beside DNS Server Press the Up and Down arrow buttons to set the IP address of the DNS server Highlight the Port Number S...
Страница 51: ...the Type and highlighting Save button reads the current IP address of the DVR configured by DHCP Dynamic Host Configuration Protocol network Highlight Auto Default and press the button to toggle betwe...
Страница 52: ...you already set up the DNS Server when setting up the LAN Highlight the box beside Port and press the button Set the port number of the FEN server using the Up and Down arrow buttons to increase or d...
Страница 53: ...ton to toggle between On and Off When set to on you can access a remote DVR using a Blackberry or other mobile devices NOTE Selecting Use Mobile sets the WebGuard service to be enabled automatically r...
Страница 54: ...up file log export or file print on an FTP site or from an FTP site Related settings are as follows Setup in the live monitoring mode System menu General tab Upgrade Import Export or System Log Export...
Страница 55: ...you to save images as a PDF file on the NetFS site The Site box displays the NetFS site information The box allows you to delete a NetFS site NOTE When you delete an FTP site in the NetFS setup screen...
Страница 56: ...ht Use VNC Virtual Network Computing and press the button to toggle between On and Off You will be able to change the settings if Use VNC is enabled NOTE VNC service allows you to access the DVR and c...
Страница 57: ...the same as pressing the MENU button on the front panel Enter or Return Pressing the Enter or Return key selects the highlighted item or completes an entry that you have made during system setup It is...
Страница 58: ...roup has been expanded and all of the Recipient Names within that group are displayed below the Group Name If there is a in front of the Group Name it indicates that the group has been collapsed and a...
Страница 59: ...er when setting up the LAN Highlight the box beside Port and press the button Use the arrow buttons to enter the SMTP Server port number obtained from your system administrator The default port number...
Страница 60: ...account highlight the and press the button Highlight the box beside Type and press the button Selecting Twitter from the Type allows you to post a tweet on Twitter when an event occurs Highlight the...
Страница 61: ...g CBF the DVR will upload an event detected video clip on the FTP site When selecting JPG the DVR will attach the event detected image file JPEG format on the FTP site The Site Info box displays the F...
Страница 62: ...you select should be enabled in the Notification setup screen and the DVR should be registered in the RAS Remote Administration System NOTE The Notify action for system events you made in the System E...
Страница 63: ...ng OSD Margin and pressing the button displays how OSD text will be displayed on the monitor You can adjust the horizontal and vertical margins so that text and icons will not be hidden beyond the edg...
Страница 64: ...he button You can select from 1280x1024 1440x900 and 1920x1080 for NTSC video and 1280x1024 1440x900 and 1920x1080 60Hz or 50Hz for PAL video NOTE When the individual main monitors are connected to th...
Страница 65: ...Power Once you have installed the DVR following the instructions in Chapter 2 Installation it is ready to record Live Monitoring As soon as the DVR completes its initialization process it will begin s...
Страница 66: ...elected channel with the main channel This function is supported only in the 1 5 and 1 7 display modes and can be activated from any of channel screens except the main channel screen Camera OSD Status...
Страница 67: ...ra for the selected camera if a user who has Color Control authority logs into the system It is the same as pressing and holding a camera button for a few seconds Edit Group Selecting Camera Menu Edit...
Страница 68: ...For a few seconds after pressing the ZOOM button a rectangle displays on the screen A rectangle shows the area that will be enlarged You can move the rectangle around using the arrow buttons Pressing...
Страница 69: ...ottom of the screen and the following PTZ toolbar will display Clicking on the left side exits the toolbar If you want to display the toolbar again position the mouse pointer at the bottom of the scre...
Страница 70: ...vent Status Event Status screen The Event Status screen displays the status of the DVR s systems and inputs Events will be highlighted and related channels or events will flicker for five seconds when...
Страница 71: ...e SMART Self Monitoring Analysis and Reporting Technology monitoring program Recording Video Once you have installed the DVR following the instructions in Chapter 2 Installation it is ready to record...
Страница 72: ...tains the same display format as it does in the live mode A red outline surrounding the video and the camera title indicates the search channel While in the Triplex Mode the DVR continues recording ca...
Страница 73: ...control Position the mouse pointer on the playback screen and the following Record Table Search Compact View Mode screen will display The individual controls on the toolbar perform the following func...
Страница 74: ...ew the surrounding video Bookmark Selecting Bookmark in the Search menu adds the current playback point to the bookmark list See the following Bookmarks section for details Display Full Screen Selecti...
Страница 75: ...p Copy will set the starting point of the video to be clip copied and the icon displays at the bottom left corner of the screen Selecting A B Clip Copy again will set the ending point of the video to...
Страница 76: ...essing SEARCH returns to live monitoring NOTE It is possible that no recorded image displays on the current screen Press the DISPLAY button and change the screen mode to 4x4 You will be able to easily...
Страница 77: ...any reports of motion Highlight the box beside Video Loss and press the button You can select the cameras for which you want any reports of lost video Highlight the box beside Video Blind and press th...
Страница 78: ...only the toolbar Selecting the icon in the Compact view mode switches to the Standard view mode and selecting the icon in the Expanded view mode switches to the Standard view mode Selecting or located...
Страница 79: ...ing in the top left corner exits the Record Table Search screen Motion Search Figure 50 Motion Search screen The Motion Search can be selected from the Search menu while the DVR displays the camera fu...
Страница 80: ...you want to search for motion is nearly identical to setting up the DVR for Motion Please refer to Motion Screen in Chapter 3 Configuration for more detailed instructions on setting up the detection b...
Страница 81: ...the search will be from the last recorded image When highlighting and pressing the button the bookmark list displays and the bookmark point you selected will be the ending date and time Highlight the...
Страница 82: ...py Selecting A B Clip Copy in the Search Export menu or pressing the BACK UP button on the remote control during playback will set the starting point of the video to be clip copied and the icon displa...
Страница 83: ...tFS tab and set the Use setting to ALL or Clip Copy you can copy video clips to the NetFS site If you select NetFS select a NetFS site from the registered NetFS site list CAUTION The USB device for cl...
Страница 84: ...while copying video clips THE DVR SYSTEM MAY NOT WORK NORMALLY OR THE EXTERNAL DRIVE COULD BE DAMAGED and you will get an error message the next time you try to copy video clips You will need to power...
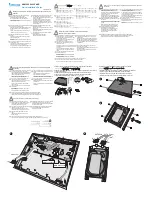
Страница 85: ...ated region of the USB hard disk drive Then click Create Partition 6 In the Create Partition wizard click Next then Primary Partition and follow the instructions on the screen Make sure that the FAT32...
Страница 86: ...mparison value is located at 17th Unit price mark will be ignored automatically 28th Qty and 40th amount characters including spaces from the left but the value of amount category is located on a diff...
Страница 87: ...nd PASSWORD and clicking the LOGIN button logs in using the selected mode You will need to enter the DVR IP address in the DVR ADDRESS field when running the WebGuard program by entering http www dvro...
Страница 88: ...with elevated administrator permissions Restart your computer to apply the changes Web Monitoring Mode WebWatch is a remote web monitoring program that allows you to monitor live video transmitted in...
Страница 89: ...the attached speaker and click the button again stop monitoring live audio Clicking both and allows two way communication Clicking the disables audio communication Aspect Ratio Changes the image aspec...
Страница 90: ...image drawing mode and select OSD information to be displayed on the screen Click the to save any video clip of recorded data as an executable file or click the to save the current image in a bitmap...
Страница 91: ...from the search time ranges as follows From four o clock of the first segment to five o clock of the first segment From four o clock of the first segment to five o clock of the second segment From fo...
Страница 92: ...Change Disk No serial number Time Zone Change Disk No Removed Time Sync Auto Deletion Time Sync Fail Search Begin Disk Bad Search End Login Clip Copy Begin Logout Clip Copy End Setup Begin Clip Copy C...
Страница 93: ...rage System Event RECORD General Schedule Pre Event EVENT Motion Alarm In Video Loss Video Blind Text In CAMERA General PTZ DEVICE Audio Alarm Out Remote Control NETWORK General LAN FEN RTSP WebGuard...
Страница 94: ...higher than the upgrade package file version you should reset the DVR first using the Factory Reset When using the Factory Reset you will lose any settings you have saved Specifications VIDEO Signal F...
Страница 95: ...e SATA hard disk drive Secondary Storage USB hard disk drive or flash drive GENERAL Dimensions W x H x D 11 8 x 2 4 x 9 1 300mm x 62mm x 232mm Unit Weight 6 83 lbs 3 1kg Shipping Weight 11 46 lbs 5 2k...