background image

English - 6

OPERA

OPERA

TION & ADJUSTMENT

TION & ADJUSTMENT

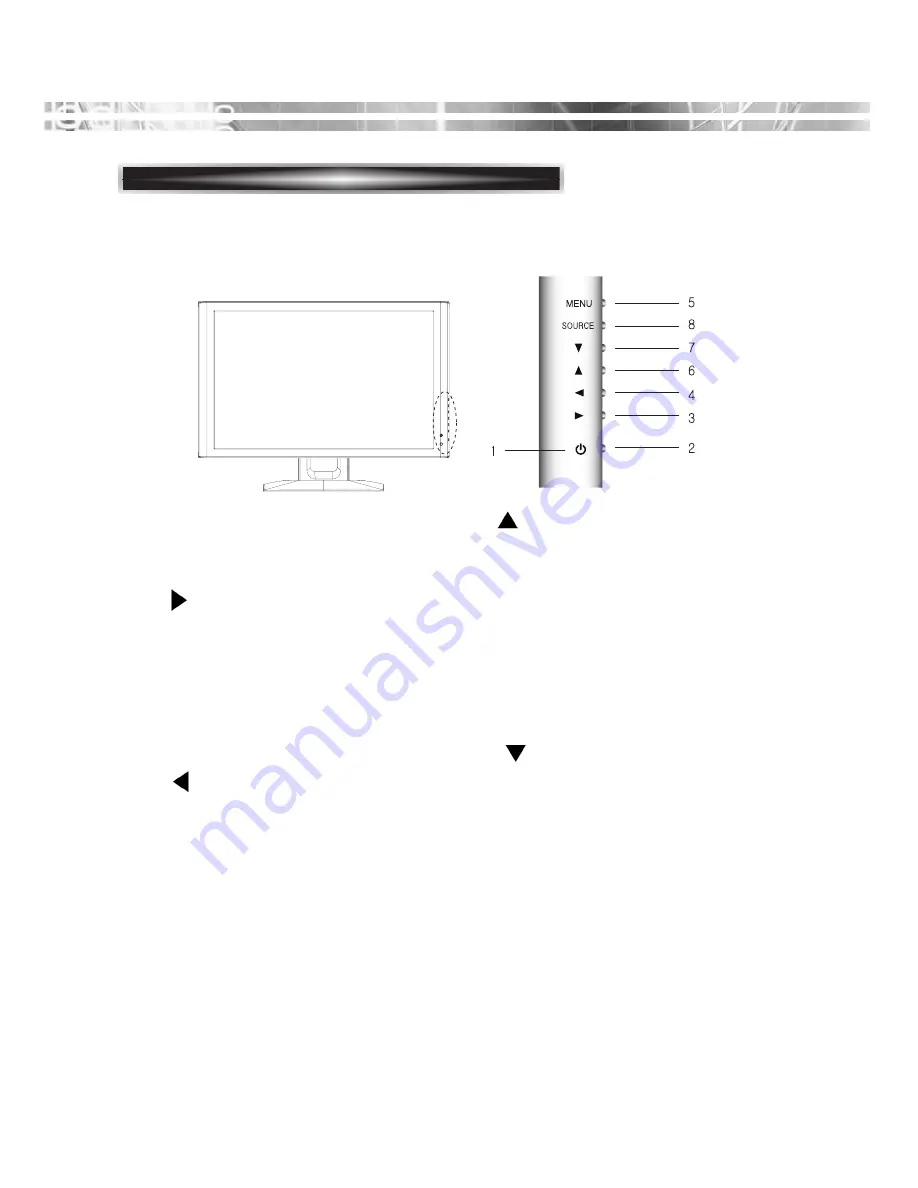
CONTROL PANEL (Case #1)

POWER Indicator

1

SOURCE 

MENU 

5

Turns the OSD window on.

Turns the OSD (On-Screen

Display) window off and moves
from sub menu to top menu in
the OSD window.

Switches the monitor on

and off.

POWER 

Up Arrow - Auto Adjustment

Down Arrow

Right Arrow - Volume

Left Arrow - Volume

2

Shows both normal operation and power management status with

power indicator light. 

*

(    )

6

Primary Function: Automatically

adjusts the display to the most

optimal setting possible.(Analog

MODE)

Secondary Function: Allows

forVertical scrolling in the OSD

Menu and to INCREASE the

value of the selected menu

function.

3

Selects menu.

Primary Function : Used to

INCREASE the volume.

Secondary Function:Moves

cursor to the right in the OSD

window and increases the

value of any selected menu.

(    )

*

7

Allows for Vertical scrolling in

the OSD Menu, and to
DECREASE the value of the
selected sub menu function.

8

Used to select from different

input sources. Press the UP or
DOWN arrow to scroll
through the available sources,
and press LEFT or RIGHT
arrow to confirm selection.

HOT KEY

(    )

*

(    )

*

4

Selects menu.

Primary Function: Used to

DECREASE the volume.

Secondary Function:Moves

cursor to the Left in the OSD

window and decreases the

value of any selected menu.

(    )

*

Содержание mle215w

Страница 1: ...21 5 CCTV LED MONITOR...

Страница 2: ......

Страница 3: ...warnings and instructions marked on the monitor IMPORTANT SAFEGUARDS 12 For added protection for this monitor during a lightning storm or when it is left unattended and unused for long periods of tim...

Страница 4: ...elevision reception which can be determined by turning the equipment off and on the user is encouraged to try to correct the interference by one or more of the following measures Reorient or relocate...

Страница 5: ...ures 2 Setup 3 Stand Assembling Procedures 3 Connecting the 15 Pin Signal Cable and Power Cord 4 Connecting the others 5 Operation Adjustment 6 OSD Function 10 Specifications 18 Factory Preset Timings...

Страница 6: ...keep it near your monitor for quick reference First please check that the contents of the box corresponds with the following checklist LED monitor Power cord Remote Controller User s guide AC Adapter...

Страница 7: ...ements Use the on screen controls to adjust the color temperature RGB gain value for the best possible screen color and intensity Press the menu button and activate the Self Diagnosis menu to determin...

Страница 8: ...Put some smooth pad or cloth on the level surface and place the monitor on it with the face downward 2 Insert the stand as below 1 Put some smooth pad or cloth on the level surface and place the monit...

Страница 9: ...of the video card in your computer and monitor Optional Connect the audio cable to the output port of the sound card in your computer Plug the DC jack into the DC in port located on the back of the mo...

Страница 10: ...al output for CAM1 and CAM2 2 Audio signal input left and right for CAM1 3 Audio signal input left and right for CAM2 4 Separated signal input and looping output for S VIDEO 5 Composite signal input a...

Страница 11: ...dary Function Allows forVertical scrolling in the OSD Menu and to INCREASE the value of the selected menu function 3 Selects menu Primary Function Used to INCREASE the volume Secondary Function Moves...

Страница 12: ...een Display Main Menu Use Left Right button to select the menu Use Down button to select the sub menus Use Up Down buttons to select sub menu function Press SOURCE button then using left right buttons...

Страница 13: ...n there is no OSD if you press this UP AUTO button you can use the best displayperformance fit for a current mode Selects signal in order VGA HDMI CAM1 CAM2 S VIDEO When there is no OSD you can adjust...

Страница 14: ...st the CLOCK control Perform the H POSITION Perform the Auto tracking Is the H SIZE proper Is the noise displayed on the screen Adjust the CLOCK until the screen is cleared Is the noise displayed on t...

Страница 15: ...your own customized sound Standard Movie Music User 1 Contrast Adjust the contrast of image the difference between light and dark areas on the screen 2 Brightness Adjust the brightness of image 3 Colo...

Страница 16: ...5 OSD Timeout Adjust the display OSD Menu 5 60 Second 6 OSD Transparency Adjust the OSD Transparency 7 Information Shows the status of the current Display settings 8 Memory Recall Reset the screen to...

Страница 17: ...3 Size Select the PIP display size Small Middle Large Double 1 Double 2 4 Position Adjust the PIP display position R Up R Down L Down L Up 5 Border Color Select the border color of the PIP display Bla...

Страница 18: ...e Music User 1 Contrast Adjust the contrast of image the difference between light and dark areas on the screen 2 Brightness Adjust the brightness of image 3 Tint Adjust the tint of image 4 Color Adjus...

Страница 19: ...the Display vertically up or down 1 3D NR Reduce the noise in the picture due to poor reception or poor picture quality Off Low Middle High 2 MADi Generation advanced color engine automatic picture en...

Страница 20: ...R Up R Down L Down L Up 5 Border Color Select the border color of the PIP display Black Blue 6 Sound Swap Select the sound Swap Main Sub 7 Picture Swap Change the main picture and the sub pictures of...

Страница 21: ...English 16 Supported X Non Supported PIP TABLE MAIN VGA HDMI CAM1 CAM2 S VIDEO VGA X HDMI X CAM1 X X CAM2 X X S VIDEO X X SUB...

Страница 22: ...of range or None support No Signal screen is displayed when the D Sub signal connector is connected but the status of the monitor is on DPMS mode Out of Range screen is displayed when the applied fre...

Страница 23: ...7 M Colors Display Area 476 6 x 268 1mm Interface VGA IN 15pin D sub YES PC Streo In YES Head Phone Out YES HDMI YES CAM1 CAM2 BNC Input Output 2 2 RCA Left Right Input 2 2 S VIDEO Input Output AUDIO...

Страница 24: ...75Hz 60 0 75 Non interlaced 1280 X1024 60Hz 64 0 60 Non interlaced 1280 X1024 75Hz 80 0 75 Non interlaced 1152 X 864 75Hz 67 5 75 Non interlaced 1280 X 960 60Hz 60 0 60 Non interlaced 1440 x 900 60Hz...

Страница 25: ...ar as below 3 Remove the four screws connecting the stand and the body and the stand is disassembled Turn off the monitor and pull out the power cable Place a cushion or a soft cloth on the floor and...

Страница 26: ...AND OPTION Tighten up screws at the locations indicated by arrows Support stand Surface for stand installation This monitor s installation surface is compatible with various kinds of VESA standard sta...

Страница 27: ...connected Check if the signal cable is suitable to the video card Adjust Clock or H V Center to get the proper image Keep the devices that may cause electrical interference away from the monitor See...

Страница 28: ...terminal is properly connected Check if the video cable is correctly connected to the computer and set to the Funtions on the OSD picture menu Adjust the Color or Tint on the OSD Picture Menu Adjust...

Страница 29: ...MEMO MEMO...

Страница 30: ...MEMO MEMO...

Страница 31: ......

Страница 32: ...S N 9978641912A...

Отзывы: