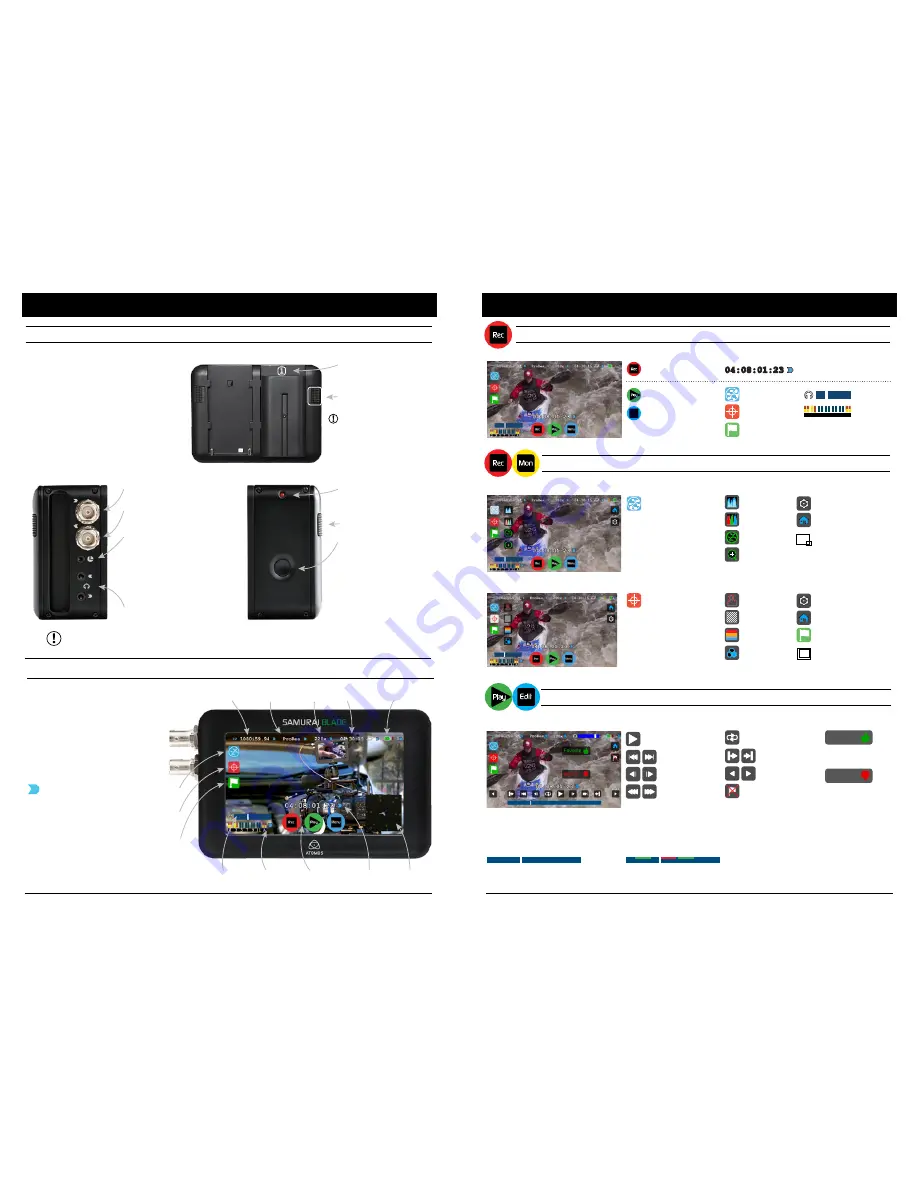
The Samurai Blade is controlled by
a simple user-friendly
touchscreen
interface. Pictured left are the main
controls seen when the Samurai Blade
is first powered up and there is a video
input connection.
Pay special attention
to any items on screen
which are marked by a
small blue arrow.
Touch these items to
access or cycle through
the available options.
For example, touching
the Video Input Format
or blue arrow at right
will cycle through all
available input formats.
Atomos Samurai Blade
~ QuickStart Guide
CAUTION: The Samurai Blade is constructed from aluminium which acts as the unit’s heat sink. In high or extreme temperatures / climates, the metal
chassis may feel slightly warm / hot to touch. This is completely normal and does not in any way effect the overall functionality of the Samurai Blade.
Touchscreen / User Interface
Battery number 1
Gently slide down into battery
slot/s and
lock into position.
Tally Light
Flashes red when recording.
Battery Latch
Connect & power-up
Attach Battery:
Attach the supplied battery to the Samurai Blade.
Make sure to use the battery slot marked with
the number “1” as this is the primary battery. If
you purchase an additional battery, it should be
connected to the other, secondary slot.
The Samurai Blade utilises only one battery at a
time. This way a battery can be removed, charged
and replaced during operation. Refer to the User
Manual for more information.
IMPORTANT Samurai Blade can only power up /
turn on from the primary battery position.
[Battery Slot #1]
Power up using
battery slot 1 ONLY
Push latch to release battery
Video Input
Connect camera using HD/SD-SDI cable
Headphone
Line Out Volume
Cut and Tag
Favorite/Reject
Monitor Assist Functions
Waveform Monitoring
Video Output
Connect external device via the
HD/SD-SDI cable
LANC Remote
Optionally control the Samurai using
LANC remote control connected here
(use a 2.5mm TRS/ 3-pin plug )
Share remote control with other devices
(loop thru ) by connecting them to the
second LANC connector cable
Audio
Stereo Line In or Headphones
On/Off & Screen lock
Briefly press the circular button on
the side of the Samurai Blade to
power-up the unit. To shut down,
depress button for at least 4 seconds
(until unit turns off)
When in operation, a single press
of the power on/off button will lock
the display and controls. A second
press will enable the display and
controls again.
Audio Channels
and Levels
Rec / Play / Menu
Timecode and
Record Trigger
Vectorscope
Continuous Power
Battery Indicator
Time
Remaining
Recording
Quality
Recording
Format
Video Input Format and
Pulldown Status
Tag for Favourite: Touch once
to set the IN point. Touch
again to set OUT point.
Tag for Reject: Touch once to
set the IN point. Touch again
to set OUT point.
Atomos Samurai Blade
~ QuickStart Guide
Waveform & Monitor Assist Functions
Playback & Edit: One-touch Review
Record
Main Interface:
Monitor Assist Menu:
Playback Interface:
Record:
Press to start/stop recording
Record Trigger: set by supported
camera/or rolling timecode trigger
OR
Waveform Monitoring
Monitor Assist
Cut and Tag
Audio Level
Audio Metering
Play: Enter playback mode
Focus Assist
TIP:
Touch the centre of the screen
to remove all overlays
TIP:
Touch the centre of the Samurai Blade screen to remove
all overlays. Touch the screen again to restore previous
screen/overlays and playback controls.
Timeline / scrub bar
TIP:
Each touch of an icon toggles
the controls on/off
Monitor Assist Settings: Touch to
reveal Focus Assist Options (Color/
Mono/Outline) and Zebra (%)
Return to main page
Safe Areas/Grid Lines
Note: Tagging available while
recording and monitoring
Zebra Pattern
False Color
Blue Only Exposure
Use transport controls or touch anywhere on the
timeline to scrub to a section for review. Check
recorded shots diuring playback using WFM and
Monitor Assist tools.
Move frame by frame to select cut and tag In and
Out Points, marking them as favorite or reject. Once
cut and tag is complete, export an XML project for
instant timeline assembly and editing.
Playback & Review on large monitor/s:
Recorded footage can also be played from the
Samurai Blade’s HD/SD-SDI Out. This is ideal for large
screen client viewing, feedback and editing on location.
Menu: Device settings / options
Set Loop In / Out point
Loop: Loop playback
Previous / Next Clip
Clear Tagging
Jump to beginning / end
Frame by frame RWD/FFWD
Play: Press to play clip
Super RWD/Super FFWD
Menu
04:08:01:23
04:08:01:23
Favorite
Reject
Waveform Monitoring Menu:
Luma Parade
Touch the Waveform Monitoring
icon to reveal WFM functions
Touch the Monitor Assist icon
to reveal the Monistor Assist
functions
Return to main page
Waveform Monitoring Settings:
Touch to reveal Position/Dynamic
Range/Opacity controls
While waveforms or vectorscopes
are active, touch the bottom right
hand side to toggle between 1/4 view,
1/3 view and full screen mode.
RGB Parade
Vectorscope
Vectorscope Zoom
1 3 5 7 9 11 A
Timeline showing tagged footage


