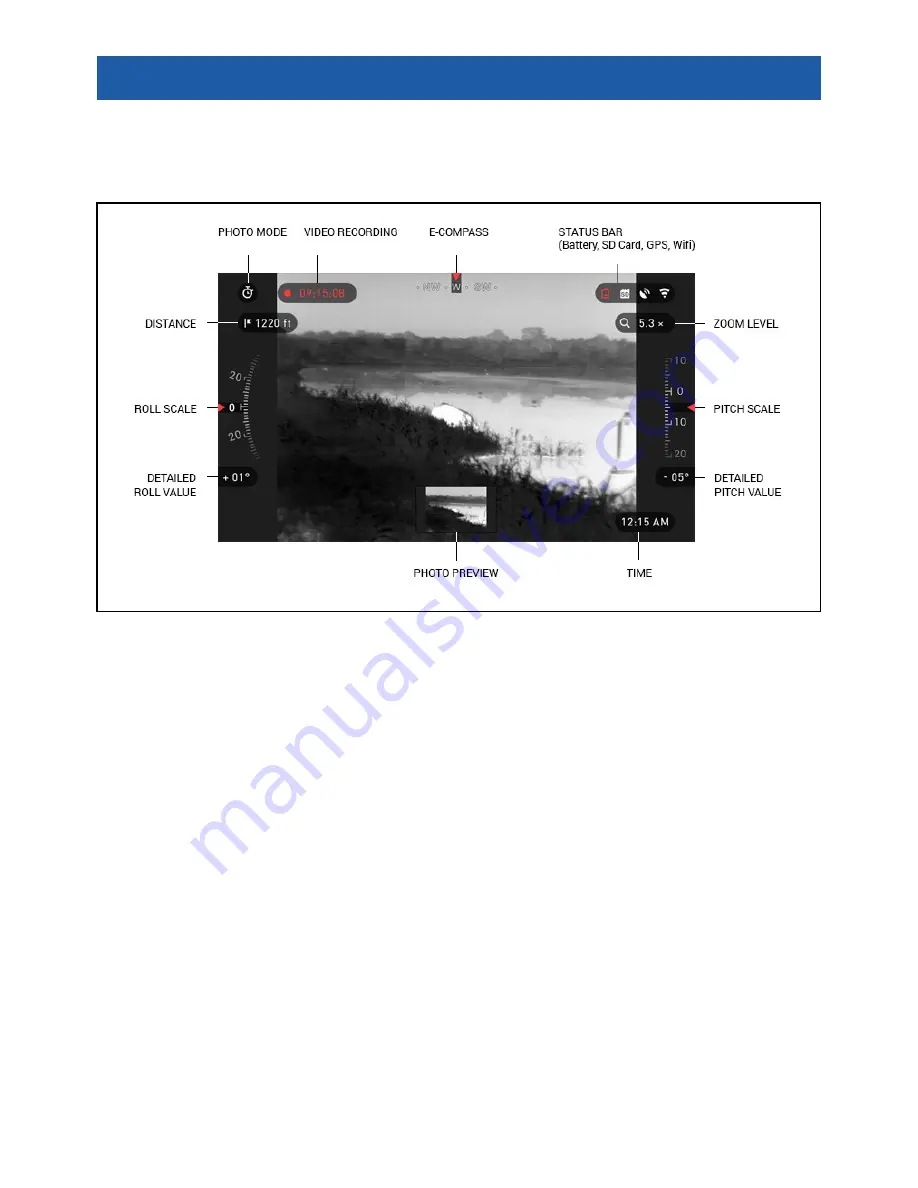
ATN OTS-HD Series Скачать руководство пользователя страница 11

11

I N T E R FAC E

HOMESCREEN

First screen you’ll see after switching on the device is Homescreen. It consist of 

Scales, Status Bar icons and different Information Widgets.

SCALES
E-Compass Scale shows yaw angle based on e-Magnetometer data. 
Roll Scale shows viewer cant based on internal 3D Gyroscope. 
Pitch Scale shows viewer inclination based on internal 3D Gyroscope. 

STATUS BAR
Its job is to display information about the current state of the system. 
Currently inactive icons become invisible, so you may see only the important 

information at the moment:

•  Battery — appears when energy level is low;
•  SD Card — shows the presence or absence (red icon) of memory card; 
•  Bluetooth, GPS and WiFi — shows enable or disable the function.

WIDGETS
They are interface elements which provide quick access to useful information. 

There are several types of widgets:

•  Icons without value — is used for mode displaying (Photo and Video Modes);
•  Only numerical value (Detailed Roll and Pitch Values);
•  Icons with a numerical value which provide detailed numerical readings;
•  Photo Preview (appears in the bottom of the homescreen, after the photo was 

taken).

Содержание OTS-HD Series

Страница 1: ...OTS HD Series M A N U A L OTS HD USER S GUIDE REV 2 DECEMBER 2016 AMERICAN TECHNOLOGIES NETWORK CORP THERMAL SMART HD MONOCULARS VIEWERS...

Страница 2: ...is not to be construed as a commitment by ATN Corp ATN Corp assumes no responsibility or liability for any errors or inaccuracies that may appear in this book 2016 ATN Corp All rights reserved POWER...

Страница 3: ...re update 8 ON OFF 9 Using keypad 9 Focusing 9 Compass calibration 10 Interface 11 Homescreen 11 Main operations 12 Shortcut carousel 13 Using System menu 14 Functions 16 Photo and video modes 16 Rang...

Страница 4: ...l core beats at the heart of our systems More power more features smaller packaging and lower cost have allowed ATN to make the biggest update to its award winning thermal product line Record videos a...

Страница 5: ...gle of view 16 12 5 12 9 5 6 4 7 3 2 4 32 25 24 19 12 5 9 7 6 4 7 Objective lens focal length 19 mm 25 mm 50 mm 100 mm 19 mm 25 mm 50 mm 100 mm Micro Display HD Display Core ATN Obsidian T II Eye reli...

Страница 6: ...6 85 3 16 3 14 174 80 26 80 mm 8 81 3 16 3 14 224 80 26 80 mm 10 67 3 97 3 47 271 101 88 mm 6 85 3 16 3 14 174 80 26 80 mm 8 81 x 3 16 x 3 14 224 80 26 80 mm 10 67 3 97 3 47 271 101 88 mm Weight 1 55...

Страница 7: ...ies Install batteries as follows 1 Remove the battery cap by unscrewing it counter clockwise 2 Insert batteries as shown 3 Return the battery cap into the housing screw clockwise until finger tight Do...

Страница 8: ...mware updates please register your device on our website you ll receive an email letting you know when new firmware becomes available To update the new firmware you will need a microSD Card and batter...

Страница 9: ...PAD The KEYPAD is programmed to be used in two different ways Short and Quick Taps used for most functions and to get around the menu Press and Hold designed to be used on the following situations ON...

Страница 10: ...le To calibrate you should rotate the device in three axis as pictured below NOTE After calibrating the device please remember that the com pass will work best when hold ing the OTS HD parallel to the...

Страница 11: ...ly inactive icons become invisible so you may see only the important information at the moment Battery appears when energy level is low SD Card shows the presence or absence red icon of memory card Bl...

Страница 12: ...OUT Current Zoom Level is displayed at the Zoom widget on the Homescreen NOTE When the device is launched for the first time you need to configure the lense option in the pop up window before zooming...

Страница 13: ...sing the LEFT RIGHT buttons except the group of ON OFF switches WiFi GPS Bluetooth Shooting Solution RAV You should use the UP DOWN buttons between switches To turn ON or OFF a particular switch you s...

Страница 14: ...the menu The System Menu consist of Tab Bar at the top of the screen list of subcategories in the center and Help Information at the bottom On the left side of the Tab Bar you will find the Exit with...

Страница 15: ...eps Select the subcategory you needed with the UP or DOWN buttons Press the Center button to select a particular value once selected it will turns red Change the value with the UP and DOWN buttons To...

Страница 16: ...and select the wrench icon with RIGHT or LEFT buttons Then push CENTER button to enter the menu There are three photo modes to choose from Switching between modes is done in the System Menu from Photo...

Страница 17: ...in the System Menu While you are in this mode the Burst widget appears Regardless of which mode you are using the preview appears after a photograph is taken on the bottom of the screen for sev eral...

Страница 18: ...the distance is measured the value will be automatically integrated into your Smart Shooting Solution RANGEFINDER To use select the Flag Icon from the Shortcut Carousel Pressing the CENTER button wil...

Страница 19: ...HT button to enter the Menu Choose one of the presets or input the height manually Accept the height with CENTER button and go back to the Main Screen DISTANCE ENTRY Allows you to input or cor rect th...

Страница 20: ...nment or scenery They may be white or black and remain static and or nonresponsive 1 Enter the Carousel by pressing the Enter key 2 Select System Settings 3 Select Thermal Category 4 Select Pixel Corr...

Страница 21: ...PSE SETTINGS Total Photos amount of photos in a series 2 10 Frame Interval length of the interval 2 15 sec MICROPHONE sound recording ON OFF VIDEO QUALITY can be 1280x960 30 fps FORMAT SD CARD after y...

Страница 22: ...ID Password MAC Address RECORD GEO TAGGING adding geographical identification to your videos ON OFF LENSE TYPE to make all features work correctly you need to choose the type of your lense Example 2x...

Страница 23: ...llergic reactions The scope is a precision electro optical instrument and must be handled care fully Do not scratch the external lens surfaces or touch them with your fingers CAUTION Failure to follow...

Страница 24: ...n For customer service and technical support please contact American Technologies Network Corp 1341 San Mateo Avenue South San Francisco CA 94080 phone 800 910 2862 650 989 5100 e mail service atncorp...

Отзывы: