ATN binox-thd Скачать руководство пользователя страница 5

5

PR E PA R I N G   T H E   D E V I C E

UNPACKING

The following steps must be accomplished prior to each mission where the device 

is used:

1. Open packaging box, remove Thermal BinoX-THD and check the contents
2. Make sure that nothing is missing
3. Inspect the device for damage to optical surfaces, body, eyecups, operation 

buttons, etc. 

4. Ensure that all optical surfaces are clean and ready for use.

NOTE

If any accessories are missing or broken contact ATN’s Customer Service.

INSTALLATION OF BATTERIES

The Thermal BinoX-THD will operate on three CR123 type batteries.

NOTE

We highly recommend using lithium 

CR123 batteries. They will provide much 

longer battery life.

Install batteries as follows:
1. Remove the Battery Cover following the 

arrow direction

2. Insert batteries as shown.
3. Close the Battery Cover.

NOTE

Make sure that the device is turned off 

before changing sources of energy (batte­

ries or USB in power supply mode).

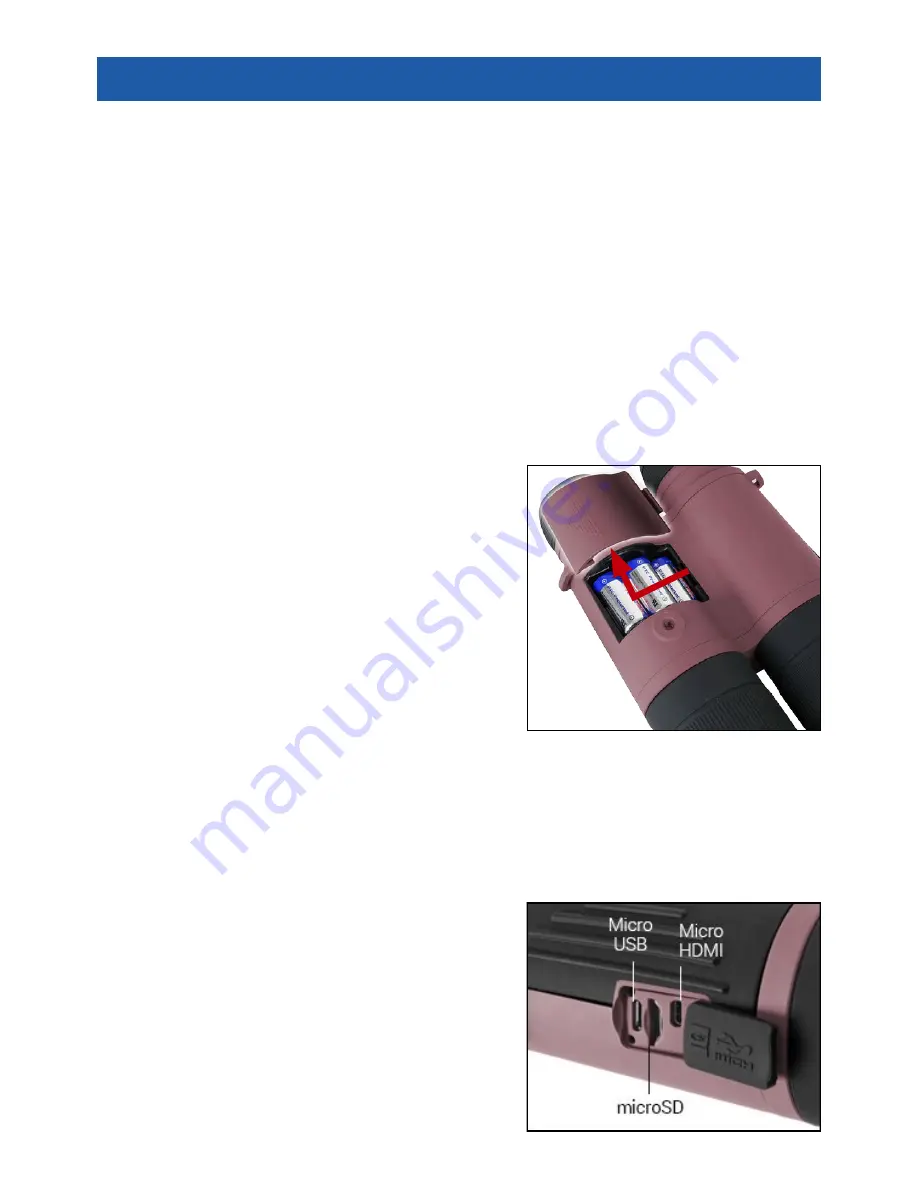
MicroSD, USB AND HDMI PORTS

The device is equipped with microSD, Micro USB and Micro HDMI ports. You can 

find them under the rubber cover near the battery block (we marked the cap with 

appropriate icons).

To open the cover you should gently lift the 

rubber cover and move it out of the way.

NOTE

Make sure that the device is turned off before 

inserting the microSD card into the slot.

1. A new card should be formatted before 

usage.

2. Insert microSD card as shown.
3. To lock the card in the slot push it in with a thin 

object (a small coin, paper clip, toothpick, etc.).

  SMART RANGE FINDER

Содержание binox-thd

Страница 1: ...THERMAL SMART HD BINOCULARS M A N U A L ATN BinoX THD USER S GUIDE REV 2 JUNE 2016 AMERICAN TECHNOLOGIES NETWORK CORP BinoX THD...

Страница 2: ...otice is not to be construed as a commitment by ATN Corp ATN Corp assumes no responsibility or liability for any errors or inaccuracies that may appear in this book 2016 ATN Corp All rights reserved B...

Страница 3: ...e update 6 ON OFF 7 Using your keypad 7 Focusing 7 Compass calibration 8 Interface 9 Homescreen 9 Main operations 10 Shortcut carousel 11 Using System menu 12 Functions 14 Photo and video modes 14 Ran...

Страница 4: ...notice APPLICATION No longer do thermal binoculars need to be expensive and clunky The Ther mal BinoX is here to provide you with unprecedented capabilities at a fraction of the cost Well designed er...

Страница 5: ...longer battery life Install batteries as follows 1 Remove the Battery Cover following the arrow direction 2 Insert batteries as shown 3 Close the Battery Cover NOTE Make sure that the device is turned...

Страница 6: ...nt of a power failure during an update the device may crash corrupt ing its system files and will need to be sent back to the ATN factory for service It is important not to use additional sources of p...

Страница 7: ...wing situations ON OFF ZOOM SHORTCUT MENU NOTE Using LEFT or RIGHT buttons in the menu lets you quickly Exit Shortcuts from any position FOCUSING DIOPTER ADJUSTMENT By rotating the Diopter Adjustment...

Страница 8: ...ate you should rotate the device on three axis as illus trated NOTE After calibrating the device please remember that the compass will work best when holding the BinoX THD parallel to the ground Other...

Страница 9: ...inactive icons become invisible so you will only see the important infor mation on the Homescreen Interface Battery appears when energy level is low SD Card shows the presence or absence red icon of m...

Страница 10: ...nd holding the UP or DOWN button on the keypad you will be able to Zoom IN and OUT Current Zoom Level is displayed in the Zoom widget on the Homescreen TAKING PHOTOS Press the LEFT button to TAKE A PH...

Страница 11: ...n while having the switch selected Example WiFi EXIT Exit Carousel NUC The shortcut allows to make non uniformity compensation NUC NUC ing is required to improve image quality when the image is degrad...

Страница 12: ...ystem Menu consists of a Tab Bar at the top of the screen list of subcatego ries in the center and Help Information at the bottom On the left side of the Tab Bar you will find the Exit with arrow icon...

Страница 13: ...w steps Select the subcategory you need with the UP or DOWN buttons Press the Center button to select a particular value once selected it will turn red Change the value with the UP and DOWN buttons To...

Страница 14: ...nd select the wrench icon with RIGHT or LEFT buttons Then push CENTER button to enter the menu There are three photo modes to choose from Switching between modes is done in the System Menu from Photo...

Страница 15: ...d in the System Menu While you are in this mode the Burst widget appears Regardless of which mode you are using the preview appears after a photograph is taken on the bottom of the screen for sev eral...

Страница 16: ...onable knowledge of the size of your target RANGEFINDER To use select the Flag Icon from the Shortcut Carousel Pressing the CENTER button will take you to the Main Screen of the Range finder feature T...

Страница 17: ...red to improve image quality when the image is degraded by var ious enviromental events There are multiple NUC tables that span the full operating temperature range and the sensor automatically select...

Страница 18: ...y pad to move the reticle over the neutral pixel If it is hard to target the neutral pixel press the enter button and select zoom Use the up and down keys to zoom in and out on to the neutral pixel in...

Страница 19: ...PSE SETTINGS Total Photos amount of photos in a series 2 10 Frame Interval length of the interval 2 15 sec MICROPHONE sound recording ON OFF VIDEO QUALITY can be 1280x960 30 fps FORMAT SD CARD after y...

Страница 20: ...ws you to choose a geographical region with standard time WiFi values are not changeable SSID Password MAC Address RECORD GEO TAGGING adding geographical identification to your videos ON OFF ZOOM allo...

Страница 21: ...llergic reactions The device is a precision electro optical instrument and must be handled carefully Do not scratch the external lens surfaces or touch them with your fingers CAUTION Failure to follow...

Страница 22: ...n For customer service and technical support please contact American Technologies Network Corp 1341 San Mateo Avenue South San Francisco CA 94080 phone 800 910 2862 650 989 5100 e mail service atncorp...

Отзывы: