background image

www.atmorusa.com

Hot Water


on Demand

Instalación y guía de funcionamiento

Serie InLine 800

3kW-13kW

Содержание InLine 800 Series

Страница 1: ...www atmorusa com Hot Water on Demand Installation and Operation Guide InLine 800 Series 3kW 13kW ...

Страница 2: ...icity is turned off Safety Instructions 1 01 04 07 03 06 09 02 05 08 The water heater must be installed by a licensed electrician and in compliance with all local electrical and building regulations The heater must be installed according to the installation instructions see figures The plumbing installation requires metal or reinforced pipes that can withstand a minimum pressure of 8 bar Other typ...

Страница 3: ...W 240 44 1 50 6 AWG AT 800 13 13 kW 240 55 1 60 4 AWG Minimum water flow to activate unit 0 5 GPM Nominal water volume 2 7G Min Working pressure 0 5 8 bar 7 115 psi Tested pressure 16 bar 230 psi Water connections 1 2 NPT Dimensions in H x W x D 7 3 x 11 8 x 3 55 Weight Ib 3 4 Model 240V 220V 110V 120V AT 800 04 3 8 kW 3 2 kW AT 800 70 7 0 kW 5 4 kW AT 800 08 8 5 kW 7 1 kW AT 800 10 10 5 kW 8 8 kW...

Страница 4: ... hose will cause damage Figure 5 Residential plumbing systems with unstable pressure or pressure above 5 bar require the application of a pressure stabilizer valve set to 4 5 bars Do not install the water heater with water connections facing upward or to the side Figure 6 Mount unit to wall with 4 screws at the marked points Figure 4 The appliance must be mounted horizontally with water inlets and...

Страница 5: ...am 1 Rubber Cold Cold Hot Hot PRD L1 L2 N 3a 3 0 3 5kW 110 120V 3b 3 8 8 5kW 240V 3c 8 6 13kW 240V Note Neutral N does not need to be connected L1 L1 L2 N L2 L1 G G N N L1 L1 G G N L1 L2 Inline 800 0 L O W MI D H I G H Inline 800 0 L O W MI D H I G H Inline 800 0 L O W MI D H I G H Inline 800 0 LO W M I D H I G H ...

Страница 6: ...ratures Maximum of 0 5 GPM flow rate is needed for optimal heating performance Run the water flow for one minute to check for leakage before connecting to power Reattach the front cover of the heater and secure it with 4 screws and then slide the bottom gray cover Connect the power cable to the terminal block Caution The heater must be grounded Reference figure 3 on page 4 and Electrical diagram o...

Страница 7: ...nal block 2 Thermal cut out with reset 4 Relay 5 Switch 0 Off 1 Low 2 Medium 3 High 6 Light 7 Heating element 8 Read sensor 8 5kW 10 5kW 240V 13kW 240V 3 0 110V 3 8 6 5Kw 240V Install Line 1 L1 E G Ground Line 2 L2 L1 L2 Line1 Line2 Black or Red E G Ground Green Yellow N Neutral White or Silver Neutral acts as Line 2 L2 for 220V 240V 1 2 8 3 4 5 6 7 R R 85º Led 1 Led 2 85º 57º L1 G L2 2 3 4 6 7 1 ...

Страница 8: ...igher temperature setting Check if the main water line stop valve is fully open and that there are no other restrictions in the water supply line Have the Heater unit check by a qualified eIectrician or contact your local authorized distributor MODEL kW kW kW kW AT 800 35 0 1 2 3 5 AT 800 04 0 1 6 2 2 3 8 AT 800 70 0 3 3 5 7 AT 800 08 0 3 8 4 7 8 5 AT 800 10 0 5 25 5 25 10 5 AT 800 13 4 5 8 5 13 L...

Страница 9: ... held shower head Check to see that your shower head hose is not twisted or blocked It is necessary for the hose to have a free passage of water Check if the main water line stop valve is fully open and that there are no other restrictions in the water supply line Water temperature varies from hot to cold during use Water pressure has dropped below min level Increase hot water supply No hot water ...

Страница 10: ...3 Cold water inlet 2 PRD 5 Hot water outlet to be connected to the main hot water pipe 9 Parts Inline 800 0 L O W MI D H I G H 1 Switches ...

Страница 11: ...10 ...

Страница 12: ... to participate in a class action In addition the original owner agrees to waive subordination to the extent a loss is covered by insurance so that their insurance company cannot proceed with action against Atmor for recovery of any claims Furthermore all claims must be arbitrated in the state of New Jersey Should the owner wish to return the water heater for repair the owner must first secure a w...

Страница 13: ...www atmorusa com Hot Water on Demand Instalación y guía de funcionamiento Serie InLine 800 3kW 13kW ...

Страница 14: ...sconectada Instrucciones de seguridad 1 01 04 07 03 06 09 02 05 08 El calentador de agua debe ser instalado por un electricista certificado y en conformidad con todas las regulaciones locales en materia de electricidad y edificios El calentador se debe instalar de acuerdo con las instrucciones de instalación ver las figuras La instalación de plomería requiere tuberías reforzadas o metálicas que pu...

Страница 15: ...0 13 13 kW 240 55 1 60 4 AWG Flujo mínimo de agua para activar la unidad 0 5 GPM Volumen de agua nominal 0 11 galones 0 42 l Presión de funcionamiento de 0 5 a 8 bares de 7 a 115 psi Presión probada 16 bares 230 psi Conexiones de agua 1 2 NPT Dimensiones pulg A x A x P 7 3 x 11 8 x 3 55 Peso libras 3 4 Modelo 240V 220V 110V 120V AT 800 04 3 8 kW 3 2 kW AT 800 70 7 0 kW 5 4 kW AT 800 08 8 5 kW 7 1 ...

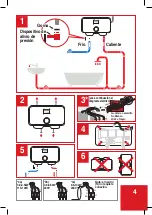
Страница 16: ...idenciales con una presión inestable o una presión que supere los 5 bares requieren la aplicación de una válvula estabilizadora de presión fijada en 4 a 5 bares No instale el artefacto con las entradas y salidas de agua en la parte superior Figura 6 Instale la unidad con los 4 tornillos en los puntos marcados Figura 4 El artefacto se debe instalar horizontalmente con las entradas y salidas de agua...

Страница 17: ...0 L O W MI D H I G H Inline 800 0 L O W MI D H I G H Inline 800 0 L O W MI D H I G H Inline 800 0 L O W M I D H I GH vea a continuación el diagrama eléctrico 3a 3 0 3 5kW 110 120V 3b 3 8 8 5kW 240V 3c 8 6 13kW 240V Nota el neutro N no requiere conexión L1 L1 L2 N L2 L1 G G N N L1 L1 G G N L1 L2 Inline 800 0 LO W M I D H I G H ...

Страница 18: ...luego deslice la cubierta gris inferior Conecte el cable de alimentación al bloque de terminales Precaución el calentador debe estar conectado a tierra Consulte la figura 3 en la página 4 y el diagrama eléctrico en la página 6 Cuando el sistema se instala al aire libre el calentador se debe colocar en una caja eléctrica sellada a prueba de agua Asegúrese de que el artefacto esté lleno de agua ante...

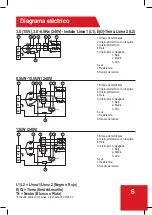
Страница 19: ... Bloque de terminales 2 Interruptor térmico con reajuste 4 Relé 5 Interruptor 0 Apagado 1 Bajo 2 Medio 3 Alto 6 Luz 7 Resistencia 8 Sensor de lectura 8 5kW 10 5kW 240V 13kW 240V 3 0 110V 3 8 6 5Kw 240V Instalar Línea 1 L1 E G Tierra Línea 2 L2 L1 L2 Línea 1 Línea 2 Negro o Rojo E G Tierra Verde Amarillo N Neutro Blanco o Plata El neutro actúa como Línea 2 L2 para 220 V 240 V 1 2 8 3 4 5 6 7 R R 85...

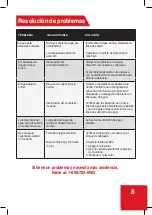
Страница 20: ...lvula de cierre de la línea de agua esté completamente abierta y que no existan otras restricciones en la línea de suministro de agua Hacer que un electricista certificado revise el calentador o comunicarse con su distribuidor local autorizado MODELO kW kW kW kW AT 800 35 0 1 2 3 5 AT 800 04 0 1 6 2 2 3 8 AT 800 70 0 3 3 5 7 AT 800 08 0 3 8 4 7 8 5 AT 800 10 0 5 25 5 25 10 5 AT 800 13 0 4 5 8 5 13...

Страница 21: ...abezal de la ducha Verificar que la manguera del cabezal de ducha no esté retorcida o bloqueada La manguera debe tener un libre paso de agua Verificar que la válvula de cierre de la línea de agua esté completamente abierta y que no existan otras restricciones en la línea de suministro de agua La temperatura del agua varía de caliente a fría durante el uso La presión del agua ha caído por debajo de...

Страница 22: ...3 Entrada de agua fría 2 Dispositivo de alivio de presión 5 Salida de agua caliente para conectar a la tubería de agua caliente 9 Piezas Inline 800 0 L O W MI D H I G H 1 Interuptores ...

Страница 23: ...10 ...

Страница 24: ... de Atmor se limita al costo del producto o 1 000 00 lo que sea menor Atmor no es una aseguradora y el propietario original debe comprar un seguro para cubrir los daños a la propiedad o pertenencias El propietario original se compromete a renunciar a su derecho a juicio por jurado oa participar en una acción colectiva Además el propietario original se compromete a renunciar a la subordinación en l...

Отзывы: