background image

3

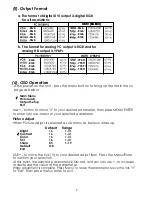
Use +,- button to move "V" to your desired parameter, then press MENU/ENTER

to enter into sub-menu of your selected parameter.

Picture Adjust

When Picture Adjust is selected a sub menu as below comes up.

Bright

Contrast

Color

Tint

Sharp

Default

Exit

USE +,- to move the tick (V) to your desired adjust item, Press the Menu/Enter 

to confirm your selection.

At this point, the selected parameter will turn red, and you can use +,- to increase

or decrease the value of the parameter.

When adjustment is complete, Press "Menu" to leave the parameter. Move the tick "V"

to "Exit", then press menu/enter to exit.

(6). OSD Operation


After power on the unit , pess the menu button to bring up the main menu 

  page as below:


Main Menu

         Picture adj.

         Output Setup

         Exit

b. The format for analog PC output is RGB and for 

    analog HD output is YPbPr.

-YPbPr

-YPbPr

-YPbPr

-YPbPr

-RGB

-RGB

-RGB

-RGB

HDTV (RGBHV)

HDTV (RGBHV)

HDTV  (YPbPr)

(5). Output Format 

Default      Range

16

16

16

16

05

OK

1-31

1-31

1-31

1-31

1-19

-RGB

-RGB

-RGB

-RGB

-RGB

-RGB

-RGB

-RGB

-RGB

-RGB

a. The format of digital DVI output is digital RGB 

     for all resolutions.

Содержание CM-391

Страница 1: ...Video to DVI Scaler Box Operation Manual CM 391 ...

Страница 2: ...Atlona CM 391 has many great features to enhance video performance and is ideal for use in professional large screen presentation 3 This package includes 1 Video Scaler Unit 2 DC adaptor 3 VGA Cable HD 15 to HD 15 x 1 4 HD 15 D Sub to YPbPr 3 RCA Cable x 1 5 User Manual 6 Remote Control 7 Lithium battery 2 Features 1 1 Motion adaptive 3D Y C separation comb filter for composite video input 3D fram...

Страница 3: ...to DVI Scaler Box CV SV Rear Panel 4 3 2 1 1 DC power jack 5V 2A DC power input 2 Composite Video Use a Composite video cable to connect the composite video output of the source equipment to this composite video CV input of the scaler 3 S Video Use a S Video cable to connect the S Video output of the source video equipment to this S Video input on the back of the video scaler S Video provides impr...

Страница 4: ... decrease the value of the parameter When adjustment is complete Press Menu to leave the parameter Move the tick V to Exit then press menu enter to exit 6 OSD Operation After power on the unit pess the menu button to bring up the main menu page as below Main Menu Picture adj Output Setup Exit b The format for analog PC output is RGB and for analog HD output is YPbPr YPbPr YPbPr YPbPr YPbPr RGB RGB...

Страница 5: ... S Data2 T M D S Data2 T M D S Data2 4 Shield N C N C DDC Clock DDC Data Analog Vertical Sync Analog Red Analog Horizontal Sync T M D S Data1 T M D S Data1 T M D S Data1 3 Shield N C N C 5V Power Ground Return for 5V Hsync and Vsync Hot Plug Detect Analog Green Analog Ground Analog R G B return Pin Signal Assignment T M D S Data0 T M D S Data0 T M D S Data0 5 Shield N C N C T M D S Clock Shield T ...

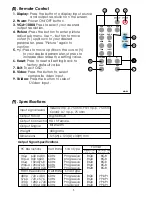
Страница 6: ...rlaced YPbPr YPbPr YPbPr YPbPr Output Signal Specifications 5 8 Remote Control VIDEO VGA SVGA XGA WXGA SXGA 480p 720p 1080i PICTURE RESET EXIT 576p SVIDEO CR 21 1 3 4 2 1 Display Press the button to display input source and output resolution on the screen 2 Power Power ON OFF button 3 VGA 1080i Press to select your desired output resolution 4 Picture Press the button to enter picture adjust submen...

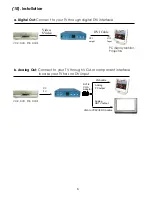
Страница 7: ...Input DVI Cable VCR DVD STB DVHS CV SV a Digital Out Connect to your TV through digital DVI interface b Analog Out Connect to your TV through VGA or component interface in case your TV has no DVI input Analog HDTV output VGA to YPbPr 3 RCA cable VGA cable Analog PC output DVI to VGA Adaptor 6 ...

Отзывы: