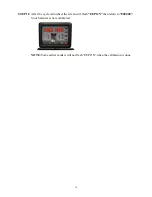
background image


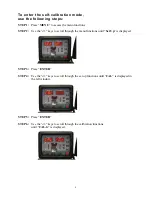
To enter the self-calibration mode, 

use the following steps: 

 
STEP 1:


Press “

MENU

” to access the menu functions


STEP 2:


Use the “

-/+

” keys to scroll through the menu functions until “

Set Up

” is displayed.


STEP 3:


Press “

ENTER

”  


STEP 4:


Use the “

-/+

” keys to scroll through the set up functions until “

CAL

” is displayed in 

the left window. 


STEP 5:


Press “

ENTER

” 


STEP 6:


Use the “

-/+

” keys to scroll through the calibration functions 

until “

CAL-G

” is displayed. 


Содержание WB41

Страница 1: ...1 ...

Страница 2: ...2 INDEX PAGE Control Panel 3 Special Key Functions 4 Switching From Grams to Ounces 4 Calibration 5 ...

Страница 3: ...rom the balancer to the wheel B Width Press the to enter the width of the wheel D Diameter Press the to enter the diameter of the wheel Fine Measurement Press and hold to display the exact imbalance measured rounded values will automatically display Start Press to spin the wheel whenever the hood is closed Stop Press to exit any function or to stop the balancer DISCLAIMER The Split Weight Function...

Страница 4: ...splayed STEP 3 Press ENTER STEP 4 Use the keys to scroll through the set up functions until U is displayed STEP 5 Press ENTER STEP 6 Use the keys to select ounces or grams Press ENTER to confirm the setting STEP 7 Press MENU to exit Press STOP to return to the regular balancing mode NOTE Refer to the Installation and Service Manual for additional key functions and instructions ...

Страница 5: ...s cannot be used for calibration Aluminum or alloy wheels cannot be used for calibration The wheel used must not have any weights installed The only weight you will use in the calibration procedure is the special red calibration weight provided with the balancer Failure to follow these instructions will result in an incorrect calibration and poor balancing accuracy STEP 2 Begin by selecting a cone...

Страница 6: ...shaft with the pressure cup attached Tighten the Quick Nut securely but do not over tighten NOTE Over tightening the Quick Nut will cause damage to the nut STEP 6 Verify that the balancer is in DYNAMIC mode then manually enter the A distance of the wheel from the machine in millimeters ...

Страница 7: ... in centimeters You must convert to millimeters by multiplying the measurement by 10 This is the value you must enter as the A measurement See the examples below Example 1 shown 13 1cm X 10 131mm Enter 131 as A Example 2 9 5cm X 10 95mm Enter 95 as A In some cases you must round the figure to the nearest millimeter as seen below Example 3 3 75cm X 10 37 5mm Enter 37 as A ...

Страница 8: ...STEP 2 Use the keys to scroll through the menu functions until Set Up is displayed STEP 3 Press ENTER STEP 4 Use the keys to scroll through the set up functions until CAL is displayed in the left window STEP 5 Press ENTER STEP 6 Use the keys to scroll through the calibration functions until CAL G is displayed ...

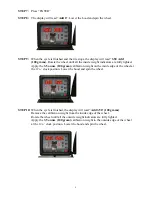
Страница 9: ... 100 gram calibration weight on the inside edge of the wheel at the 12 o clock position Lower the hood and spin the wheel STEP 10 When the cycle is finished the display will read Add 3 50 100 grams Remove the calibration weight from the inside edge of the wheel Rotate the wheel until all the outside weight indicators are fully lighted Apply the 3 5 ounce 100 gram calibration weight to the outside ...

Страница 10: ...10 STEP 11 After the cycle is finished the screen will flash EEP ON then return to 000 000 Your balancer is now calibrated NOTE Some earlier models will not flash EEP ON when the calibration is done ...

Отзывы:

Похожие инструкции для WB41