background image

Delfi and Sharky User Guide 


3.  Initial use


No part of this User Guide may be reproduced, stored in a retrieval system, or published, in any form or by any means, electronic, 

mechanical, photocopying, recording or otherwise, without the prior written permission of Atlas Revalidatie Techniek BV. 

© 2008 Atlas Revalidatie Techniek B.V. 

3

3

.

.


I

I

n

n

i

i

t

t

i

i

a

a

l

l


u

u

s

s

e

e


Before  putting  the  seat  unit  into  use,  inspect  it  for  visible  defects.  In  case  of  doubt,  consult  the 
supplier. Ask the supplier to instruct you, if you are not yet familiar with the use of this type of seat 
unit. 
 
The seat unit is delivered with the features specifically ordered for your child. The adjustments to 
corrective  accessories  are  exclusively  made  on  the  basis  of  the  advice  of  a  paramedic.  It  is 
possible  that  after  initial  use,  changes  to  the  standard  settings  are  required.  You  must  make  an 
appointment  with  the  supplier  for  this  purpose.  Please  note:  standard  settings  may  only  be 
adjusted by a trained expert! 
 
Please read this manual carefully prior to making use of the seat unit and verify that the use and 
purpose of all components and accessories are clear to you (try everything out first, before placing 
the child in the seat unit). Familiarise yourself with the safety instructions in chapter 2. 
 
Arrangements can be made to receive personal instruction from you supplier. In case of problems, 
contact the treating therapist or the supplier of the seat unit. 

3.1 

Lifting the child into the seat unit 

To lift the child into the seat unit in a safe and responsible way, it is important to carefully adhere to 
the sequence of steps described below. Please refer to chapter 4, “Operation”, for the seat unit’s 
operating instructions. 
a)  Set the brakes on at least two of the chair’s four swivel wheels, so that the seat unit cannot roll 

away as you lift the child into the chair; 

b)  Ensure that all fastenings are properly secured; 
c)  If applicable: remove the tray table; 
d)  Adjust the seat unit to the correct working height; 
e)  Loosen the parts used to secure the child in position; 
f)  Lift the child into the seat unit; 
g)  Hold the child firmly and tighten the parts used to secure the child in position; 
h)  If applicable: reposition the tray table; 
i)  If necessary, change some settings to ease the child’s seating position; 
j)  Never leave the child alone in the seat unit and always supervise its use. 
 

3.2 

Lifting the child out of the seat unit 

To lift the child out of the seat unit in a safe and responsible way, it is important to carefully adhere 
to the sequence of steps described below. Please refer to chapter 4, “Operation”, for the seat unit’s 
operating instructions.  
a)  Set the brakes on at least two of the chair’s four swivel wheels, so that the seat unit cannot roll 

away as you lift the child out of the chair; 

b)  Adjust the seat unit to the correct working height; 
c)  If applicable: remove the tray table; 
d)  Hold the child firmly and loosen the parts used to secure the child in position; 
e)  Lift the child out of the seat unit. 


Attention: 

Read  chapter  4,  “Operation”,  before  using  the  seat  unit  for  the  first 
time. 

Содержание Delfi

Страница 1: ...s Postal address Atlas Revalidatie Techniek BV PO Box 106 5370 AC Ravenstein The Netherlands Visiting address Korte Stukken 7 5371 MN Ravenstein The Netherlands Tel 31 0 486 45 33 44 Fax 31 0 486 45 35 15 www atlas rehab nl info atlas rehab nl M Ma ay y 2 20 00 08 8 ...

Страница 2: ... of the seat unit are adjusted by the dealer prior to delivery Refer to this manual to make any further important adjustments to enable the child to make optimum use of the Delfi or Sharky This user guide describes each setting see chapter 4 and clear photographs and instructions explain how to make the necessary adjustments Your experiences with the Delfi or Sharky are important for their continu...

Страница 3: ...e parts to secure the child in position 7 Hip belt 8 Chest belt 8 Leg harness 9 Body harnesses 9 Ankle strap 11 4 1 2 Arm supports the angle 11 4 1 3 Attaching and removing the tray table optional 12 4 2 STANDARD SETTINGS IT IS ADVISABLE TO HAVE THESE SETTINGS FIXED BY A PARAMEDIC 13 4 2 1 The seat depth 13 4 2 2 Back support the height width and angle 13 Width of the back support 14 Angle of the ...

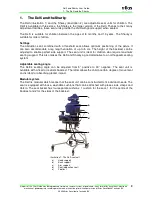
Страница 4: ... allows optimum positioning of the pelvis It can also accommodate a leg length variation of up to 5 cm The height of the backrest can be adjusted to enable perfect side support The seat unit is ideal for children who require maximum seating support This also makes the Delfi and Sharky a good alternative to an orthopaedic seating system Adjustable seating angle The Delfi s seating angle can be adju...

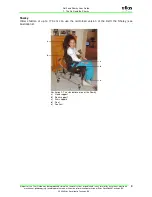
Страница 5: ...hanical photocopying recording or otherwise without the prior written permission of Atlas Revalidatie Techniek BV 2008 Atlas Revalidatie Techniek B V 4 Sharky Older children of up to 170 cm can use the reinforced version of the Delfi the Sharky see illustration 2 Illustration 2 The standard version of the Sharky a Head support b Back support c Arm supports d Seat e Footrest c d a b e ...

Страница 6: ...llow other children to play with the seat unit or ride on it h Adjustments may only be made by parents or carers i Unless absolutely necessary adjustment of the seat unit should only be done when the child is not seated in it j Once the adjustments have been made properly tighten the head screws and clamps k Avoid adopting an uncomfortable position for long periods of time while you are attending ...

Страница 7: ... 3 1 Lifting the child into the seat unit To lift the child into the seat unit in a safe and responsible way it is important to carefully adhere to the sequence of steps described below Please refer to chapter 4 Operation for the seat unit s operating instructions a Set the brakes on at least two of the chair s four swivel wheels so that the seat unit cannot roll away as you lift the child into th...

Страница 8: ...t unit or to be able to change the seating position of the child somewhat when there is a need No tools are required for the daily adjustments 4 1 1 The parts to secure the child in position Various parts are available to secure the child s trunk pelvis and feet in position A body harness and a chest belt can be used to secure the trunk The hip belt and leg harness can be used to secure the pelvic...

Страница 9: ...ERROR undefined OFFENDING COMMAND STACK ...

Отзывы: