


800.261.3602
Revised 07/18
Battery Type & Temperature Scale Set Up
At this point in the installation you need to select your battery type and the temperature reading
to be displayed in either °F or °C.
1.
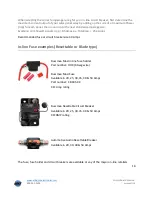
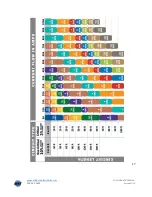
Check to make sure the shorting jumper is on the temperature sensor connector. Then insert
the recommended fuse (amperage based on total solar panel wattage) into fuse holder. This
powers the charge controller. The SunExplorer III controller will power up displaying “888"
for 3 seconds then it will enter setup mode, displaying the battery type and temperature. The
battery/temp LED will be illuminate.
2.
The display read out will show “FLF”, the factory default setting if being powered for the first
time. FL = (WET) Flooded lead acid battery type and F= Fahrenheit temperature scale. If this
is correct go to step 7.
3.
If the display doesn’t match your system, press and hold the select button for 5 seconds, the
left two characters will flash and rotate through the 3 battery types: FL=(Wet) Flooded cell,
GL = Gel Cell and AG = AGM cell. It will show each for 5 seconds.
4.
When the display is showing correct battery type press and hold the select button for 5
seconds, this stores the battery type, the left two characters stop flashing and the right
character will begin flashing and alternate between the two temperature scales, F=Fahrenheit
and C=Celsius.
5.
When it shows the temperature scale you want, press and hold the select button for 5 seconds,
this stores the temperature type and stop flashing the display and battery type/Temperature
LED.
6.
If not satisfied with your selection, repeat steps 3 through 5.
7.
If you’re satisfied with the battery type and temperature scale, remove shorting jumper from
the temperature sensor input pins and attach it to this manual, you will need it if you change
your battery type in the future. The SunExplorer III exits the setup mode.
8.
If you installed to optional battery temperature sensor, connect it to the temperature sensor
terminal. The Display now indicates battery temperature.
9.
If you didn’t install the optional temperature sensor the display indicates the battery type and
temperature scale you selected.
10.
Remove fuse from the in-line battery fuse holder to power down the controller. Now it is time
to complete the mounting instructions.
9
Содержание SUNEXPLORER III Series
Страница 8: ...www atkinsonelectronics com Circuit Board Division 800 261 3602 Revised 07 18 Wiring Diagram 6 ...
Страница 20: ...www atkinsonelectronics com Circuit Board Division 800 261 3602 Revised 07 18 17 ...
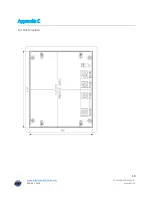
Страница 22: ...www atkinsonelectronics com Circuit Board Division 800 261 3602 Revised 07 18 Appendix C Cut Out Template 19 ...