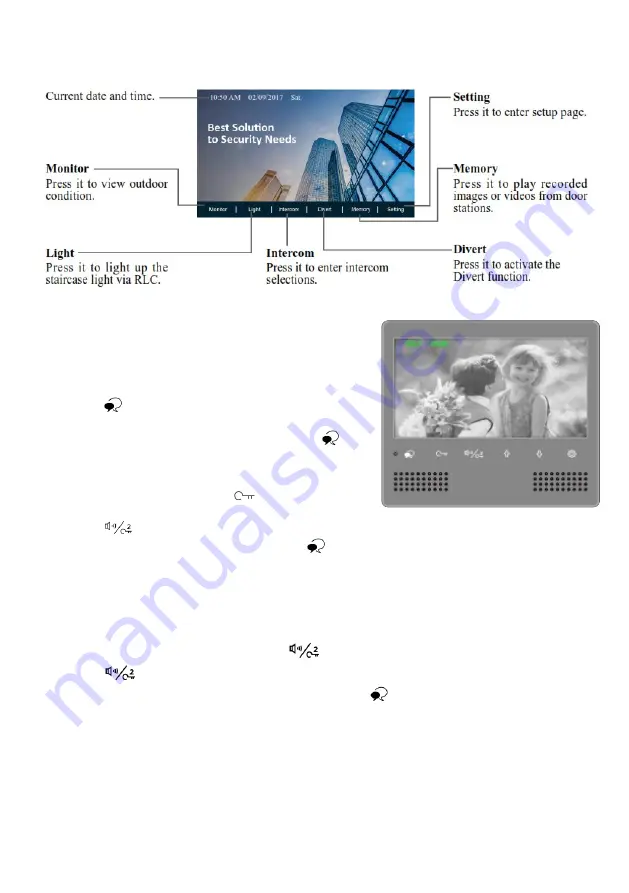
ATIGO A1701 Скачать руководство пользователя страница 3

Main Menu 


Answering a call and door release 


1. 

When the Call button on the door entry panel is 
pressed, the monitor will start ringing and at the same 
time the image will be displayed on the screen


2. 

Press 


Talk/Mon

 button on the monitor to start 

hands free communication which will last for a 
maximum of 90 seconds. You can press again  


Talk/Mon

 to end the communication earlier. If the call 

is not answered withing 40 seconds, the screen will 
automatically turn off.


3. 

During the conversation press 

Unlock

 button to 

open the door. If two locks are installed and setup, 
press 


Call/Unlock 2

nd

 button to release the second door. 


4. 

When the monitor is in standby mode, press 


Talk/Mon

 button to preview the camera from the 

door entry panel. If there are other door entry panels or CCTV cameras installed on the system, 
you can use the 

UP/DOWN

 buttons to switch between them.


Intercom 

Calling other monitors in the same system: 

1. 

With the monitor in standby mode, press 

Call/Unlock 2

nd

 button to enter the Intercom page


2. 

Press 

Call/Unlock 2

nd

 button again to enter Intercom Call page


3. 

Select the apartment number you want to call and press 


Talk/Mon

 button to place the call


4. 

Communication begins once the call is answered 


NOTE:  

1. 

Apartment number is 2-digit number


2. 

The system will automatically display the last dialed number 


3. 

An error message will be displayed if there is a space between the 2-digits number


Содержание A1701

Страница 1: ...A1701 User Manual ...

Страница 2: ...n In standby it is used to start an intercom call During a call it is used to unlock a 2nd door i e gate or back entrance Mounting hook Use to fix the monitor to bracket Connection port BUS terminal Terminal description SW SW Extra doorbell call button connection port Ring GND Extra buzzer connection port DIP switches Total 6 bits can be configured Bit1 Bit5 User code setting switch Bit6 Video imp...

Страница 3: ...ease the second door 4 When the monitor is in standby mode press Talk Mon button to preview the camera from the door entry panel If there are other door entry panels or CCTV cameras installed on the system you can use the UP DOWN buttons to switch between them Intercom Calling other monitors in the same system 1 With the monitor in standby mode press Call Unlock 2nd button to enter the Intercom pa...

Страница 4: ...ther monitors will stop ringing The call is cancelled automatically if not answered within 30 seconds Memory All recorded videos or images can be viewed and deleted on the monitor To delete videos or images follow the next steps 1 With the monitor in standby mode press Setting button to enter Main Menu page 2 Press DOWN button to enter Memory page 3 Press Talk Mon button to activate the Delete fun...

Страница 5: ...e Doorbell tone setting 1 With the monitor in standby mode press Setting button to enter Main Menu page 2 Press Setting button three times to enter Doorbell Call Tone setting page 3 Use UP DOWN buttons to select the desired tone Intercom call tone setting 1 With the monitor in standby mode press Setting button to enter Main Menu page 2 Press Setting button twice to enter Intercom Call Tone setting...

Страница 6: ...nitor in standby mode press Setting button to enter Main Menu page 2 Press Setting button five times to enter Restore to Default page 3 Use UP DOWN buttons to restore to default Screen and volume adjustments During a call or when previewing the camera press Setting button to display the adjustment page Adjust the screen using one of the four scenes which are in sequence using the Call Unlock 2nd b...

Страница 7: ...n standby mode to enter installation setting page Check current monitor parameter codes 1 Once inside the Installation setting page press Unlock button 2 Use UP DOWN buttons to search for the code Code Description Code Description 2419 Reset to default 8011 Unlock mode 1 or Fail unlocked 2500 2549 Reserved 8012 Used to set time as 12 hour format 3006 3600 Monitor screen time 8013 Used to set time ...

Страница 8: ...anel mode By default when a call is received from the door entry panel all monitors in the apartment or house will ring but only the Master monitor will display the image In order to make all monitors to ring and show the image when a call is received the setting 8006 must be set on all slave monitors Setting unlock mode and time The default setting to unlock the door release is mode 0 or Fail loc...

Страница 9: ...the back of the monitors Bit 1 to Bit 5 are used to set the unique master monitor code with the value between 1 and 32 To set slave monitors in an apartment or house use the same code as the master monitor Bit 6 is the BUS line terminal switch and has to be set to ON if the monitor is last on the BUS line otherwise it must be set to OFF ...

Страница 10: ...een with a soft cotton cloth without using any organic or chemical cleaning agent If necessary please use as little as possible water or dilute soap into water to clean the dust 3 Image distortion may occur if the monitor is mounted too close to magnetic fields like TV s microwaves computers etc 4 Please keep away from high temperatures dust oxidation or water to avoid damage 5 Please pay attentio...

Отзывы: