background image

Images and instructions are for reference only and subject to change. © 2022 AtGames.  

HOW TO INSTALL TRACKBALL ONTO ALU

2

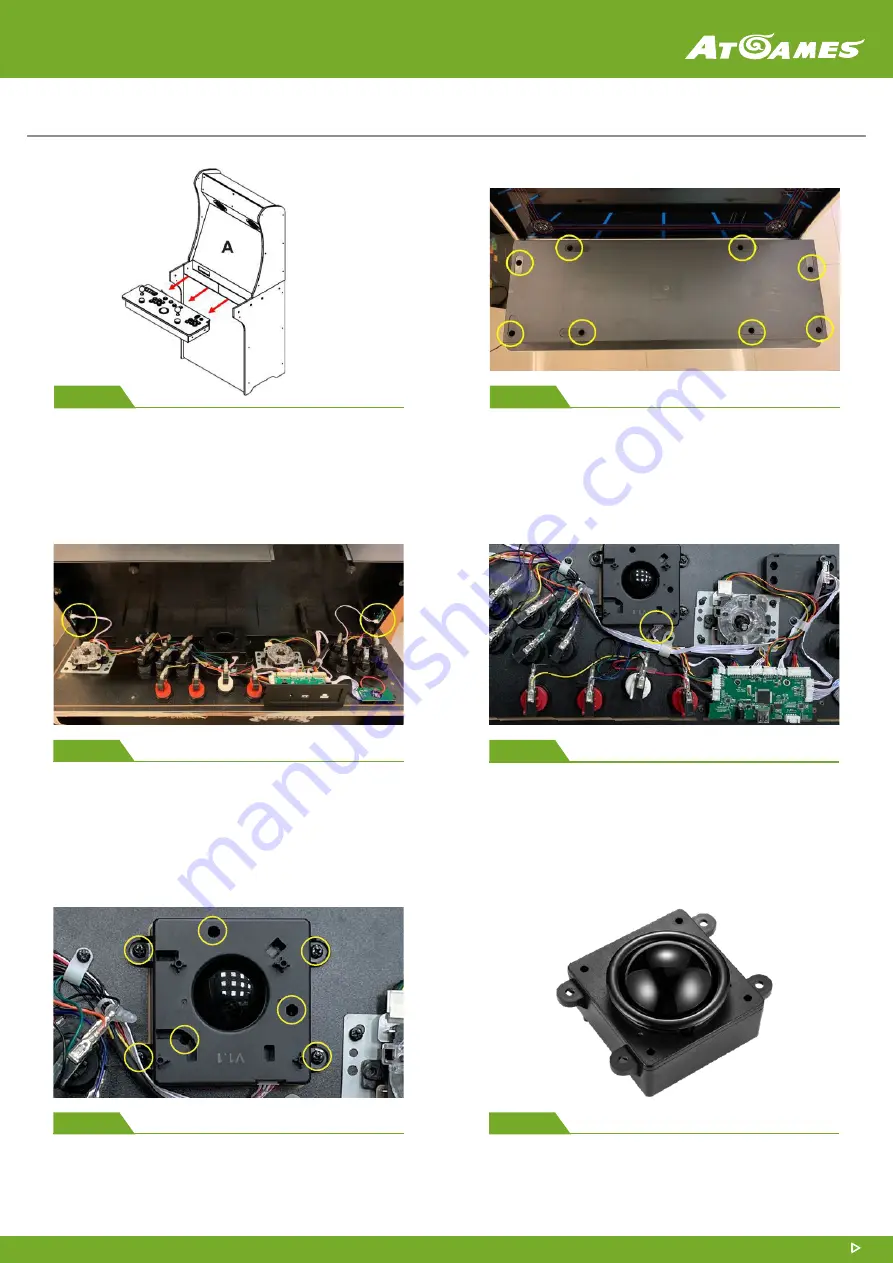
Remove the screws attaching the control panel to 

the cabinet. (If you have the Pinball Kit installed, 

please remove) Partially slide out the control panel 

and carefully unplug the rear connecting cables. 

Once cables are unplugged, fully remove the 

control panel.

Step 1

Flip the control panel upside down and remove all 

8 screws on the bottom of the control panel.

Step 2

Carefully hold the trackball ball and rim from 

underneath the control panel to avoid damaging 

it as you remove the 7 screws indicated.

Step 5

Prepare a new trackball.

Step 6

Carefully remove the control panel's bottom 

casing and carefully disconnect the Pinball cables 

from the sides.

Important note: The control panel's bottom casing may be 
difficult to remove due to a tight fit around the housing with 
the ports. May need to carefully rock side to side while lifting 
to remove. Again, please be careful of the Pinball cables.

Step 3

Remove the cable circled in yellow.

Step 4

Содержание HAA310

Страница 1: ...es 1 Tools Needed P 1 Package Includes P 1 How to Install Trackball onto ALU P 2 How to Install Trackball onto Quadplay P 5 Trackball Rim Trackball Trackball Case SA Screw x 3 SB Screw x 4 Blue Cable for ALU 1 0 version Red Cable for ALU 1 1 version and Quadplay Package includes Tools Needed A Phillips head Screwdriver ...

Страница 2: ...e all 8 screws on the bottom of the control panel Step 2 Carefully hold the trackball ball and rim from underneath the control panel to avoid damaging it as you remove the 7 screws indicated Step 5 Prepare a new trackball Step 6 Carefully remove the control panel s bottom casing and carefully disconnect the Pinball cables from the sides Important note The control panel s bottom casing may be diffi...

Страница 3: ...ing the rim to hold the ball in place and assemble the trackball case to its original state Step 8 Attach the cable to the trackball from step 4 circled in yellow Step 10 Step 9 Using the 7 screws removed in step 5 fasten them circled in yellow to secure the trackball Using the 8 screws removed in step 2 fasten them circled in yellow to secure the control panel case Step 12 Carefully attach the Pi...

Страница 4: ...tions are for reference only and subject to change 2022 AtGames HOW TO INSTALL TRACKBALL ONTO ALU Reinstall the control panel remembering to attach all the connecting cables and secure with screws removed in step 1 Step 13 ...

Страница 5: ...ed the control panel over in step 5 flip it back over while holding the trackball rim in place Place the new trackball ball into the control panel using the rim to hold the ball in place Step 6 Flip the QuadPlay control panel upside down and remove all 8 covers and screws Step 1 Remove the control panel s bottom casing Step 2 Using a Phillips head screwdriver loosen the 3 screws holding the trackb...

Страница 6: ...ircled in yellow Step 8 Fasten the included 4 SB screws circled in blue Attach the included red white cable to the CTR board and trackball case Does not matter which cable end goes to which port Shown with yellow arrows Note The slot on the CTR board is marked TRACKBALL Step 9 Step 10 Using the 8 screws removed in Step 1 fasten them to secure the QuadPlay control panel case and attach the 8 remove...

Отзывы: