background image

IP8000 User Manual

76

Upgrading the Firmware

New versions of the Mainboard firmware files can be downloaded from our 
website as they become available. After downloading the new firmware file, to 
upgrade the firmware, do the following:

1. On the 

Customization

 page of the Administration Utility’s configuration 

notebook (see page 75) click the 

Browse

 button.

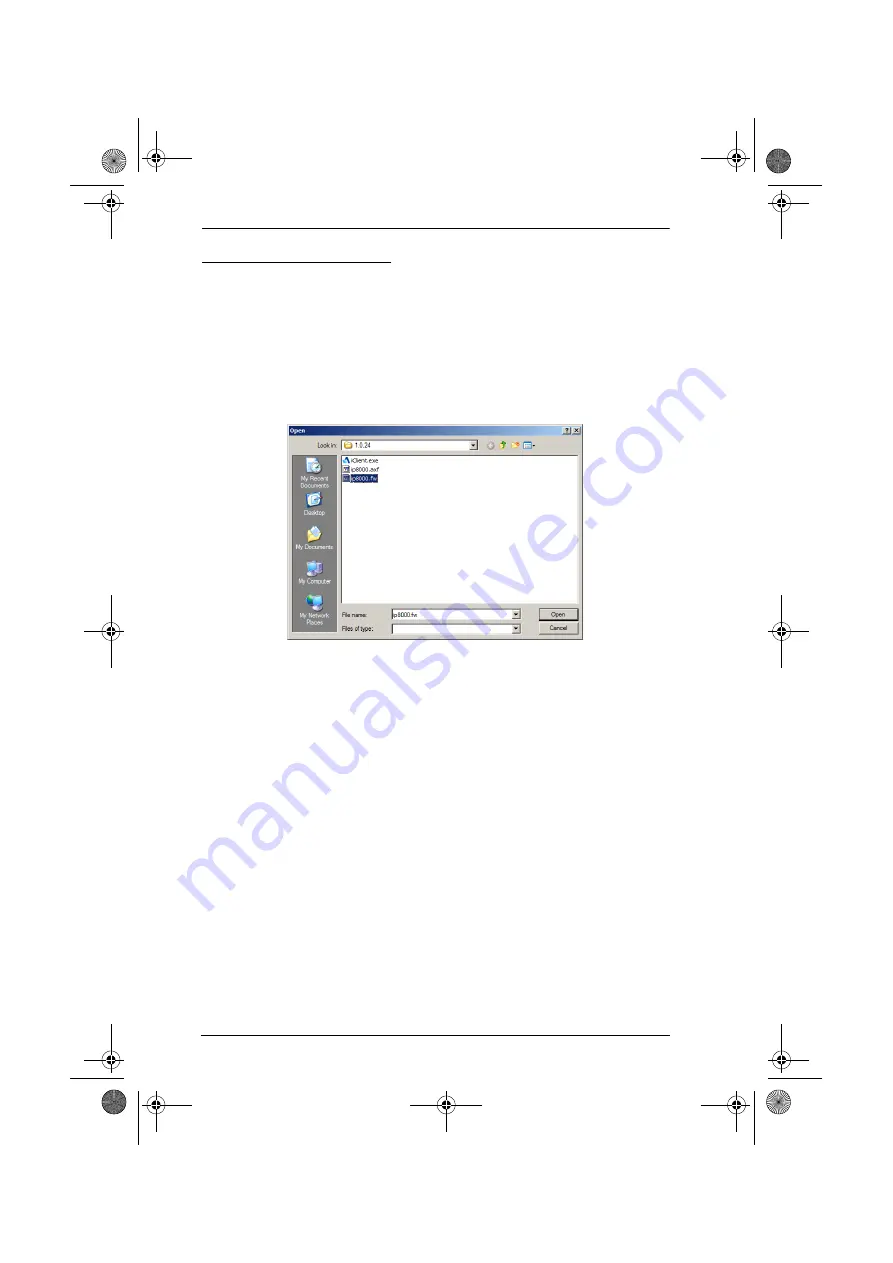
2. In the 

File Open

 dialog box that appears, navigate to the directory that the 

downloaded firmware upgrade file is in; select the file; then click 

Open

.

3. When you return to the Customization page, the file appears in the 

Mainboard F/W

 field. Click 

OK

 to perform the upgrade.

ip8000.book  Page 76  Friday, May 9, 2008  10:39 AM

Содержание IP8000

Страница 1: ...Remote Management PCI Card IP8000 User Manual www aten com ip8000 book Page i Friday May 9 2008 10 39 AM ...

Страница 2: ...rmful interference when the equipment is operated in a commercial environment This equipment generates uses and can radiate radio frequency energy and if not installed and used in accordance with the instruction manual may cause harmful interference to radio communications Operation of this equipment in a residential area is likely to cause harmful interference in which case the user will be requi...

Страница 3: ...er and not the manufacturer its distributor or its dealer assumes the entire cost of all necessary servicing repair and any incidental or consequential damages resulting from any defect in the software The manufacturer of this system is not responsible for any radio and or TV interference caused by unauthorized modifications to this device It is the responsibility of the user to correct such inter...

Страница 4: ... operation procedures carefully to prevent any damage to the unit and or any of the devices connected to it Features may have been added to the IP8000 since this manual was printed Please visit our website to download the most up to date version of the manual Copyright 2007 ATEN International Co Ltd Manual Part No PAPE 0279 100G Printing Date 12 2007 P N IP8000 ATFW Series ATEN and the ATEN logo a...

Страница 5: ...stem Requirements 3 General 3 Video 3 Cables 4 Operating Systems 4 Virtual Media Support 4 IP8000 Layout Diagram 5 2 Hardware Setup Before You Begin 7 Basic Installation 7 Feature Cable Installation 9 3 Browser Login Logging In 11 Screen Elements 14 Utility Icons 15 Administration Icons 15 Remote Console Preview 16 4 Administration Introduction 17 General 18 Network 19 Access Ports 19 IP Address 2...

Страница 6: ...e Windows Client Control Panel 35 Hotkey Setup 37 Configuring the Hotkeys 38 Video Settings 39 Virtual Media 40 Message Board 42 The Button Bar 43 Compose Panel 43 Message Display Panel 43 User List Panel 44 6 The Java Applet Introduction 45 Navigation 46 The Java Applet Control Panel 46 Hotkey Setup 48 Configuring the Hotkeys 49 Video Settings 50 Message Board 51 Ctrl Alt Del 53 Exit 53 Lock LEDs...

Страница 7: ... The AP Windows Client 65 Installation 65 Starting Up 66 The Windows Client Connection Screen 67 Logging In 68 The Administrator Utility 70 General 70 Network 71 Security 72 ANMS 73 User Management 74 Customization 75 Upgrading the Firmware 76 The AP Java Client 77 Starting Up 77 The Java Client Connection Screen 78 Logging In 78 Appendix Safety Instructions 79 General 79 Technical Support 81 Inte...

Страница 8: ...hooting 86 Overview 86 The Windows Client 86 The Java Client 87 The Log Server 87 Sun Systems 88 Additional Mouse Synchronization Procedures 89 Windows 89 Sun Linux 90 Trusted Certificates 91 Overview 91 Installing the Certificate 92 Certificate Trusted 93 About SPHD Connectors 94 Limited Warranty 94 ip8000 book Page viii Friday May 9 2008 10 39 AM ...

Страница 9: ...d to configure the IP8000 s working environment Chapter 5 The Windows Client explains how to connect to the IP8000 with the browser based Windows Client software and describes how to use the OSD to access and control the server that the card is installed in Chapter 6 The Java Applet describes how to connect to the IP8000 with the Java Applet software and explains how to use the OSD to access and c...

Страница 10: ...e Enter means to press the Enter key If keys need to be chorded they appear together in the same bracket with a plus sign between them Ctrl Alt 1 Numbered lists represent procedures with sequential steps Bullet lists provide information but do not involve sequential steps Indicates selecting the option on a menu or dialog box for example that comes next For example Start Run means to open the Star...

Страница 11: ...pendent and is able to work with all operating systems Operators at remote locations connect to the IP8000 via its IP address Once a connection has been established and authorization granted remote users can exchange keyboard video and mouse signals with the server just as if they were physically present and working on the equipment directly Administrator utilities are provided to configure the sy...

Страница 12: ...rom any browser Windows GUI and Java client software for non browser access the Java client works with practically all operating systems Supports TCP IP HTTP HTTPS UDP DHCP SSL ARP DNS ICMP CHAP Supports 10Base T 100Base T Superior video resolution up to 1600 x 1200 60Hz 24 bit color depth for remote sessions Bandwidth optimization via grayscale and video quality setting Advanced security features...

Страница 13: ...s For the browser based Java Applet and AP Java Client you must have Sun s Java Runtime Environment JRE 6 Update 3 or higher For the Log Server you must have the Microsoft Jet OLEDB 4 0 or higher driver installed Video Only non interlaced video signals at the following resolutions and refresh rates are supported Resolution Refresh Rates 640 x 480 60 72 75 85 90 100 120 720 x 400 70 75 800 x 600 56...

Страница 14: ...Cat 5 or higher cable should be used to connect the IP8000 to the LAN WAN or Internet Operating Systems Supported operating systems are shown in the table below Virtual Media Support USB CDROM Drives USB Floppy Drives USB Flash Drives IDE CDROM Drives Image Files OS Version Windows 2000 and higher Linux RedHat 7 1 and higher SuSE 8 2 and higher Mandriva Mandrake 9 0 and higher UNIX AIX 4 3 and hig...

Страница 15: ... The Custom KVM cable that links the card to your server s Video and USB ports plugs in here 4 Power Jack The power adapter cable plugs in here Note Use of the power adapter is optional If it is not used however you will be unable to perform a remote Power On 5 Feature Cable Connector The feature cable plugs in here See Feature Cable Installation page 9 for details 1 2 3 4 5 ip8000 book Page 5 Fri...

Страница 16: ...IP8000 User Manual 6 This Page Intentionally Left Blank ip8000 book Page 6 Friday May 9 2008 10 39 AM ...

Страница 17: ...g the power cords of any computers that have the Keyboard Power On function 2 Avoid Electrostatic Discharge ESD Keep your IP8000 card in its antistatic bag until it is ready to be installed Avoid contact with any component or connector on any adapter card printed circuit board or memory module Handle these components by the mounting bracket 3 Perform all unpacking and installation procedures on a ...

Страница 18: ...AC power source Note Use of a power adapter is optional If a power adapter isn t used however you will not be able to perform a remote Power On Note Although the IP8000 plugs into a server s PCI slot it has its own environment and operates independently of the server it resides on using its I O ports to link to the server it controls It can even link to with steps 2 and 3 and control a server othe...

Страница 19: ... white wire at the top the orange wire at the bottom 2 Unplug the leads from the computer mainboard s Reset pin header These are the ones coming from the computer case s Reset switch 3 Plug the feature cable connector containing the white and blue wires into the mainboard s Reset pin header 4 Unplug the leads from the computer mainboard s Power pin header These are the ones coming from the compute...

Страница 20: ...tch into pins 5 7 on the upper row of the IP8000 s feature cable pin header Note It is not necessary to pay attention to the plug alignment i e which wire is aligned with which pin when you plug the leads from the feature cable into the mainboard headers or when you plug the leads from the case into the feature cable header From Case Reset Switch From Case Power Switch 1 3 5 7 ip8000 book Page 10 ...

Страница 21: ... IP8000 you want to access in the browser s URL location bar Note 1 For security purposes a login string may have been set by the administrator If so you must include a forward slash and the login string along with the IP address when you log in For example 192 168 0 100 ip8k If you don t know the IP address and login string ask your Administrator 2 If you are the administrator and are logging in ...

Страница 22: ...m previous page 2 A Security Alert dialog box appears Accept the certificate it can be trusted See Trusted Certificates page 91 for details If a second certificate appears accept it as well ip8000 book Page 12 Friday May 9 2008 10 39 AM ...

Страница 23: ...r the first time use the default Username administrator and the default Password password For security purposes we strongly recommend you remove these and give yourself a unique Username and Password see User Management page 27 2 If you supplied an invalid login the login entry boxes will become blank Log in again being careful to specify a valid Username and Password ip8000 book Page 13 Friday Ma...

Страница 24: ... Administration icons arranged across the top and a Remote Console Preview with icons to launch the Java Applet and Windows Client displayed in the center Note If a user doesn t have permission to perform a particular activity the icon for that activity doesn t appear See User Management page 27 for permission details Continues on next page ip8000 book Page 14 Friday May 9 2008 10 39 AM ...

Страница 25: ...le Preview Power Management If the feature cable has been properly installed see Feature Cable Installation page 9 and you have the proper permission see User Management page 27 clicking this icon will bring up an interface that allows you to Power On Power Off or Reset the remote server Log All the events that take place on the IP8000 are recorded in a log file If you have the proper permission s...

Страница 26: ...the client does not appear IP8000 operation using the Java applet is discussed in Chapter 6 IP8000 operation using the Windows client is discussed in Chapter 5 Element Action Refresh Clicking Refresh updates the snapshot of the remote display Open Java Applet If you are on a platform other than Windows clicking Open Java Applet uses a Java applet to open the remote server s display on your desktop...

Страница 27: ...guration changes in each dialog box click Apply to save them 2 Some configuration changes only take effect after an IP8000 reset For those changes a check is automatically put in the Reset on Exit box see Customization page 29 To have the changes take effect log out and then log back in again 3 If you don t have Configuration privileges see User Management page 27 the Administration configuration ...

Страница 28: ...0 s MAC Address displays here Firmware Version Indicates the IP8000 s current firmware version level New versions of the IP8000 s firmware can be downloaded from our website as they become available see Firmware page 31 You can reference this number to see if there are newer versions available on the website Last IP from DHCP Server If the IP8000 is on a network that uses DHCP assigned IP addresse...

Страница 29: ... access ports cannot have the same value You must set a different value for each one Field Explanation Program This is the port number used for keyboard mouse video and message data transfers Valid entries are from 1024 65535 The default is 9000 Virtual Media This is the port number used for data transfer using the IP8000 s virtual media feature Valid entries are from 1024 65535 The default is 900...

Страница 30: ... either have its DNS server address assigned automatically or a fixed address can be specified For automatic address assignment select the Obtain DNS server address automatically radio button To specify a fixed address select the Use the following DNS server address radio button and fill in the required information Note Specifying the Primary DNS Server address is required the Alternate DNS Server...

Страница 31: ... Administrator specify a login string in addition to the IP address that users must include when they access the IP8000 with a browser For example 192 168 0 126 abcdefg Users must include the forward slash and the string when they specify the IP address in the browser s URL bar For security purposes we recommend that you change this string from time to time Note If no string is specified here anyo...

Страница 32: ...hin the filter range are denied access all other addresses are allowed access IP Filtering To add an IP filter 1 Click Add A dialog box similar to the one below appears 2 Specify the filter address in the dialog box then Click OK A second dialog box similar to the one below appears 3 To filter a single IP address key in the same address as the start IP To filter a continuous range of addresses key...

Страница 33: ... a MAC filter 1 Click Add A dialog box similar to the one below appears 2 Specify the MAC address in the dialog box then Click OK 3 Repeat these steps for any additional MAC addresses you want to filter To delete a filter select it and Click Remove To modify a filter select it and Click Edit The Edit dialog box is similar to the Add dialog box When it comes up simply delete the old address and rep...

Страница 34: ...wing 1 Check Enable RADIUS 2 Fill in the IP addresses and Service Ports for the Primary and Alternate RADIUS servers 3 In the Timeout field set the time in seconds that the IP8000 waits for a RADIUS server reply before it times out 4 In the Retries field set the number of allowed RADIUS retries 5 In the Shared Secret field key in the character string that you want to use for authentication between...

Страница 35: ...e system W Allows the user to access the system via the Windows Client program J Allows the user to access the system via Java P Allows the user to Power On Off Reset the computer that the IP8000 is connected to L Allows the user to access log information via the user s browser V Limits the user s access to only viewing the video display S Allows the user to use the virtual media function String M...

Страница 36: ...cur on the IP8000 such as logins and internal status messages are kept in an automatically generated log file See Chapter 8 The Log Server for details on setting up the log server Specify the MAC address of the computer that the Log Server runs on in the MAC address field Specify the port used by the computer that the Log Server runs on to listen for log details in the Port field The valid port ra...

Страница 37: ...List panel To modify a user profile first select it from the list in the upper panel then change the information that appears in the User Info dialog box Note The user s password is not displayed the Password and Confirm fields are blank If you do not want to change the user s password simply leave the two fields blank If you do want to change the user s password key the new password in the Passwo...

Страница 38: ...ndows Client software View Only Checking View Only allows a user to view the video of the display of the computers attached to the ports of the KVM switch connected to the IP8000 but they are not allowed to perform any operations on the computers Power Management Checking Power Management allows a user to Power On Power Off Reset the computer that the IP8000 is connected to Log Checking Log allows...

Страница 39: ...he IP8000 doesn t receive any input from a computer that is accessing it with the Windows Client or Java Applet for the amount of time specified here it ends the connection Login failures Allowed Sets the number of consecutive failed login attempts that are permitted from a remote computer Timeout Sets the amount of time a remote computer must wait before attempting to login again after it has exc...

Страница 40: ...ouse pointers when a connection to the remote display is made Note This feature only supports USB mice on Windows systems For all other configurations you must select Manual Manual Selecting Manual means that no automatic mouse pointer synching takes place All synching must be done manually with the Windows Client and Java Applet synching procedures See Auto Sync page 39 and page 50 and Adjust Mou...

Страница 41: ...lled on 2 From that computer open your browser log in to the IP8000 and click the Firmware icon to bring up the Firmware File dialog box 3 Click Browse navigate to the directory that the new firmware file is in and select the file 4 Click Upload 5 After the upload completes the Reset on exit checkbox See Customization page 29 will automatically be enabled To have the new firmware take effect click...

Страница 42: ...IP8000 User Manual 32 This Page Intentionally Left Blank ip8000 book Page 32 Friday May 9 2008 10 39 AM ...

Страница 43: ...alog box that comes up click Run If the dialog box doesn t have a Run option click Save then with the browser still open run the file This brings up the plugin installation wizard Click Next to start the installation then follow along with the wizard to complete it Now go back to the login screen and click Open Windows Client again 2 To uninstall the plugin use the Windows Add or Remove Programs f...

Страница 44: ...local system Note 1 You can maximize the window drag the borders to resize the window or use the scrollbars to move around the screen 2 Due to net lag there might be a slight delay before your keystrokes show up You may also have to wait a bit for the remote mouse to catch up to your local mouse before you click 3 Due to net lag or insufficient computing power on the local machine some images espe...

Страница 45: ...p you control remote KVM operations The panel consists of an icon bar with a text bar below it The text bars displays the remote server s video resolution Note You can move the control panel to any convenient location on the screen by moving the mouse pointer over one of its borders and dragging Continues on next page ip8000 book Page 35 Friday May 9 2008 10 39 AM ...

Страница 46: ...p the Virtual media dialog box Click to bring up the Message board Click to send a Ctrl Alt Del signal to the remote system Click to exit the remote view These icons show the Num Lock Caps Lock and Scroll Lock status of the remote computer When the lock state is On the LED is bright green and the lock hasp is closed When the lock state is Off the LED is dull green and the lock hasp is open Click o...

Страница 47: ... If you find the display of the two mouse pointers local and remote to be confusing or annoying you can use this function to hide the non functioning pointer Since this function is a toggle use the hotkeys again to bring the pointer display back to its original configuration Adjust Mouse Synchronizes the movement of the local and remote mice Substitute Alt Key Although all other keyboard input is ...

Страница 48: ...key combinations inconvenient you can configure them by following these steps 1 Highlight the Action then Click Start 2 Key in the new combination The key names appear in the Key field as you press them 3 Click Set 4 Click Close ip8000 book Page 38 Friday May 9 2008 10 39 AM ...

Страница 49: ... offset values of the remote screen and automatically synchronize it with the local screen If the local and remote mouse pointers are out of sync in most cases performing this function will bring them back into sync Note This function works best with a bright screen If you are not satisfied with the results use the Screen Position arrows to position the remote display manually Video Quality Drag t...

Страница 50: ...act as if it were installed on the remote server To implement this redirection feature do the following 1 Bring up the Virtual media dialog box 2 Select the media source a If you select Drive drop down the drive list to select the appropriate drive b If you select File click the button with the three dots to browse to your image file ip8000 book Page 40 Friday May 9 2008 10 39 AM ...

Страница 51: ...tay in effect You can treat the folder as if it were really on the remote server drag and drop files to from it open files on the remote system for editing and save them to the redirected drive etc Files that you save to the redirected drive will actually be saved to the USB device on your local system Files that you drag from the redirected drive will actually come from the USB device on your loc...

Страница 52: ...ltiple user logins which can possibly give rise to access conflicts To alleviate this problem a message board similar to an internet chat program allows users to communicate with each other Continues on next page ip8000 book Page 42 Friday May 9 2008 10 39 AM ...

Страница 53: ...e Chat When disabled messages posted to the board are not displayed The icon displays next to the user s name in the User List panel when he has disabled Chat Occupy Release Keyboard Video Mouse When you Occupy the KVM other users cannot see the video and cannot input keyboard or mouse data The icon displays next to the user s name in the User List panel when he has occupied the KVM Occupy Release...

Страница 54: ...he names of the users that you wish to send the message to before sending your message If a user has disabled Chat its icon displays before the user s name to indicate so If a user has occupied the KVM or the KM its icon displays before the user s name to indicate so ip8000 book Page 44 Friday May 9 2008 10 39 AM ...

Страница 55: ... web site http www java com or http java sun com To access the IP8000 with the Java Applet After you log in see Logging In page 11 Click the Open Java Applet link on the Remote Console Preview screen Note If a Security Warning dialog box appears click Run to accept it After a second or two the remote server s display appears as a window on your desktop ip8000 book Page 45 Friday May 9 2008 10 39 A...

Страница 56: ...catch up to your local mouse before you click 2 Due to net lag or insufficient computing power on the local machine some images especially motion images may display poorly The Java Applet Control Panel The Java Applet control panel located at the bottom right of the screen provides utilities to help you control remote KVM operations The panel consists of an icon bar with a text bar below it The te...

Страница 57: ...lick to bring up the Message board see page 51 Click to send a Ctrl Alt Del signal to the remote system Click to exit the remote view The Lock Key LEDs show the Num Lock Caps Lock and Scroll Lock status of the remote computer When the lock state is Off the LED is dull green and the lock hasp is open When the lock state is On the LED turns bright green and the lock hasp is closed Click on the icon ...

Страница 58: ...ou find the display of the two mouse pointers local and remote to be confusing or annoying you can use this function to hide the non functioning pointer Since this function is a toggle use the hotkeys again to bring the pointer display back to its original configuration Adjust Mouse Synchronizes the movement of the local and remote mice Substitute Alt Key Although all other keyboard input is captu...

Страница 59: ...otkey combinations inconvenient you can reconfigure them by following these steps 1 Highlight the Action then click Start 2 Key in the new combination The key names appear in the Key field as you press them 3 Click Set 4 Click Close ip8000 book Page 49 Friday May 9 2008 10 39 AM ...

Страница 60: ... remote screen and automatically synchronize it with the local screen If the local and remote mouse pointers are out of sync in most cases performing this function will bring them back into sync Note This function works best with a bright screen If you are not satisfied with the results use the Screen Position arrows to position the remote display manually Video quality Drag the slider bar to adju...

Страница 61: ...he board are not displayed The icon displays next to the user s name in the User List panel when he has disabled Chat Occupy Release Keyboard Video Mouse When you Occupy the KVM other users cannot see the video and cannot input keyboard or mouse data The icon displays next to the user s name in the User List panel when he has occupied the KVM Occupy Release Keyboard Mouse When you Occupy the KM ot...

Страница 62: ...abled Chat icon displays before the user s name to indicate so If a user has occupied the KVM or the KM the corresponding icon displays before the user s name to indicate so Key in the messages that you want to post to the board in the Compose panel Click Send to post the message to the board Messages that users post to the board as well as system messages display in the Message Display panel If y...

Страница 63: ...how the Num Lock Caps Lock and Scroll Lock status of the remote computer When the lock state is Off the LED is dull green and the lock hasp is open When the lock state is On the LED turns bright green and the lock hasp is closed Click on the icon to toggle the status Note When you first connect the LED display may not be accurate To be sure click on the LEDs to set them ip8000 book Page 53 Friday ...

Страница 64: ...IP8000 User Manual 54 This Page Intentionally Left Blank ip8000 book Page 54 Friday May 9 2008 10 39 AM ...

Страница 65: ... When a new event is recorded after there are 512 events in the log file the earliest event in the list is discarded To clear the log file click on the Clear Log icon at the lower right of the page Note If the server that the IP8000 is installed in is shut down and the IP8000 s power adapter isn t plugged in the contents of the browser based log file are lost If the Log Server has been properly in...

Страница 66: ...IP8000 User Manual 56 This Page Intentionally Left Blank ip8000 book Page 56 Friday May 9 2008 10 39 AM ...

Страница 67: ...cribes how to install and configure the Log Server Installation Installation To install the Log Server program do the following 1 Copy LogSetup exe from the software CD to a convenient location on your hard disk 2 Run the program and follow along with the installation dialog boxes When the installation completes an icon LogServer is placed on your desktop and a program entry is made in the Windows...

Страница 68: ...r must be specified in the ANMS settings see page 24 for details 2 The Log Server requires the Microsoft Jet OLEDB 4 0 driver in order to access the database The screen is divided into three components A Menu Bar at the top A panel that will contain a list of IP8000 units in the middle see The Log Server Main Screen page 63 for details A panel that will contain an Events List at the bottom Each of...

Страница 69: ...ns three items Add Edit and Delete They are used to add new IP8000 units to the IP8000 List edit the information for units already on the list or delete IP8000 units from the list To add a IP8000 to the IP8000 List click Add To edit or delete a listed IP8000 first select the one you want in the IP8000 List window then open this menu and click Edit or Delete When you choose Add or Edit a dialog box...

Страница 70: ...er be the IP address of the IP8000 or its DNS name if the network administrator has assigned it a DNS name Key in the value specified for the IP8000 in the ANMS settings see ANMS page 24 Port Key in the port number that was specified for the IP8000 in the ANMS settings see ANMS page 24 Description This field is provided so that you can put in a descriptive reference for the unit to help identify i...

Страница 71: ...their IP address Select the unit that you want to perform the search on from this list You can select more than one unit for the search If no units are selected the search is performed on all of them Priority List Sets the level for how detailed the search results display should be 1 is the most general 3 is the most specific Start Date Select the date that you want the search to start from The fo...

Страница 72: ...mpt to connect failed When you click this item a dialog box similar to the one below appears Key in the number of seconds then click OK to finish Help From the Help Menu click Contents to access the online Windows Help file The help file contains instructions about how to setup operation and troubleshoot the Log Server ip8000 book Page 62 Friday May 9 2008 10 39 AM ...

Страница 73: ...ist panel lists the IP8000 units that have been selected for the Log Server to track see Configure page 59 The lower Event panel displays the log events for the currently selected IP8000 the highlighted one if there are more than one To select a IP8000 unit in the list simply click on it ip8000 book Page 63 Friday May 9 2008 10 39 AM ...

Страница 74: ...e Log Server will still record its log events Address This is the IP Address or DNS name that was given to the IP8000 when it was added to the Log Server see Configure page 59 Port This is the port number that was assigned to the IP8000 when it was added to the Log Server see Configure page 59 Connection If the Log Server is connected to the IP8000 this field displays Connected If it is not connec...

Страница 75: ...rogram is called iClientJ jar The AP Windows Client Installation To install the stand alone Windows Client program do the following 1 Copy ip8000winclient exe from the software CD to a convenient location on your hard disk 2 Run the program and follow along with the installation dialog boxes When the installation completes an icon IP8000 WinClient is placed on your desktop and a program entry is m...

Страница 76: ...equesting you to input your serial number The serial number can be found on the IP8000 s CD case Key in the serial number 5 characters per box then click OK to bring up the IP8000 Connection Screen Note 1 Letters in the serial number must be entered in capitals 2 This dialog box only appears the first time you run the program In the future you go directly to the Windows Client Connection screen ip...

Страница 77: ...o a IP8000 at a remote location You can drop down the IP list box and select an address from the list If the address you want isn t listed you can key in the IP address you want Then key in the Port number in the Port field If you don t know the Port number contact the Administrator When the IP address and Port number for the unit you wish to connect to have been specified click Login to start the...

Страница 78: ... valid Username and Password then Click OK to continue Note The default Username is administrator the default Password is password For security we strongly recommend that you change these to something unique see User Management page 74 for details Continues on next page ip8000 book Page 68 Friday May 9 2008 10 39 AM ...

Страница 79: ... this problem It opens a window on the user s desktop containing the remote server s display that is the same as the one that appears with the browser based Windows client Refer to Chapter 5 The Windows Client for operation details Change Password Allows users to change their passwords without administrator intervention Admin Utility The Administrator Utility provides administrators with a non bro...

Страница 80: ...lained in the table below Item Description Device Name To make it easier to manage installations that have more than one IP8000 each one can be given a name To assign a name for the IP8000 erase the current name and key in one of your choosing 16 characters max MAC Address The IP8000 s MAC Address displays here Main Firmware Version Indicates the mainboard s current firmware version level New vers...

Страница 81: ...ally the same as that of the browser based version See Network page 19 for details Note Be sure to enable Reset on exit on the Customization page see page 75 before exiting the Administrator Utility This allows network changes to take effect without having to power the IP8000 off and on ip8000 book Page 71 Friday May 9 2008 10 39 AM ...

Страница 82: ...ity The Security page is used to control access to the IP8000 The settings on this page are essentially the same as that of the browser based version See Security page 21 for details ip8000 book Page 72 Friday May 9 2008 10 39 AM ...

Страница 83: ...nt Settings dialog box allows you to set up login authorization management from a external sources The settings on this page are essentially the same as that of the browser based version See ANMS page 24 for details ip8000 book Page 73 Friday May 9 2008 10 39 AM ...

Страница 84: ...ge user profiles It defines the access rights of each user Up to 64 user profiles can be established The settings on this page are essentially the same as that of the browser based version See User Management page 27 for details ip8000 book Page 74 Friday May 9 2008 10 39 AM ...

Страница 85: ...on the settings on this page are essentially the same as that of the browser based version See Customization page 29 for details on setting Timeout Login failure Working mode and Mouse Sync Mode parameters The Firmware Upgrade section is used when upgrading the IP8000 s firmware Upgrading the firmware is discussed in the next section ip8000 book Page 75 Friday May 9 2008 10 39 AM ...

Страница 86: ... On the Customization page of the Administration Utility s configuration notebook see page 75 click the Browse button 2 In the File Open dialog box that appears navigate to the directory that the downloaded firmware upgrade file is in select the file then click Open 3 When you return to the Customization page the file appears in the Mainboard F W field Click OK to perform the upgrade ip8000 book P...

Страница 87: ...lick its icon or key in the full path to the program on the command line to bring up the Java Client Connection screen Note 1 Letters in the serial number must be entered in capitals 2 If this is the first time that you are running the program a dialog box appears requesting you to input your serial number The serial number can be found on the IP8000 s CD case Key in the serial number 5 characters...

Страница 88: ...ame and Password then Click OK Note The default Username is administrator the default Password is password For security we strongly recommend that you change these to something unique see User Management page 74 for details After you have successfully logged in a window opens on your desktop containing the remote server s display This is the same window that appears when you run the browser based ...

Страница 89: ... device Unplug the device from the wall outlet before cleaning Do not use liquid or aerosol cleaners Use a damp cloth for cleaning The device should be operated from the type of power source indicated on the marking label If you are not sure of the type of power available consult your dealer or local power company Do not allow anything to rest on the power cord or cables Route the power cord and c...

Страница 90: ... yourself Refer all servicing to qualified service personnel If the following conditions occur unplug the device from the wall outlet and bring it to qualified service personnel for repair The power cord or plug has become damaged or frayed Liquid has been spilled into the device The device has been exposed to rain or water The device has been dropped or the cabinet has been damaged The device exh...

Страница 91: ... information you feel may be of help Email Support support aten com Online Support Technical Support http support aten com Troubleshooting Documentation Software Updates http www aten com Telephone Support 886 2 8692 6959 Email Support ATEN TECH support aten usa com ATEN NJ sales aten com Online Support Technical Support ATEN TECH http www aten usa com support ATEN NJ http support aten com Trouble...

Страница 92: ... Power 1 x DC Jack 5V LEDs Link 1 Green 10 100 Mbps 1 Orange Green Emulation Keyboard Mouse USB PS 2 Video 1600 x 1200 60 Hz DDC2B Power Consumption DC 5 V 5 5 W Environment Operating Temp 0 50o C Storage Temp 20 60o C Humidity 0 80 RH Physical Properties Weight 0 10 kg Dimensions L x W x H 15 35 x 12 00 x 2 15 cm ip8000 book Page 82 Friday May 9 2008 10 39 AM ...

Страница 93: ...00 you can give it a fixed network address in the Network Settings dialog box see page 19 Resetting Your Computer Address For non Windows computers a browser based method for setting the IP8000 s IP address is available It is based on the fact that when the IP8000 starts if it doesn t find a DHCP environment after 30 seconds it automatically sets its IP address to 192 168 0 60 To set the IP8000 s ...

Страница 94: ...on see page 65 it searches the network segment for IP8000 devices and displays what it finds in a dialog box similar to the one below You can now use this network address if it is suitable to do so You can change it to a more suitable one if you wish by clicking Login logging in clicking Admin Utility and clicking the Network tab See Network page 71 for details ip8000 book Page 84 Friday May 9 200...

Страница 95: ...ults do the following 1 Power off the IP8000 by unplugging its power adapter cable 2 Power off the server that the IP8000 is installed in and remove its housing 3 Short the jumper on the IP8000 labeled J2 Default Password 4 Power on the IP8000 by plugging its power adapter cable back in Wait a few seconds then unplug it again 5 Remove the jumper cap from J2 6 Close the housing and start the server...

Страница 96: ...oSync feature see Video Settings page 39 to synch the local and remote monitors If the method shown above fail to resolve the problem use the Toggle Mouse Display function see page 37 If the procedures above fail to resolve the problem perform the operations described under Additional Mouse Synchronization Procedures page 89 on both the local and remote computers Part of remote window is off my mo...

Страница 97: ...f Trusted Authorities The certificate can be trusted See Trusted Certificates page 91 for details There is no Virtual Media icon on my Control Panel The virtual media function only supports the Windows browser and AP client programs Problem Resolution The Log Server program does not run The Log Server requires the Microsoft Jet OLEDB 4 0 driver in order to access the database This driver is automa...

Страница 98: ...in Video display problems with 13W3 interface systems e g Sun Ultra servers The display resolution should be set to 1024 x 768 Under Text Mode 1 Go to OK mode and issue the following commands setenv output device screen r1024x768x60 reset all Under XWindow 1 Open a console and issue the following command m64config res 1024x768x60 2 Log out 3 Log in The local and remote mouse pointers do not sync F...

Страница 99: ...chronize you must use the generic mouse driver supplied with the MS operating system If you have a third party driver installed such as one supplied by the mouse manufacturer you must remove it 1 Windows 2000 a Open the Mouse Properties dialog box Control Panel Mouse Mouse Properties b Click the Motion tab c Set the mouse speed to the middle position 6 units in from the left d Set the mouse accele...

Страница 100: ...in from the left d Disable Enhance Pointer Precision 3 Windows ME Set the mouse speed to the middle position disable mouse acceleration click Advanced to get the dialog box for this 4 Windows NT Windows 98 Windows 95 Set the mouse speed to the slowest position Sun Linux Open a terminal session and issue the following command Sun xset m 1 Linux xset m 0 ip8000 book Page 90 Friday May 9 2008 10 39 A...

Страница 101: ...d on Microsoft s list of Trusted Authorities You have two options 1 you can ignore the warning and click Yes to go on or 2 you can install the certificate and have it be recognized as trusted If you are working on a computer at another location accept the certificate for just this session by clicking Yes If you are working at your own computer install the certificate on your computer see below for...

Страница 102: ...ite X logo over the certificate to indicate that it is not trusted 2 Click Install Certificate 3 Follow the Installation Wizard to complete the installation Unless you have a specific reason to choose otherwise accept the default options 4 When the Wizard presents a caution screen Click Yes 5 Next click Finish to complete the installation then click OK to close the dialog box ip8000 book Page 92 F...

Страница 103: ...sted The certificate is now trusted When you click View Certificate you can see that the red and white X logo is no longer present further indication that the certificate is trusted ip8000 book Page 93 Friday May 9 2008 10 39 AM ...

Страница 104: ...r WITH FAULTS IN NO EVENT SHALL ALTUSEN S LIABILITY EXCEED THE PRICE PAID FOR THE PRODUCT FURTHER ALTUSEN SHALL NOT BE RESPONSIBLE FOR DIRECT INDIRECT SPECIAL INCIDENTAL OR CONSEQUENTIAL DAMAGES RESULTING FROM THE USE OF THE PRODUCT ITS ACCOMPANYING SOFTWARE OR ITS DOCUMENTATION ALTUSEN SHALL NOT IN ANY WAY BE RESPONSIBLE FOR WITHOUT LIMITATION LOSS OF DATA LOSS OF PROFITS DOWNTIME GOODWILL DAMAGE...

Страница 105: ... Customization 29 settings 75 D DNS Server 20 F Features 2 Filtering 21 IP 22 MAC 23 Firmware Upgrading 75 upgrading 76 Firmware upgrading 31 Forgotten Password 85 G General 18 settings 70 H Hardware Setup Basic Installation 7 Feature Cable Installation 9 Hotkey Setup Java Applet 48 Windows Client 37 Hotkeys Windows Client 37 48 I Installation 7 basic 7 feature cable 9 Invalid login 13 IP Address ...

Страница 106: ...ssage Board Java Applet 51 Windows Client 42 Mouse Synchronization 89 Mouse synchronization Windows 89 N Network 19 settings 71 Network environment 71 O Online Registration iii Overview 1 R RADIUS 24 Access Rights Examples 25 Requirements Operating Systems 4 OS Support 4 RoHS ii S Safety Instructions General 79 Screen Elements 14 Security 21 settings 72 Serial number 66 77 Settings Notebook ANMS 7...

Страница 107: ...Firmware 76 User Management 74 Administration User Management 27 User management settings 74 User Notice iii User Station filtering MAC 23 V Video Settings Java Applet 50 Windows Client 39 Virtual Media 40 W Windows Client 1 33 AP Version 65 Installation 57 65 Navigation 34 Starting up 33 Troubleshooting 86 ip8000 book Page 97 Friday May 9 2008 10 39 AM ...

Отзывы: