background image

Fig.8

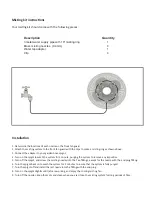
4. 4. Insert the end with bolt holes of the inner pole into the clamping supports. Align the holes on the 

ĐůĂŵƉŝŶŐƐƵƉƉŽƌƚĂŶĚƚŚĞŝŶŶĞƌƉŽůĞ;ƐĞĞĮŐ͘ϴ͕ϵͿ

Fig.

ϵ

5. Insert the long bolts with washers through the holes on the clamping support and inner pole, then 

ŝŶƐĞƌƚƚŚĞǁĂƐŚĞƌƐŽŶƚŚĞŽƚŚĞƌƐŝĚĞŽĨďŽůƚƐ͕ƟŐŚƚĞŶƚŚĞŵƵƉǁŝƚŚŶƵƚƐ͘;ƐĞĞĮŐ͘ϭϬ͕ϭϭ͕ϭϮ͕ϭϯͿ

Fig.1

Ϭ

Fig.11

Fig.12

Fig.13

Wheel Assembly:

Assemble wheels to base by placing the wheel stud through the hole on the edge of the base and securing 
the caster with the nut provided.

Содержание ATD-30332

Страница 1: ...FUHDVHG PRELOLW XUDEOH EDOO EHDULQJ PRWRU XWRPDWLF VKXW RII IHDWXUH SUHYHQWV RYHUKHDWLQJ XUDEOH EODFN SRZGHU FRDWLQJ ILQLVK GMXVWDEOH WLOW IDQ KHDG DQG KHLJKW IW JURXQGHG FRUG DQ EH XVHG GU RU ZLWK PL...

Страница 2: ...n any manner Use of extreme caution is necessary when any fan is used by or near children disabled persons or pets and whenever the fan is left operating unattended Do not place the fan on an unlevel...

Страница 3: ...or exhaust in any manner Do not insert or allow foreign objects to enter any ventilation or exhaust opening as this may cause an electric shock fire or damage the fan WARNING Electrical Shock Hazard...

Страница 4: ...a qualified electrician Do not attempt to bypass this procedure 3 This product is for indooruse only 4 Unplug from electrical supply source before cleaning 5 If the power cord is damaged contact your...

Страница 5: ...Assembly Instructions 1 Fig 1 Fig 2 2 Fig 3 Fig 4 3 Insert the end of outer pole into the base hole align the bolt holes on the base with the ones end of Fig 5 Fig 6 Fig 7 h...

Страница 6: ...holes on the Fig 5 Insert the long bolts with washers through the holes on the clamping support and inner pole then Fig 1 Fig 11 Fig 12 Fig 13 Wheel Assembly Assemble wheels to base by placing the wh...

Страница 7: ...Periodic grille cleaning with a vacuum will prevent dust build up The motor is sealed and does not require any interior maintenance cleaning or lubrication Maintenance The Internal motor bearings are...

Страница 8: ...to the Tee ngs except for the nozzle with the end pl 6 Turn the spigot back on to wash the system for 2 minutes to insure that the system is fully purged 7 Turn the spigot o and install the last nozzl...

Страница 9: ...QXPEHU DQG GHVFULSWLRQ DOO RXU GLVWULEXWRU IRU FXUUHQW SULFLQJ 5 7 7 ITEM ORDERING PART PART DESCRIPTION ITEM ORDERING PART PART DESCRIPTION PR7 R2N7 G8 R PR7 6 R PR7 PR7 N87 PR7 R R G8 R PR7 NN R P2...

Страница 10: ...EOH IRU GDPDJH WR RUQDPHQWDO GHVLJQV RX SODFH RQ WKLV 7 SURGXFW DQG VXFK RUQDPHQWDWLRQ VKRXOG QRW FRYHU DQ ZDUQLQJV RU LQVWUXFWLRQV RU WKH PD YRLG WKH ZDUUDQW 7KLV ZDUUDQW GRHV QRW FRYHU VFUDWFKHV VXS...

Отзывы: